cropper
update

Nasty Performance ~ 847-458-4858 

update
  • Blog Home
  • Categories
    • Motorcycle Maintenance
    • Riding Tips & Preps
    • Safety & Inspection
    • Customizations & Upgrades
    • DIY Motorcycle Repairs
    • Motocycle Audio Systems
    • Motocycle Seasonal Care & Storage
    • Engine, Electrical Performance
  • Bike Night
  • Nasty Performance Motorcycle Shop
April 01.2026
1 Minute Read

Motorcycle Spring Tune-Up: Get Ready for the Ride of Your Life

Imagine starting your riding season confident your motorcycle won’t let you down. According to the Motorcycle Industry Council, over 80% of riders who perform a comprehensive motorcycle spring tune-up experience fewer roadside breakdowns during the riding season. Don’t leave your open road adventures to chance—proper spring motorcycle maintenance can mean the difference between a memorable ride and an unforeseen pit stop. This guide walks you through every step of the motorcycle spring tune-up process, so you’re ready to hit the open road safely and with peace of mind.

Kickstart Your Riding Season: The Shocking Truth About Motorcycle Spring Tune-Up

"According to the Motorcycle Industry Council, over 80% of riders who perform a comprehensive motorcycle spring tune-up experience fewer roadside breakdowns during the riding season."

Vibrant motorcycle parked in a suburban driveway during spring, confident rider performing a motorcycle spring tune-up with a wrench, fresh grass and budding trees in background, high detail, natural sunlight.

As the weather warms up and the roads beckon, getting your motorcycle ready with a spring tune-up isn’t just advisable—it’s essential. Your bike’s performance, reliability, and your own safety depend on starting the season with a thorough maintenance check. Riders who consistently perform a motorcycle spring tune-up report smoother rides, fewer interruptions, and avoid the common frustrations that plague those who neglect their bikes after winter storage. By focusing on a maintenance checklist—covering everything from tire pressure to spark plugs—riders can eliminate surprises and maximize every journey. It's not just about the thrill of the open road; it's about ensuring every mile is worry-free. This section will present the realities, the facts, and the best practices so you can make this riding season exceptional.

While a spring tune-up is crucial, many riders overlook the importance of adapting their maintenance routine to the unique challenges of each season. For a deeper dive into how to keep your bike in peak condition year-round, check out these seasonal bike care secrets every rider should know—they offer practical tips that complement your spring preparations and help extend your motorcycle’s longevity.

What You'll Learn in This Motorcycle Spring Tune-Up Guide

  • Essential steps in a motorcycle spring tune-up for riding season preparation
  • Comprehensive motorcycle maintenance checklist and common maintenance tasks
  • Expert tips on air filter, spark plugs, and suspension adjustments
  • How to conduct an effective maintenance check and safeguard your spring motorcycle
  • Best practices to maximize performance and safety on the open road

Understanding the Importance of Motorcycle Spring Tune-Up for Riding Season

Why Motorcycle Maintenance Matters: Safety, Longevity, and Performance

Motorcycle maintenance isn’t just a box to check; it’s a proactive approach to protect your investment and, more critically, your wellbeing. When you perform diligent motorcycle maintenance at the start of the riding season, you ensure that all components—from brakes to drive chains—are in optimal working order. This means your bike responds quickly, handles predictably, and you reduce the risk of breakdowns or, worse, accidents. Even a simple maintenance checklist can reveal hidden issues like worn brake pads, low brake fluid, or cracks in fuel lines that could become hazardous once you hit the open road. By staying vigilant, you extend the life of your motorcycle, improve fuel efficiency, and enjoy each mile with confidence during the spring motorcycle season.

Routine motorcycle maintenance also impacts your wallet in the long run. Small issues such as dirty air filters, slightly loose drive chains, or unbalanced wheels can cause undue wear on your engine, suspension, and tires, leading to unexpected (and expensive) repairs down the road. Remember to check your bike’s major systems: a quick maintenance check on spark plugs, suspension, and battery health can prevent interruptions to your riding season. Riding gear also benefits from inspection—ensuring your helmet, gloves, and protective clothing are intact. In short, a little preventative care through a motorcycle spring tune-up goes a long way toward an enjoyable, hassle-free season.

Common Issues Prevented by Thorough Maintenance Check

A thorough maintenance check during your motorcycle spring tune-up helps you catch potential surprises before they become dangerous problems. For instance, tire flat spots from winter storage, weakened brake pads, or stale fuel in the gas tank can cause major headaches—or worse, safety hazards—if left unaddressed. Checking the air filter is critical, as debris or blockages reduce engine performance. Similarly, corroded battery connections or frayed control cables can lead to electrical failures, leaving you stranded.

Unattended suspension issues or traction problems—often due to overlooked tire pressure or tread depth—can dramatically impact handling on the open road. By performing a complete motorcycle maintenance checklist at the season’s start, you also prevent minor nuisances like weak brake lights, leaky brake lines, or insufficient oil levels from turning into larger, costlier repairs. This diligent approach makes each ride this riding season not only safer but also more pleasurable, knowing your bike is in prime condition.

Close-up of motorcycle mechanic

Motorcycle Maintenance Checklist: Must-Do Tasks for Spring Motorcycle Preparation

  • Visual inspection (tires, frame, chain, and bodywork)
  • Fluid levels (oil, coolant, brake, and clutch)
  • Electrical system: battery and lighting
  • Control cables and levers
  • Brakes and suspension
Spring Motorcycle Maintenance Checklist with Estimated Time and Tools Needed
Task Estimated Time Tools Needed
Check Tire Pressure & Tread 10 minutes Tire gauge, flashlight
Inspect & Lubricate Chain 15 minutes Chain brush, lubricant, rags
Change Oil & Replace Oil Filter 30 minutes Socket set, oil pan, new filter
Check Brake Pads & Fluid 15 minutes Wrenches, fluid tester, gloves
Test Battery and Lights 10 minutes Multimeter
Inspect Air Filter 15 minutes Screwdrivers, new filter (if needed)
Suspension Adjustment 20 minutes Wrenches, measuring tape

Step-by-Step Motorcycle Spring Tune-Up: Detailed Maintenance Check

Inspecting and Replacing the Air Filter During Your Motorcycle Spring Tune-Up

The air filter is a critical yet often overlooked component during spring motorcycle maintenance. After months in winter storage, dust and debris can clog the air filter, restricting airflow and reducing engine performance and fuel economy. Start by locating the air filter housing—typically under the seat or a side panel. Gently remove it for inspection. If you notice heavy dirt accumulation, tears, or oil contamination, it’s time to replace the filter with a new one that matches your model’s specifications.

For reusable filters, cleaning per the manufacturer’s instructions is sufficient—just make sure it’s thoroughly dry before reinstalling. A clean air filter ensures optimal engine combustion, allowing your bike to breathe freely and deliver peak performance during the riding season. Ignoring air filter maintenance could lead to sluggish acceleration, poor mileage, and even long-term engine damage, making this step indispensable in your motorcycle spring tune-up.

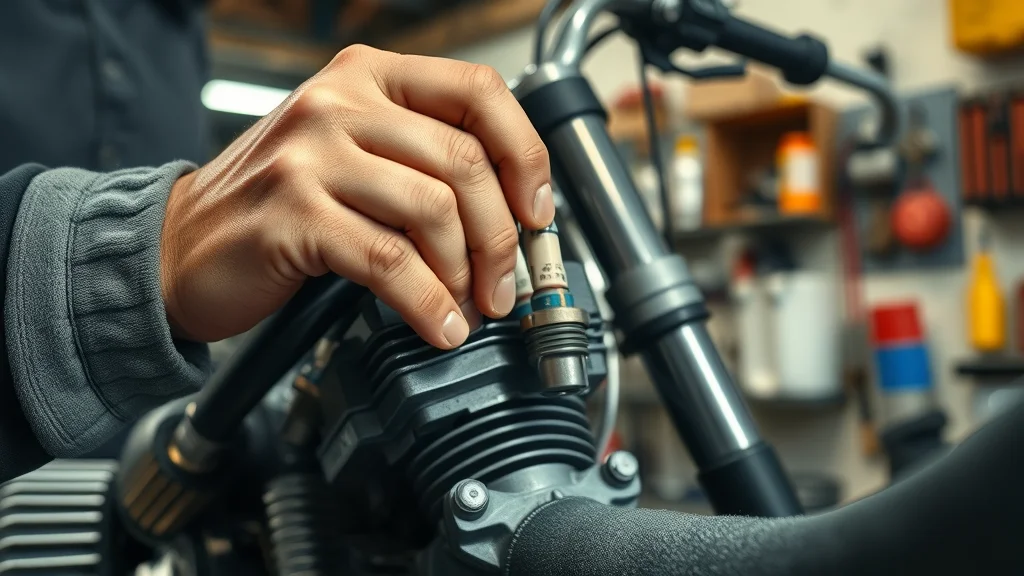
Spark Plug and Spark Plugs Check: Ensuring Reliable Ignition

Reliable ignition is paramount, and nothing affects it more than healthy spark plugs. Over time, spark plugs collect carbon deposits, erode at the electrodes, and may even crack—especially after winter storage. During your comprehensive motorcycle maintenance check, remove each spark plug and inspect its tip. Look for ash, oil, or excessive blackening, which indicates it’s time for a replacement. Using a feeler gauge, check and adjust the gap on new spark plugs to ensure precise ignition.

Replacing old or fouled spark plugs guarantees smooth startups and consistent power delivery, so you aren’t left with a stalling bike on the open road. For peace of mind, consider swapping all spark plugs at the beginning of the riding season. Experts also recommend an anti-seize compound on the threads to facilitate future removals. Integrating spark plug inspection into your motorcycle maintenance checklist will safeguard against rough idling and misfires throughout your spring motorcycle adventures.

Oil Change and Fluid Replacement in Spring Motorcycle Maintenance

Fluids are the lifeblood of your bike, and changing your oil is one of the most crucial spring motorcycle maintenance tasks. Oil degrades over time—especially when your bike sits idle during winter storage—collecting moisture, acids, and particulates. Begin by warming up your engine to thin the oil, then drain it completely from the sump. Replace the oil filter to ensure no contaminants linger before filling with fresh, high-quality oil suitable for your bike’s specifications.

Don’t overlook other fluid systems: inspect and top up coolant levels to avoid overheating, check brake fluid for clarity and level (replace if murky or old), and test clutch fluid if applicable. Neglecting fluids invites corrosion, impairs lubrication, and risks catastrophic failures just as the riding season begins. Proper fluid replacement is a hallmark of responsible motorcycle maintenance, directly impacting not just performance but rider safety for all your spring adventures.

Motorcycle on a lift being serviced for spring maintenance—rider pouring fresh engine oil, detailed modern garage, oil bottles and tools visible, high realism, golden sunlight.

Checking Tire Pressure, Tread, and Wheel Suspension

Tires connect you to the road, making them a central focus of every motorcycle maintenance checklist. Start with air pressure: refer to the owner’s manual for recommended PSI and use a quality tire gauge to check both front and rear tires. Low air pressure can affect handling and speed premature tire wear, while overinflation may reduce traction, especially in changing spring weather conditions.

Next, examine tread depth using a tread gauge or the “penny test”—insufficient tread compromises grip, especially on wet or silt-covered roads common in early spring. Don’t skip a careful look for cracks, bald patches, or flat spots (a common byproduct of winter storage). Lastly, test wheel suspension by pressing down on the handlebars and rear of the motorcycle; watch for smooth rebound and listen for unusual noises. Any resistance, oil leaks, or uneven damping in the suspension system warrant immediate attention to ensure a safe, stable ride as you embrace the open road.

Adjusting and Lubricating the Chain

The drive chain is responsible for transferring engine power to the rear wheel, and its condition directly affects your bike’s performance during the riding season. Begin with a visual inspection: look for signs of kinks, excessive slack, rust, or dry spots. Rotate the rear wheel and measure deflection at the chain’s midpoint; adjust the tension using your manufacturer-specified guidelines—too tight, and you risk premature bearing wear; too loose, and the chain may skip or derail.

After adjustment, thoroughly clean the chain using a chain brush and apply a suitable lubricant. This preventive maintenance helps avoid costly repairs and keeps acceleration smooth. Include the chain check in every spring motorcycle maintenance session, ensuring both safety and optimal power delivery. Regular adjustment and lubrication also complement other motorcycle maintenance tasks by reducing component stress and extending chain life.

Getting Your Motorcycle Suspension Ready for the Riding Season

How to Perform a Suspension Maintenance Check

The suspension system dictates how your motorcycle handles bumps, corners, and uneven pavement—a critical factor in rider safety and comfort during the open road season. Start with a visual inspection for oil leaks near shocks or forks, and check bushings and seals for signs of damage or wear. Next, compress and rebound the suspension by applying weight to the bike—smooth, resistance-free movement is a good sign; harsh compression or noisy rebounds often signal issues that need addressing.

Ensure both front and rear shocks are adjusted according to your riding weight and style. Refer to your owner’s manual for preload, damping, and rebound settings, and use measuring tools to verify correct sag. Suspension maintenance is a nuanced motorcycle maintenance task, but when performed correctly, it dramatically improves tire contact, braking, and general bike control—making every ride smoother and safer throughout the spring motorcycle season.

Upgrading Springs and Adjusting Suspension Settings

Advanced riders or those carrying extra weight (such as passengers or luggage) may benefit from upgrading to progressive or performance springs. Modern shocks offer a range of adjustability—and springtime is the perfect opportunity to dial in your settings. Use a spanner wrench or the provided tools to adjust preload, damping, and compression (if your model supports it). Write down baseline settings and make incremental adjustments based on road feel and handling feedback.

Suspension improvements can reduce fatigue on long rides and help prevent loss of control over rough terrain. If you notice uneven tire wear, persistent bottoming, or excessive bounce, consider professional service. Regardless of your skill level, include suspension tuning in all spring motorcycle maintenance routines for maximum safety and comfort as you launch into the new riding season.

Professional mechanic checking and adjusting motorcycle suspension settings in a high-end, well-lit workshop during a spring maintenance check.

Preparing for the Open Road: Spring Motorcycle Riding Tips

  • Pre-ride checks before every trip
  • Adapting to changing spring weather
  • Practicing the 4 second rule and other safe riding techniques

Your first ride after a winter hiatus deserves both excitement and careful attention. Conduct a quick pre-ride check every time—inspect tire pressure, brakes, lights, and signals, and ensure your riding gear (especially helmet and gloves) fits correctly and is damage-free. Spring weather can be unpredictable: be prepared for cool mornings, warm afternoons, or sudden spring showers, and adjust your speed and following distance to suit road conditions.

Most importantly, put safety first by employing the “4 second rule”: allow at least four seconds’ distance between your bike and the vehicle in front to give yourself ample time to react. Reacclimate gradually—don’t start with the longest or most challenging rides. By following these spring motorcycle tips, you’ll not only keep yourself safe but also ensure the riding season begins on a high note, filled with memorable journeys along the open road.

Adventurous motorcycle group gearing up for a scenic spring ride, various bikes and riders preparing, flowering countryside road, smiles and vibrant outdoor energy.

People Also Ask: Essential Motorcycle Spring Tune-Up Questions Answered

What does a motorcycle tune-up consist of?

A motorcycle tune-up typically includes a comprehensive maintenance check and covers essential systems: oil and fluid changes, air filter inspection or replacement, spark plugs assessment, adjustment and lubrication of the drive chain, full brake inspection (pads, lines, and fluid), and checking tire pressure and tread. It should also involve battery testing, lighting and electrical system check, and visual scan for any obvious signs of damage or wear. A tune-up ensures that your bike is in working order, maximizing performance, safety, and longevity for a smooth riding season.

How to prep a motorcycle for spring?

To prep a motorcycle for spring, begin by inspecting and charging the battery with a trickle charger if necessary, draining any stale fuel and checking the gas tank for residue, and replacing engine oil and filter. Move onto visual and tactile checks for flat spots, tire air pressure, and tread depth. Inspect fluid systems (coolant, brake fluid, clutch), examine brake pads and lines, and ensure lights and signals work properly. Clean or replace the air filter, check the drive chain for proper tension and lubrication, and test all controls (levers, cables). Finish by reviewing riding gear and confirming your motorcycle insurance is up to date—then you’re ready and safe to hit the open road.

What is the 4 second rule for motorcycles?

The “4 second rule” is a safe following distance guideline for motorcyclists. It means you should keep at least four seconds of space between your motorcycle and the vehicle ahead. To measure, choose a stationary point and start counting when the vehicle in front passes it—your front tire should pass four seconds later. This gap gives you enough time to react to sudden stops, road hazards, or changing conditions, especially at higher speeds or during the unpredictable spring motorcycle riding season. It’s a simple yet effective component of safe riding technique.

Do I need to tune my motorcycle suspension?

Yes—tuning your suspension is recommended, especially at the start of the riding season or after winter storage. Suspension settings directly affect how your motorcycle handles, brakes, and absorbs road irregularities. Whether it's adjusting preload, damping, or changing springs, a suspension check ensures comfort, stability, and safety. Riders who carry extra weight or seek improved performance should fine-tune their settings or consider upgrades as part of their motorcycle maintenance checklist. Properly tuned suspension delivers the smooth, predictable ride that makes spring motorcycle adventures enjoyable and secure.

Motorcycle Spring Tune-Up FAQs

  • How often should you conduct a motorcycle spring tune-up?
    At minimum, a full tune-up should be performed at the beginning of every riding season. If you ride year-round or cover high mileage, additional checks every few thousand miles are ideal.
  • What tools are needed for a comprehensive motorcycle maintenance checklist?
    Basic toolkit includes socket set, wrenches, screwdrivers, tire pressure gauge, chain brush and lube, oil pan, multimeter, and service manual. Advanced tasks may require a torque wrench, feeler gauge, or specialized suspension tools.
  • Are there signs your spring motorcycle needs immediate repairs?
    Yes—look for slow starts, flickering lights, odd engine noises, spongy brakes, fluid leaks, uneven tire wear, or any dashboard warning indicators. Prompt repairs keep your season smooth and safe.
  • Can beginners handle spring motorcycle maintenance, or should they consult professionals?
    Many basic tasks are beginner-friendly with a good manual and patience; however, complex repairs or high-performance bikes often require professional service to guarantee safety and optimal results.

Photorealistic close-up of motorcycle dashboard and gauges, illuminated and clean, reflecting a bright spring landscape, gloved rider

Key Takeaways: Maximize Your Riding Season with a Motorcycle Spring Tune-Up

  • Consistent motorcycle maintenance boosts performance and safety
  • Follow a thorough maintenance checklist for reliable riding season readiness
  • Spring motorcycle care prevents costly breakdowns during open road adventures
  • Professional tune-ups can add value for complex or high-performance bikes

Ready for the Ride? Call Nasty Performance Motorcycle Shop Today: 847-458-4858

Don’t let hidden issues curb your adventure. Book your professional motorcycle spring tune-up at Nasty Performance Motorcycle Shop—your safest ticket to a worry-free riding season!

As you gear up for an unforgettable riding season, remember that spring maintenance is just the beginning of a year-round commitment to your bike’s health and your own safety. If you’re eager to take your motorcycle care to the next level, explore our expert guide on seasonal bike care strategies for every rider. You’ll discover advanced tips for adapting your maintenance routine to changing weather, storage, and riding demands—ensuring your machine stays in top shape no matter the season. Dive deeper and empower yourself with knowledge that keeps you ahead of the curve, mile after mile.

Motorcycle Maintenance

0 Comments

Write A Comment

*
*
Please complete the captcha to submit your comment.
Related Posts All Posts

How To Perform a Motorcycle Tune Up

Ever wondered if a simple routine could be the difference between your bike running smooth and stalling at the worst moment? A regular motorcycle tune up not only boosts your bike’s performance but also protects your investment, enhances fuel economy, and ensures safe riding every time you hit the road. This complete guide unlocks all the secrets you need to know—from essential tools and step-by-step processes to expert maintenance tips. Whether you’re a longtime rider or a new motorcycle owner, read on to master every aspect of keeping your bike running smoothly and reliably. Unlock the Secrets of a Motorcycle Tune Up: Why Routine Motorcycle Maintenance Matters Every motorcycle enthusiast wants their machine to deliver smooth power, crisp throttle response, and long-term reliability. But did you know the foundation of optimal performance and bike longevity lies in regular motorcycle maintenance? A thorough motorcycle tune up involves more than a quick oil change—it requires visual inspection, cleaning, and replacing key components such as the spark plug, air filter, and regular checks on engine oil and the chain. Routine tune ups not only maximize your motorcycle’s lifespan but also significantly reduce the chances of unexpected breakdowns, improve fuel efficiency, and keep your ride enjoyable. Skipping essential maintenance tasks might save some time now, but could cost you big in repairs and inconvenience later. By embracing a proactive approach, you support both your bike’s smooth power delivery and your own peace of mind, making every journey safer and more enjoyable. Motorcycle Tune Up: What You'll Learn in This Guide Step-by-step motorcycle tune up procedures Key components of motorcycle maintenance Expert tips for spark plug, air filter, and engine oil check How to maximize lifespan and performance Common mistakes and safety considerations Motorcycle Maintenance Tune Up Schedule Component Inspection Steps Replacement Interval Spark Plug Remove, inspect, clean or replace Every 6000-8000 miles Air Filter Remove, inspect, clean or replace Every 10,000 miles or as needed Engine Oil Drain, replace with manufacturer-recommended grade Every 3000-5000 miles Chain Inspect tension, clean, lubricate Every 500 miles or as necessary Battery Check voltage, clean terminals Twice per year What Does a Motorcycle Tune Up Include? (People Also Ask) Comprehensive Motorcycle Tune Up Checklist Inspecting and replacing spark plug Cleaning or replacing air filter Changing engine oil Lubricating and adjusting chain Checking brakes and tires Battery maintenance Inspecting cables and controls What does a motorcycle tune-up include? Answer: "A motorcycle tune up involves a systematic inspection and maintenance of various components, such as spark plugs, air filters, and engine oil, to ensure optimal performance and safety." When you perform a motorcycle tune up, you’re providing more than just basic care; you are following a detailed process that addresses the essential elements of a motorcycle maintenance routine. These steps go beyond just an oil level or a chain check. You’ll assess everything from the spark plug and air filters to brake pads and battery health, ensuring everything is in good condition for safe riding. Regular tuning directly leads to the bike running smoothly, improved fuel efficiency, and helps extend its longevity. Don’t neglect essential areas like the fuel lines and the fuel filter, as these contribute equally to the smooth power delivery and reliability you expect from your ride. Essential Tools and Safety Equipment for Effective Motorcycle Maintenance Getting your motorcycle tune up right always starts with the right equipment. Using proper tools not only makes the maintenance process easier but also protects vital bike parts from accidental damage. Whether you're conducting a spark plug check or swapping the air filter, a set of quality wrenches, screwdrivers, and safety gear ensures every task is done precisely. Professional mechanics and experienced riders always recommend completing every visual inspection with appropriate safety gloves and eye protection to prevent injuries or accidents. Preparing for regular motorcycle maintenance means more than gathering a handful of tools. Each tool ensures that essential components like brake pads, engine oil, and chain receive the care they need without causing unnecessary wear or safety risks. Keep your bench organized and all maintenance tasks straightforward, so your motorcycle is always ready for the road and delivering optimal performance. Motorcycle Tune Up Tools Checklist Wrenches and socket sets Screwdrivers Spark plug wrench Oil drain pan Funnel Safety gloves and eye protection Step 1: Inspect and Replace Spark Plug During Your Motorcycle Tune Up The spark plug is the heart of your motorcycle’s ignition system. Over time, spark plugs accumulate deposits, suffer from electrode wear, and lose their ability to deliver crisp sparks, undermining your bike’s smooth power and efficiency. Inspecting, cleaning, or replacing the spark plug during every motorcycle tune up keeps your engine firing on all cylinders, allowing for optimal combustion and reduced risk of misfires. Always follow your manufacturer’s recommended intervals for this task—usually every 6,000–8,000 miles—but check more often if your ride feels sluggish or the engine is hard to start. To inspect a spark plug: remove it using a spark plug wrench, examine for discoloration or heavy deposits, and check the electrode gap. If the electrode is worn or the ceramic insulator is cracked, a replacement is necessary. After fitting new or cleaned spark plugs, you’ll often notice faster starts and improved throttle response. Don't neglect this step—as essential as keeping oil level within spec or replacing the air filter, spark plug care is the key to your bike running smoothly mile after mile. Why Replacing or Cleaning Spark Plugs Is Crucial Improved ignition Better fuel efficiency Smoother ride "Neglecting spark plug maintenance can harm engine performance and fuel economy." Many riders underestimate the impact of a spark plug that’s past its prime. Persistent problems like slow starts, engine knock, or loss of power can often be traced back to worn or dirty spark plugs. Regularly cleaning or replacing these small yet essential components ensures reliable ignition and stable power delivery. In addition to fuel efficiency gains, addressing spark plug issues early can prevent bigger headaches like engine misfires or poor idle quality. While mastering the basics of a motorcycle tune up is crucial, it's equally important to adapt your maintenance routine to the changing seasons. For practical tips on how to keep your bike in peak condition year-round, check out these seasonal bike care secrets every rider must know. Step 2: Air Filter Inspection - Clean or Replace for Optimal Motorcycle Performance The air filter is your engine’s first line of defense against dust, dirt, and airborne contaminants. Over time, clogged air filters can choke off the flow of clean air, leading to reduced power, sluggish throttle response, and poor fuel economy. During any motorcycle tune up, always include an air filter inspection and replacement if needed. This simple step protects your engine, maximizes performance, and keeps your motorcycle running smoothly in all conditions. An air filter that goes unchecked may lead to dirt building up inside the engine, causing premature engine wear and higher maintenance costs in the long run. Learning to properly access, clean, or replace your motorcycle’s air filter is an easy win for optimal performance, giving you cleaner power and extending engine life. Make it a standard part of your motorcycle maintenance routine, especially if you ride in dusty or harsh conditions. Best Practices for Air Filter and Air Filters Service How to access and inspect the air filter Signs it's time to clean or replace an air filter OEM vs. aftermarket air filters comparison Accessing the air filter typically involves removing the seat or side panel. Once exposed, perform a visual inspection—check for excessive dust, deformities, or signs of oil/fuel contamination. If the air filter is clogged or misshapen, cleaning won’t be enough; you’ll need to replace it. Compare OEM with aftermarket options: OEM filters guarantee perfect fit for your bike model, while high-quality aftermarket air filters might offer improved airflow for performance upgrades. Always reinstall the filter carefully, ensuring airtight sealing to avoid engine damage. Adhering to the proper replacement interval (around every 10,000 miles or per the owner’s manual) prevents bigger issues like reduced power delivery and increased fuel consumption. Step 3: Motorcycle Tune Up Engine Oil Change Procedure Engine oil is the lifeblood of your motorcycle. It lubricates moving parts, dissipates heat, and carries away impurities. As miles accumulate, engine oil loses its viscosity and cleaning power, leading to possible engine damage if neglected. During any motorcycle tune up, draining and replacing engine oil—and checking the oil filter—ensures your bike’s engine operates at peak efficiency and is protected against wear and overheating. Routine oil change intervals, typically every 3,000–5,000 miles, are essential for long-term reliability and good condition of your motor. For the oil change, always warm up the engine slightly—the oil will flow better and carry away more debris. Use an oil drain pan to collect used oil, which must be disposed of properly to protect the environment. Choose the recommended grade of engine oil for your motorcycle model, as indicated in the owner’s manual. After topping up and ensuring the right oil level, double-check for any leaks before starting your next ride, so your motorcycle is both safe and ready to perform. Selecting and Replacing Motorcycle Engine Oil Draining old engine oil safely Choosing the correct engine oil grade Proper disposal of used oil Never underestimate the importance of using manufacturer-approved oil grades—synthetic, semi-synthetic, or mineral. Each works differently to shield engine parts and maintain optimal performance. Regular oil changes flush out damaging deposits and preserve the engine in good condition, while skipping this task can cause accelerated wear, reduced fuel economy, and even catastrophic failure. Remember to reset your oil change reminder or maintenance log so you’re always on schedule with your tune up routine. Step 4: Additional Motorcycle Maintenance Checks Besides the critical spark plug, air filter, and engine oil, several other motorcycle maintenance checks are essential for a thorough motorcycle tune up. Chain tension should be just right to avoid slipping or unnecessary wear, and regular lubrication keeps it running smoothly and quietly. Brakes, including brake pads and brake fluid, directly affect your safety—inspect them frequently for wear and top off or replace as needed. Don’t forget tire pressure, as underinflated tires not only reduce handling and increase fuel consumption but also pose a serious safety risk. Your routine tune up should also include a close inspection of all cables (clutch, throttle, brakes), checking for fractures, wear, or binding that could compromise smooth power delivery. Regularly care for your battery—clean terminals, check charge, and replace if needed—to prevent dreaded no-start situations. Keeping an eye on the electrical system and conducting regular visual inspections helps ensure your motorcycle is always in good condition and ready for every adventure. Routine Inspection for Motorcycle Tune Up Longevity Lubricating chains Checking tire pressure Inspecting brakes Battery care and electrical system checks Implementing these maintenance tasks in your tune up not only helps your motorcycle run optimally but can also save significant repair costs over time. By proactively assessing each component, you control your bike’s safety, performance, and cost of ownership—season after season, mile after mile. Frequently Asked Motorcycle Tune Up Questions (FAQs) How much does a tune-up on a motorcycle cost? Answer: "The cost of a motorcycle tune up can vary significantly depending on the model and the extent of maintenance required. Consulting a trusted motorcycle shop is recommended." Who is No. 1 bike? Answer: "The answer to 'Who is No. 1 bike?' often depends on personal preference, riding style, and brand reputation. Discuss with industry experts for tailored recommendations." How often should you do a tune-up on your motorcycle? Answer: "Most manufacturers recommend a motorcycle tune up every 6,000 to 10,000 miles, but always check your owner’s manual for specific intervals." Key Takeaways from Your Comprehensive Motorcycle Tune Up Guide Motorcycle tune up is essential for performance and safety Routine maintenance of spark plugs, air filter, and engine oil is critical Using the proper tools and following recommended schedules saves money and extends your motorcycle's lifespan Ready for Your Next Motorcycle Tune Up? Call Nasty Performance Motorcycle Shop Today: 847-458-4858 Get expert help with your motorcycle tune up—schedule your service for reliable, friendly support and keep your machine running smooth every season. If you’re ready to take your motorcycle care to the next level, don’t stop at the basics—explore how seasonal changes can impact your maintenance strategy. Understanding the nuances of bike care throughout the year can help you prevent issues before they arise and keep your ride performing at its best, no matter the weather. Discover expert advice and actionable tips in our guide to seasonal bike care secrets every rider must know. This resource is perfect for riders who want to stay ahead of the curve and ensure their motorcycle is always ready for the next adventure. Dive deeper and unlock the full potential of your bike with advanced, season-specific maintenance insights. Watch a hands-on, step-by-step demonstration by a pro mechanic, covering spark plug checks, air filter replacement, oil change, and chain maintenance—see every essential detail up close for a complete motorcycle maintenance guide.

Common Mistakes In Motorcycle Brake Pad Replacement

Did you know that over 35% of DIY brake pad replacements end up with follow-up repairs due to simple mistakes? While changing brake pads on your motorcycle can save you money and offer a sense of accomplishment, a single overlooked step could put your safety at risk. Understanding and avoiding brake pad replacement mistakes is not just about saving costs—it’s about ensuring every ride is safe, smooth, and reliable. Whether you're an experienced do-it-yourselfer or just starting out with DIY brake pad replacement, this comprehensive guide will help you sidestep common pitfalls and master the art of changing brake pads safely. Understanding Brake Pad Replacement Mistakes Overview of brake pad replacement mistakes and their consequences: Even the most enthusiastic DIY brake pad replacement can go awry if critical steps are skipped. Common mistakes like improper pad alignment, failing to fully retract caliper pistons, or mismatching brake pads can lead to uneven wear, poor braking performance, and even brake system failure. These errors may not only damage the braking system but could also put you and others on the road in danger. Mistakes during pad replacement can translate to costly repairs and jeopardize the braking system’s reliability. Importance of avoiding common mistake in DIY brake pad replacement: Safety should always be the top priority when tackling brake jobs. Simple oversights—like not cleaning caliper guide pins or using incompatible friction material—can lead to squealing brakes, uneven pedal feel, or danger in emergency stops. Knowing the most frequent brake pad replacement mistakes empowers you to avoid them from the outset, ensuring each changing brake job boosts your motorcycle’s overall performance and secures your peace of mind. What You'll Learn About Brake Pad Replacement Mistakes Identifying typical brake pad mistakes: Pinpoint the most frequent slip-ups that plague DIY brake pad replacement jobs. Why pad replacement precision matters: Understand how every detail in changing brake pads contributes to your motorcycle’s safety and performance. How to improve your DIY brake pad replacement process: Gain actionable advice so you avoid brake pad replacement mistakes on your next brake job. Why Attention to Brake Pad Replacement Mistakes is Critical Impact of brake pad replacement mistakes on your motorcycle’s safety and braking system: A single common mistake, such as failing to secure brake pads or neglecting to lubricate caliper guide pins, can compromise your entire braking system. DIY brake jobs done incorrectly may cause uneven wear, noisy brakes, or even lead to brake fluid leaks. Each part of the braking system relies on proper pad replacement procedures—overlooking one can reduce braking performance, extend stopping distances, and cause unpredictable pedal feel that threatens safe riding. A quote from a trusted mechanic discussing common mistake in brake pad jobs: "One overlooked step in a brake pad replacement can compromise your entire braking system. Always double-check every component before hitting the road." – Certified Motorcycle Technician Table: Overview of the Most Frequent Brake Pad Replacement Mistakes Common Mistake Impact on Braking System How to Avoid Estimated DIY Difficulty Rating Not Retracting Caliper Pistons Fully Prevents new pads from fitting correctly and causes uneven wear. Use a proper tool to compress pistons fully before installing new pads. Moderate Improper Brake Pad Positioning Results in brake noise, vibration, and loss of braking performance. Align pads carefully and ensure proper seating in the caliper. Easy Skipping Lubrication Leads to stiff caliper movement and squeaky brakes. Apply brake grease to caliper guide pins and backs of pads. Easy Mismatched Brake Pads Inconsistent wear, reduced effectiveness, and potential caliper damage. Verify compatibility and always install matching pad sets. Easy For those looking to take their maintenance skills further, understanding how seasonal changes can impact your motorcycle’s performance is just as important as mastering brake pad replacement. You can discover practical tips for year-round care in this guide to seasonal bike care secrets every rider must know, which complements your DIY brake work with broader maintenance strategies. Preparation Steps: Avoiding Brake Pad Replacement Mistakes Before You Start Gathering proper tools for DIY brake pad replacement: Before tackling any brake job, ensure you have all the right tools on hand. This typically includes a torque wrench, caliper tool, brake pad spreader, high-quality gloves, and cleaning products. Using proper tools reduces the risk of damaging lug nuts, caliper guide pins, or the brake pad itself. Be sure to lay out all necessary equipment on a clear, organized workspace to streamline your pad replacement and help you avoid common mistakes that can arise from being unprepared. Inspecting brake pads and braking system before pad replacement: Before starting your DIY brake pad replacement, carefully inspect the current pads, brake rotors, and calipers. Check for uneven wear or signs of brake fluid leakage, as these can indicate underlying braking system issues. Ensuring components are in good condition reduces the risk of new pad replacement mistakes and helps you address problems that could affect your brake job’s effectiveness. Checking compatibility of replacement brake pads: Not all brake pads are created equal. Confirm that your replacements match your motorcycle’s make, model, and braking system specifications. Using mismatched pads can lead to inconsistent braking, excessive wear of the brake rotor, and increased risk for future brake pad replacement mistakes—so double-check before installing. Step-by-Step Guide: Correct Brake Pad Replacement Safely elevate your motorcycle and remove the wheels. Loosen lug nuts and detach the caliper, taking care not to hang the brake by the hose. This avoids strain on the brake hose and prevents brake fluid leaks. Completely retract the caliper pistons using a proper caliper tool. Ensure there is enough clearance for the new brake pads—don't force the pads, as this can damage the piston or caliper guide pin. Remove the old brake pads and carefully clean the caliper, guide pin, and rotor surface. Use brake cleaner to eliminate debris and old lubricant for a smooth pad replacement. Align the new brake pads properly in the caliper, ensuring they fit flush against the contact surface. Double-check their position to avoid common mistakes like uneven wear or noise. Apply a high-quality brake lubricant to the caliper guide pins and pad backing plates. This step is vital for smooth operation and to prevent squealing. Reinstall the brake caliper and torque all bolts to manufacturer specifications. Secure all components and ensure the brake pad is properly seated. Pump the brake lever or pedal several times to restore proper brake pad contact and pedal feel before riding. Monitor the system for leaks or warning lights. Proper brake pad alignment and installation tips: Always ensure pads sit flush against the rotor and check for any gaps or misalignment. Improper positioning can lead to reduced braking system performance and uneven pad wear. Key braking system checks during brake pad replacement: Examine caliper movement, rotor condition, and brake fluid level after each step. Resolve any abnormalities before continuing your brake job. Common DIY Brake Pad Replacement Mistakes Not fully retracting caliper pistons: A frequent error in DIY brake pad replacement, this prevents new pads from fitting and causes the brake caliper to bind or rub against the rotor, leading to reduced performance and uneven wear. Improper brake pad positioning: Incorrectly aligned pads can cause contact surface issues, brake squeal, and inefficient stopping power. Careful alignment is crucial for optimal braking system function. Skipping brake pad lubrication steps: Not lubricating caliper guide pins or pad backs results in sticky movement and persistently noisy brakes. Mismatched brake pads: Installing the wrong type or unevenly worn pads can cause inconsistent pedal feel, faster deterioration, and even damage to the caliper or rotor. Brake Pad Replacement Mistakes and the 30 30 30 Rule Explanation of the 30 30 30 break-in rule and its relevance to DIY brake pad jobs: The 30 30 30 rule is a proven break-in method after brake pad replacement: complete 30 gradual stops from 30 mph, spacing each stop about 30 seconds apart. This process evenly beds new pads into your disc brakes while ensuring proper friction material transfer. How improper brake pad replacement can make it difficult to implement the 30 30 30 rule: If pads are mismatched, installed incorrectly, or not properly lubricated, the break-in phase—critical to maximizing pad and rotor life—will not be effective. Skipping steps increases the risk of uneven wear and brake rotor damage, making even the best break-in routine much less effective. Signs You've Made a Brake Pad Replacement Mistake Common symptoms after DIY brake pad replacement mistakes: If you hear squealing, grinding, feel a pulsing brake pedal, or notice inconsistent pedal feel, your brake job may have gone wrong. These warning signs often indicate issues like sticking caliper guide pins, misplaced brake pads, or uneven contact with the rotor. Braking system warning indications: Look out for dashboard warning lights, visible brake fluid leaks around the caliper, or excessive brake dust shortly after pad replacement. Ignoring these warning signals can accelerate disc brakes and rotor damage. When to revisit your pad replacement job: If you experience any of the above or hear grinding/scraping shortly after DIY brake pad replacement, stop riding and re-examine every step. It’s better to redo a brake job than risk your safety or compromise the braking system further. How to Fix Brake Pad Replacement Mistakes and Ensure Safety Safely lift the motorcycle and remove the wheel and caliper as you did initially. Retract caliper pistons fully using a proper tool to ensure room for fitting new pads. Thoroughly clean the caliper guide pins, pad slots, and brake rotor surface with approved brake cleaner. Carefully realign new brake pads, ensuring both sides are seated evenly on the contact surface. Apply the correct lubricant to caliper guide pins and pad backs to prevent squealing and binding. Torque all bolts to the manufacturer’s specs for a secure fit and check all components for proper installation. Pump the brake lever or brake pedal to restore system pressure and check for leaks before test riding. Ensuring braking system integrity after brake pad replacement: Always check brake pedal or lever feel, inspect for leaks, and confirm pads and calipers move freely. Address warning lights on your dash immediately to protect your disc brakes and overall braking performance. When to seek professional help after a bad DIY brake job: If repeated attempts result in spongy pedal feel, persistent noises, or leakage, consult a certified mechanic. Some pad replacement issues, like damaged brake rotors or a compromised braking system, require specific expertise and diagnostic equipment. Expert Quote on the Dangers of Overlooking Brake Pad Replacement Mistakes "One overlooked step in a brake pad replacement can compromise your entire braking system. Always double-check every component before hitting the road." – Certified Motorcycle Technician People Also Ask: Brake Pad Replacement Mistakes What are common mistakes when installing brake pads? Skipping lubrication of caliper guide pins and pad backs, not seating pads correctly in the caliper, and ignoring torque specifications are some of the most frequent errors. Missing these steps leads to brake noise, uneven wear, and poor braking system performance—issues avoidable with careful attention during your pad replacement. What is the 30 30 30 rule for brakes? The 30 30 30 rule describes the break-in process for new brake pads: perform 30 gradual stops from 30 mph, each spaced about 30 seconds apart. This bedding-in routine allows friction material to transfer properly and ensures even contact surface wear, maximizing pad replacement effectiveness and disc brakes longevity. Does Les Schwab bleed brakes? Les Schwab shops generally include brake bleeding service during brake pad replacement if necessary to maintain optimal braking system function. Always confirm with your service provider when booking a brake job. How much do brake pads cost for a Mazda CX-5? Brake pad costs for a Mazda CX-5 can vary by location and product. Always consult certified shops or your dealership for accurate pad replacement estimates. Essential Tools and Products to Prevent Brake Pad Replacement Mistakes Recommended equipment for DIY brake pad replacement: Ensure you have a reliable torque wrench, caliper piston tool, brake cleaner, quality gloves, and a jack stand. Having the right gear makes your pad replacement smoother and minimizes the risk of damaging the braking system. Top-rated lubricants and cleaning products for brake pads and braking system: Use silicones or high-temp disc brakes grease for guide pins, and an approved, non-oil-based brake cleaner for rotors and calipers to keep everything moving smoothly and cleanly. Checklist for successful pad replacement job: New, compatible brake pads Brake cleaner and high-temp grease Torque wrench and piston retractor Gloves and eye protection Detailed shop manual for your specific model FAQs: Brake Pad Replacement Mistakes Can I drive after a DIY brake pad replacement if I suspect a mistake? It is strongly recommended not to drive until you’ve identified and corrected any possible brake pad replacement mistakes. Continuing to ride may worsen damage or compromise your safety. Always double-check your work if anything seems off. What if my braking system feels spongy after pad replacement? A spongy brake pedal or lever often signals air in the brake lines or insufficient pad contact. Re-bleed your brakes carefully, check all pad and caliper alignments, and ensure no brake fluid leaks are present. Persistent issues require professional inspection. How often should brake pads be checked and replaced? Brake pads should be checked as part of every major motorcycle maintenance schedule or at least every 5,000-7,000 miles, depending on usage. Replace pads when friction material is below minimum thickness, or sooner if uneven wear or performance loss is detected. Key Takeaways to Avoid Brake Pad Replacement Mistakes Always double-check alignment after changing brake pads to ensure perfect seating and avoid uneven wear. Follow the 30 30 30 break-in procedure after every DIY brake pad replacement for optimal bedding and longevity. Don’t overlook the braking system inspection after pad replacement—catch issues before they become safety hazards. Conclusion: Mastering Brake Pad Replacement and Avoiding Mistakes To prevent brake pad replacement mistakes, follow every step with care, check and double-check your work, and don’t hesitate to review your brake job if anything feels off. Consistent practice and a focus on learning are key to mastering DIY brake pad replacement and ensuring safety every ride. Keep honing your skills—confident, mistake-free brake jobs are within every DIY mechanic’s reach! If you’re committed to keeping your motorcycle in peak condition, don’t stop at just the brakes. Expanding your knowledge to include seasonal maintenance can help you anticipate issues before they arise and extend the life of every component. Explore seasonal bike care secrets every rider must know for expert advice on preparing your bike for changing weather, optimizing performance, and ensuring safe rides all year long. By integrating these advanced care strategies with your brake maintenance routine, you’ll be equipped to handle both everyday upkeep and the unique challenges each season brings. Take the next step in your DIY journey and make your motorcycle maintenance truly comprehensive. Ready to Safely Replace Your Pads? Call Nasty Performance Motorcycle Shop Today: 847-458-4858

Common Mistakes with Motorcycle Tire Pressure

While understanding the basics of tire pressure is essential, many riders overlook the importance of adjusting their approach as the seasons change. For a deeper dive into how temperature shifts and seasonal factors can impact your motorcycle’s performance and tire health, explore our guide on seasonal bike care strategies every rider should know. This resource offers practical tips for adapting your maintenance routine year-round. If you’re ready to take your motorcycle maintenance to the next level, don’t stop at tire pressure. Expanding your knowledge of comprehensive bike care—especially as the seasons change—can dramatically improve your ride’s reliability, safety, and longevity. Discover expert insights on preparing your motorcycle for every climate, from winter storage to spring tune-ups, by visiting our in-depth article on seasonal bike care secrets. Investing in a holistic maintenance approach ensures you’re always ready for the road ahead, no matter what the weather brings.

Terms of Service

Privacy Policy

Core Modal Title

Sorry, no results found

You Might Find These Articles Interesting

T
Please Check Your Email
We Will Be Following Up Shortly
*
*
*