cropper
update

Nasty Performance ~ 847-458-4858 

update
  • Blog Home
  • Categories
    • Motorcycle Maintenance
    • Riding Tips & Preps
    • Safety & Inspection
    • Customizations & Upgrades
    • DIY Motorcycle Repairs
    • Motocycle Audio Systems
    • Motocycle Seasonal Care & Storage
    • Engine, Electrical Performance
  • Bike Night
  • Nasty Performance Motorcycle Shop
May 11.2026
1 Minute Read

Tips on Performing Preventive Motorcycle Maintenance

Did you know? According to industry experts, over 70% of unexpected motorcycle breakdowns result from neglecting simple preventive maintenance tasks. Staying ahead with scheduled checks not only boosts your safety, but ensures every ride of the season is both reliable and exhilarating. This guide unpacks every critical step, tip, and pro secret for mastering preventive motorcycle maintenance and keeping your bike in peak condition for the long haul.

Why Preventive Motorcycle Maintenance Matters: The Road to Reliability

If you’ve ever felt the anxiety of being stranded by the side of the road or faced a last-minute cancellation due to mechanical trouble, you already understand the value of regular, preventive motorcycle maintenance. Routine tasks like checking tire pressure, monitoring the engine oil, and performing brake inspections are crucial to detect issues early before they escalate into costly repairs or compromise your safety. Preventive maintenance goes far beyond simple fixes; it establishes a consistent maintenance routine that helps you easily identify wear or damage and avoid accidents associated with neglected components.

Unlike emergency repairs, preventive motorcycle maintenance gives you the power to keep your machine ready for the road at all times. By regularly following a comprehensive motorcycle maintenance checklist, you ensure every ride is safe, enjoyable, and free of unwelcome surprises. Remember: a little time spent on regular inspections can save you from major headaches and expenses later. This foundation is the secret behind long-lasting, reliable motorcycles and the reason so many riders swear by consistent upkeep. Don’t wait for those warning signs—proactivity pays off every time.

Preventive motorcycle maintenance in a clean, modern motorcycle workshop: Confident mechanic inspecting a motorcycle in a well-organized garage, using a maintenance checklist
"A well-maintained motorcycle isn’t just safer; it delivers a smoother, more enjoyable ride every time you hit the road." – Nasty Performance Motorcycle Shop

What You'll Learn About Preventive Motorcycle Maintenance

  • Essential preventive motorcycle maintenance tasks every rider should know
  • How to create and follow a complete motorcycle maintenance checklist
  • Common mistakes in preventative maintenance and how to avoid them
  • Expert-approved motorcycle maintenance tips for long-term bike health

Understanding Preventive Motorcycle Maintenance: The Basics

Defining Preventive Motorcycle Maintenance and Its Importance

Preventive motorcycle maintenance involves proactively servicing and inspecting your motorcycle at routine intervals to prevent breakdowns, identify issues early, and extend your bike’s life. Essential tasks include regular engine oil changes, brake pad checks, tire inspections, drive chain lubrication, and seasonal system overviews. Compared to reactive fixes—which address problems after they become severe—preventive maintenance allows you to pay attention to early warning signs like wear and tear or unusual noises before they cause significant damage or a sudden failure. Staying on top of preventive tasks keeps your motorcycle in top condition, ready whenever you are.

Incorporating these practices into your regular routine reduces the risk of unexpected failures and extends the longevity of vital components. By monitoring fluids, examining parts for signs of damage, and documenting your maintenance history, you gain peace of mind and keep repair costs down over the long term. Preventive motorcycle maintenance isn’t just about fixing; it’s about anticipating and safeguarding your riding experience, so you get the best performance every time you hit the open road.

For riders looking to deepen their understanding of how preventive care can help avoid expensive repairs, exploring additional strategies can be invaluable. You might find it helpful to review this detailed guide on preventive motorcycle maintenance to dodge costly repairs, which covers practical steps to keep your bike running smoothly and your repair bills in check.

Preventative Maintenance vs. Reactive Repairs: Key Differences

The biggest advantage of preventative maintenance over reactive repairs lies in its proactive approach. While reactive repairs address problems after something goes wrong—such as a worn brake pad leading to brake failure—preventive maintenance identifies and resolves issues during scheduled intervals, offering a smarter and safer alternative. This practice means you seldom have to deal with breakdowns, unexpected downtime, or costly emergency repairs. On the contrary, missed preventative checks can lead to escalating problems and a greater risk of accidents or excessive wear on expensive parts. By practicing timely inspections and fluid changes, you ensure all systems remain reliable and your motorcycle in top condition.

Adopting this approach also helps preserve your motorcycle’s resale value while supporting longer, trouble-free adventures. In short, investing time into preventive motorcycle maintenance is the best way to avoid the stress and expense that come with fixing preventable issues, guaranteeing that your rides are consistently smooth and memorable.

Preventative motorcycle maintenance comparison: One pristine, well-maintained motorcycle, and one visibly neglected motorcycle, with neutral rider inspecting both outdoors. Maintenance tools visible.

Creating a Motorcycle Maintenance Checklist: Step-By-Step Approach

An effective motorcycle maintenance checklist is your roadmap to keeping your ride in peak form. By breaking down tasks according to mileage, season, and frequency, a checklist helps you stay organized, reinforces good habits, and ensures essential jobs never slip through the cracks. Begin by reviewing your owner’s manual for manufacturer-recommended intervals and supplement with common-sense checks, such as visual inspections for dry rot, signs of wear, and proper oil and filter changes. Logging completed tasks helps identify recurring issues early, reinforces your maintenance routine, and even supports lower motorcycle insurance premiums by demonstrating consistent care.

This structured method makes sure you never skip a crucial step, reducing the risk of costly oversights. Periodically review your checklist to account for environmental factors, such as frequent wet conditions that require extra chain lubrication or extended storage where battery care is vital. When in doubt, consulting a professional mechanic or using a sample maintenance checklist (like the one below) will provide a solid starting point for most riders, whether you’re a daily commuter or only ride on weekends.

Sample Motorcycle Maintenance Checklist
Task Recommended Frequency
Check tire pressure Before every ride
Lubricate chain Every 500 miles
Inspect brakes Every 1,000 miles
Change engine oil Every 3,000-5,000 miles
Replace air filter Every 10,000 miles or yearly

Essential Preventive Motorcycle Maintenance Tasks

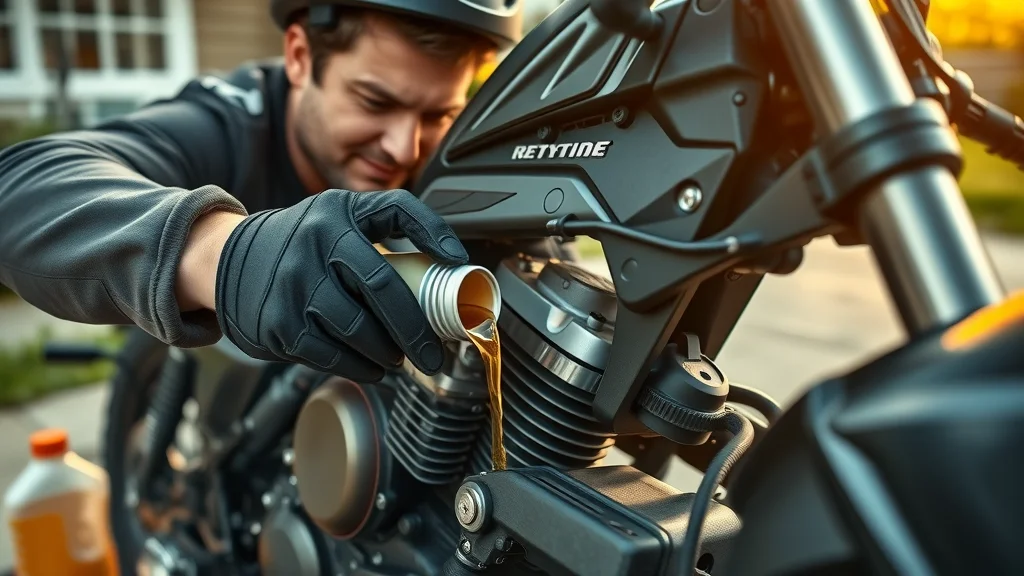
Checking and Changing Engine Oil: Preventative Maintenance Must

The heart of every great maintenance checklist is regular engine oil care. Engine oil lubricates internal moving parts, reduces friction, and carries heat away from vital areas. Over time, oil degrades, collects contaminants, and loses its protective properties, putting your engine at risk of accelerated wear or catastrophic failure. To avoid these issues, check your oil level before each ride, paying attention to oil color and clarity. Change your oil and oil filter at the intervals recommended by your owner’s manual—usually every 3,000–5,000 miles—using manufacturer-approved products for your specific motorcycle. Skipping oil changes or using the wrong oil can result in increased wear and tear, reduced performance, and long-term engine damage. Prioritize this preventative maintenance step to keep your motorcycle in top condition and ready for every adventure.

For best results, always warm up your engine before draining old oil. This helps contaminants flow out more easily. Don’t forget to properly dispose of old oil and install a fresh filter during each change. Regular oil maintenance keeps your bike running smoother, quieter, and more efficiently while minimizing unforeseen breakdowns and extending your engine’s life.

Motorcycle engine oil change: Focused rider pouring fresh engine oil, gloves on, oil bottles and bike on stand, demonstrating preventive motorcycle maintenance at home

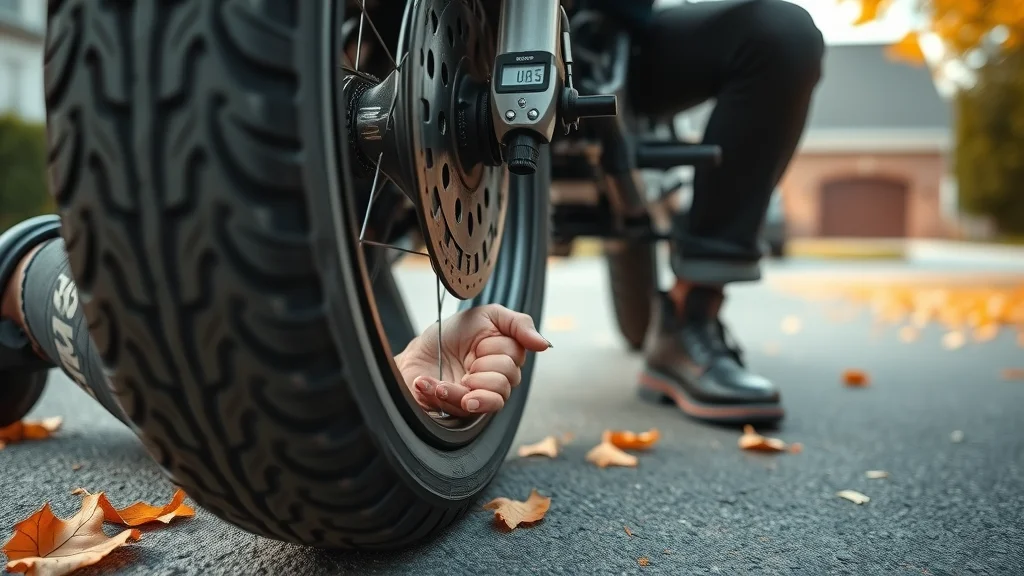
Tire Care, Pressure, and Tread Inspection in Motorcycle Maintenance

Your tires are the only connection between you and the road, making their care critical to both safety and performance. Begin every ride by checking tire pressure with an accurate gauge, and adjust per the manufacturer’s specs—under-inflated or over-inflated tires can severely affect handling. Next, inspect the tread for signs of wear, dry rot (cracking), or embedded debris. Bald or damaged tires not only reduce traction but put you at risk for blowouts, especially at high speeds or in wet weather. Always replace tires that show signs of excessive wear, dry rot, or bulging. Don’t overlook sidewalls and valve stems in your visual inspection; both should be free of cuts, punctures, or signs of long-term wear and tear. By prioritizing tire care in your motorcycle maintenance routine, you ensure every journey starts with a reliable foundation, preventing abrupt issues and providing the grip and stability essential for safe riding.

Incorporate a test ride after every tire change or significant pressure adjustment, listening and feeling for unusual vibrations or excessive play. This final check guarantees you’re ready for the road and have addressed any mounting or alignment problems before they develop into dangerous situations.

Motorcycle tire tread inspection: Rider kneeling in driveway with gauge, carefully checking tire, showing preventive motorcycle maintenance and tire care detail

Chain, Sprockets, and Lubrication: An Ongoing Maintenance Checklist

The drive chain and sprockets experience constant stress and are critical to your motorcycle’s performance. Without regular care, chains lose lubrication, stretch, or develop tight spots, leading to premature wear or even dangerous failures. Make it a habit to visually inspect your drive chain before each ride, looking for rust, stiff links, or signs of damage. Proper chain slack should match the owner’s manual guidelines; excessive play can reduce power delivery or allow chain derailment.

Lubricate your chain every 500 miles, or more frequently after wet rides. Use a motorcycle-specific chain lube and inspect the sprockets for hooked or worn teeth every 1,000 miles. Neglecting these elements in your preventative maintenance plan can lead to expensive repairs, compromised safety, and reduced efficiency. A well-lubricated, tensioned drive chain maximizes performance, supports smoother shifting, and minimizes wear on related components, ensuring a longer-lasting drivetrain.

Brake Inspection and Fluid Checks in Preventive Motorcycle Maintenance

Your brake system is essential for responsive and safe riding. Regularly inspect brake pad and disc thickness for signs of wear, replacing brake pads if they fall below the manufacturer’s minimum specification. Examine brake lines for cracks, leaks, or other signs of damage. Pay close attention to the color and level of brake fluid—old, dark, or contaminated fluid can result in decreased braking performance and even failure. A good maintenance checklist includes checking your brakes every 1,000 miles and replacing brake fluid as recommended—usually every one to two years—to maintain optimal stopping power. After service, a test ride (with light braking) ensures your adjustments provide full, reliable performance. Riders who stay on top of preventative maintenance for brakes can avoid dangerous situations and keep their motorcycles in top condition for years to come.

Establishing a routine for brake maintenance catches issues early, from worn components to fluid-related concerns, and ensures you have the immediate stopping power needed for every ride, no matter the distance or conditions.

Motorcycle brake maintenance: Mechanic performing hands-on inspection, gently squeezing brake, showing precise, preventive maintenance in a professional shop

Beyond the Basics: Advanced Preventive Motorcycle Maintenance

Electrical System and Battery Maintenance Checklist

Today’s motorcycles are more dependent than ever on reliable electrical systems. To keep your battery, lights, and electronics functioning flawlessly, perform periodic visual inspections of wiring harnesses for wear or damage, and clean battery terminals to prevent corrosion. Check that all lighting—headlights, turn indicators, brake lights—operates correctly before each ride, and ensure no flickering or intermittent failures occur. Battery health is vital, especially after storage or during cold seasons. Test your battery with a voltmeter and ensure it maintains a full charge; if it fails to hold a charge after reconditioning, replace it. In addition, keep an eye out for blown fuses, weak starter sounds, or any wiring showing signs of fraying. These steps make electrical issues less likely and guarantee that your high-tech systems remain trouble-free for the long time you own your motorcycle.

Advanced regular maintenance of your electrical system means smoother starts, consistent performance of all digital and analog instruments, and a lower risk of being caught off-guard by a dead battery in the middle of nowhere. This critical area often goes overlooked, so add it to your ongoing maintenance checklist to cover all bases.

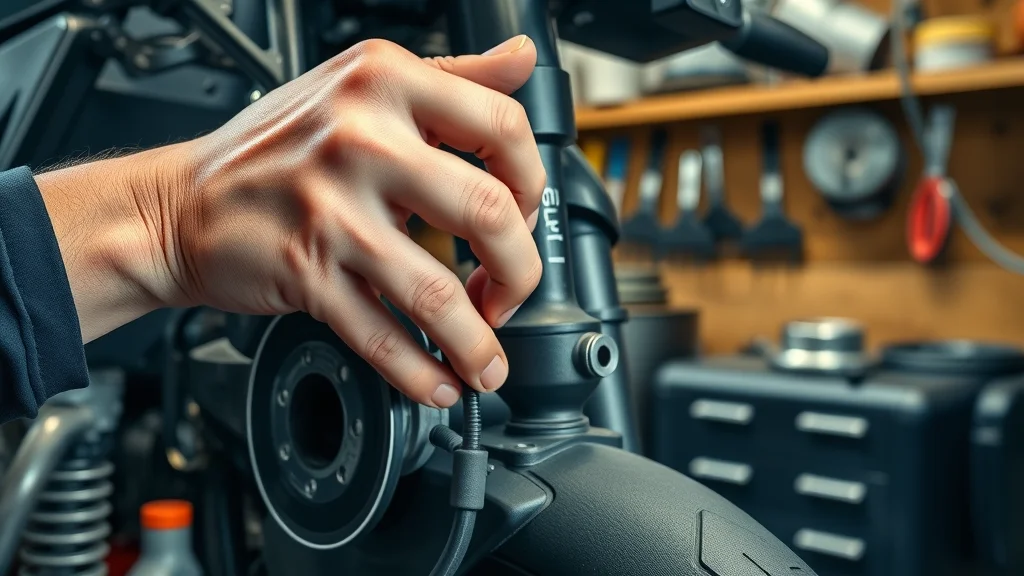
Suspension and Steering Checks for Preventative Maintenance

Your suspension and steering assemblies are responsible for stability, comfort, and handling. Start with a visual inspection for leaks at fork seals or shock absorbers and check for signs of excessive play or wear in the bearings and pivot points. Pay attention to changes in handling, such as wobbling, uneven tire wear, or pulling to one side. Over time, lubricants in the steering and suspension can degrade, potentially leading to a rougher ride or loss of control.

Consult your motorcycle’s manual for proper settings and adjustment intervals. Annual maintenance should include fresh fluid in the front forks and examination of rear suspension components. These systems require careful adjustment to match your riding style, load, and road conditions. Keeping your suspension and steering systems in peak condition will not only extend their lifespan but keep your motorcycle nimble, safe, and enjoyable through every curve and straightaway.

Common Preventive Motorcycle Maintenance Mistakes and How to Avoid Them

  • Overlooking the maintenance checklist steps
  • Using incorrect fluids or lubricants
  • Ignoring manufacturer preventative maintenance intervals
  • Forgetting seasonal maintenance tasks
  • Skipping test rides after servicing

Even experienced riders fall into common traps that can compromise their bike’s health. Forgetting a motorcycle maintenance checklist step (like lubricating the chain or changing brake fluid), using non-recommended products, or ignoring seasonal preparation lead to bigger issues down the road. Always double-check manufacturer guidelines, mark your calendar for preventative maintenance intervals, and stay consistent—your motorcycle and wallet will benefit. Never skip a post-service test ride to detect issues early, ensuring your adjustments provide the intended safety and performance improvements at every stage.

Ultimately, preventive motorcycle maintenance is about intention and attention—investing a little effort now can save a lot of hassle, expense, and risk later. If in doubt, get guidance from professionals or follow comprehensive checklists used by trusted shops for best results.

Watch:

People Also Ask: Preventive Motorcycle Maintenance FAQs

What is the preventive maintenance of a motorcycle?

Preventive motorcycle maintenance involves performing regular checks and servicing tasks, such as oil changes, brake inspections, and tire pressure monitoring, to ensure your bike operates safely and efficiently while reducing the risk of unexpected breakdowns.

What is the 4 second rule on a motorcycle?

The 4 second rule is a safety principle recommending motorcyclists maintain at least four seconds of distance between their bike and the vehicle ahead, providing ample time to react to sudden stops or obstacles.

Which bike is most liked by girls?

Preferences vary widely, but lightweight, stylish, and easy-to-handle motorcycles—such as cruisers and entry-level sport bikes—are commonly favored among women for comfort and manageability.

What does 2 fingers up mean on a motorcycle?

The '2 fingers up' gesture is a popular motorcyclist greeting, symbolizing camaraderie and respect between riders on the road.

Pro Tips From Professionals: Preventive Motorcycle Maintenance Best Practices

  • Regular use of a motorcycle maintenance checklist prolongs lifespan
  • Consult your owner's manual for preventative maintenance intervals
  • Keep a log of every maintenance task completed
  • Never skip tire, oil, or brake inspections
  • Incorporate visual and auditory checks after every ride
"Preventive motorcycle maintenance is your first line of defense against costly repairs and dangerous failures." – Shop Mechanic

Key Takeaways: Performing Effective Preventive Motorcycle Maintenance

  • Preventive motorcycle maintenance boosts bike safety and longevity
  • Following a regular maintenance checklist prevents common failures
  • Even minor proactive repairs save time and money in the long run

Ready to Ride? Schedule Your Preventive Motorcycle Maintenance Service with Experts

Your motorcycle deserves the best care—don’t wait until there's a problem. Call Nasty Performance Motorcycle Shop today: 847-458-4858 to book your preventive maintenance and enjoy every ride with confidence!

If you’re eager to take your motorcycle care to the next level, there’s always more to discover about keeping your ride in optimal shape. Delving into broader strategies for preventive maintenance can help you anticipate issues before they arise and truly maximize your bike’s performance and longevity. For a comprehensive perspective on how proactive upkeep can save you from unexpected expenses and keep your adventures on track, explore our in-depth article on preventive motorcycle maintenance to dodge costly repairs. It’s the perfect next step for riders who want to stay ahead of the curve and enjoy worry-free journeys for years to come.

Motorcycle Maintenance

0 Comments

Write A Comment

*
*
Please complete the captcha to submit your comment.
Related Posts All Posts

Common Mistakes In Motorcycle Brake Pad Replacement

Did you know that over 35% of DIY brake pad replacements end up with follow-up repairs due to simple mistakes? While changing brake pads on your motorcycle can save you money and offer a sense of accomplishment, a single overlooked step could put your safety at risk. Understanding and avoiding brake pad replacement mistakes is not just about saving costs—it’s about ensuring every ride is safe, smooth, and reliable. Whether you're an experienced do-it-yourselfer or just starting out with DIY brake pad replacement, this comprehensive guide will help you sidestep common pitfalls and master the art of changing brake pads safely. Understanding Brake Pad Replacement Mistakes Overview of brake pad replacement mistakes and their consequences: Even the most enthusiastic DIY brake pad replacement can go awry if critical steps are skipped. Common mistakes like improper pad alignment, failing to fully retract caliper pistons, or mismatching brake pads can lead to uneven wear, poor braking performance, and even brake system failure. These errors may not only damage the braking system but could also put you and others on the road in danger. Mistakes during pad replacement can translate to costly repairs and jeopardize the braking system’s reliability. Importance of avoiding common mistake in DIY brake pad replacement: Safety should always be the top priority when tackling brake jobs. Simple oversights—like not cleaning caliper guide pins or using incompatible friction material—can lead to squealing brakes, uneven pedal feel, or danger in emergency stops. Knowing the most frequent brake pad replacement mistakes empowers you to avoid them from the outset, ensuring each changing brake job boosts your motorcycle’s overall performance and secures your peace of mind. What You'll Learn About Brake Pad Replacement Mistakes Identifying typical brake pad mistakes: Pinpoint the most frequent slip-ups that plague DIY brake pad replacement jobs. Why pad replacement precision matters: Understand how every detail in changing brake pads contributes to your motorcycle’s safety and performance. How to improve your DIY brake pad replacement process: Gain actionable advice so you avoid brake pad replacement mistakes on your next brake job. Why Attention to Brake Pad Replacement Mistakes is Critical Impact of brake pad replacement mistakes on your motorcycle’s safety and braking system: A single common mistake, such as failing to secure brake pads or neglecting to lubricate caliper guide pins, can compromise your entire braking system. DIY brake jobs done incorrectly may cause uneven wear, noisy brakes, or even lead to brake fluid leaks. Each part of the braking system relies on proper pad replacement procedures—overlooking one can reduce braking performance, extend stopping distances, and cause unpredictable pedal feel that threatens safe riding. A quote from a trusted mechanic discussing common mistake in brake pad jobs: "One overlooked step in a brake pad replacement can compromise your entire braking system. Always double-check every component before hitting the road." – Certified Motorcycle Technician Table: Overview of the Most Frequent Brake Pad Replacement Mistakes Common Mistake Impact on Braking System How to Avoid Estimated DIY Difficulty Rating Not Retracting Caliper Pistons Fully Prevents new pads from fitting correctly and causes uneven wear. Use a proper tool to compress pistons fully before installing new pads. Moderate Improper Brake Pad Positioning Results in brake noise, vibration, and loss of braking performance. Align pads carefully and ensure proper seating in the caliper. Easy Skipping Lubrication Leads to stiff caliper movement and squeaky brakes. Apply brake grease to caliper guide pins and backs of pads. Easy Mismatched Brake Pads Inconsistent wear, reduced effectiveness, and potential caliper damage. Verify compatibility and always install matching pad sets. Easy For those looking to take their maintenance skills further, understanding how seasonal changes can impact your motorcycle’s performance is just as important as mastering brake pad replacement. You can discover practical tips for year-round care in this guide to seasonal bike care secrets every rider must know, which complements your DIY brake work with broader maintenance strategies. Preparation Steps: Avoiding Brake Pad Replacement Mistakes Before You Start Gathering proper tools for DIY brake pad replacement: Before tackling any brake job, ensure you have all the right tools on hand. This typically includes a torque wrench, caliper tool, brake pad spreader, high-quality gloves, and cleaning products. Using proper tools reduces the risk of damaging lug nuts, caliper guide pins, or the brake pad itself. Be sure to lay out all necessary equipment on a clear, organized workspace to streamline your pad replacement and help you avoid common mistakes that can arise from being unprepared. Inspecting brake pads and braking system before pad replacement: Before starting your DIY brake pad replacement, carefully inspect the current pads, brake rotors, and calipers. Check for uneven wear or signs of brake fluid leakage, as these can indicate underlying braking system issues. Ensuring components are in good condition reduces the risk of new pad replacement mistakes and helps you address problems that could affect your brake job’s effectiveness. Checking compatibility of replacement brake pads: Not all brake pads are created equal. Confirm that your replacements match your motorcycle’s make, model, and braking system specifications. Using mismatched pads can lead to inconsistent braking, excessive wear of the brake rotor, and increased risk for future brake pad replacement mistakes—so double-check before installing. Step-by-Step Guide: Correct Brake Pad Replacement Safely elevate your motorcycle and remove the wheels. Loosen lug nuts and detach the caliper, taking care not to hang the brake by the hose. This avoids strain on the brake hose and prevents brake fluid leaks. Completely retract the caliper pistons using a proper caliper tool. Ensure there is enough clearance for the new brake pads—don't force the pads, as this can damage the piston or caliper guide pin. Remove the old brake pads and carefully clean the caliper, guide pin, and rotor surface. Use brake cleaner to eliminate debris and old lubricant for a smooth pad replacement. Align the new brake pads properly in the caliper, ensuring they fit flush against the contact surface. Double-check their position to avoid common mistakes like uneven wear or noise. Apply a high-quality brake lubricant to the caliper guide pins and pad backing plates. This step is vital for smooth operation and to prevent squealing. Reinstall the brake caliper and torque all bolts to manufacturer specifications. Secure all components and ensure the brake pad is properly seated. Pump the brake lever or pedal several times to restore proper brake pad contact and pedal feel before riding. Monitor the system for leaks or warning lights. Proper brake pad alignment and installation tips: Always ensure pads sit flush against the rotor and check for any gaps or misalignment. Improper positioning can lead to reduced braking system performance and uneven pad wear. Key braking system checks during brake pad replacement: Examine caliper movement, rotor condition, and brake fluid level after each step. Resolve any abnormalities before continuing your brake job. Common DIY Brake Pad Replacement Mistakes Not fully retracting caliper pistons: A frequent error in DIY brake pad replacement, this prevents new pads from fitting and causes the brake caliper to bind or rub against the rotor, leading to reduced performance and uneven wear. Improper brake pad positioning: Incorrectly aligned pads can cause contact surface issues, brake squeal, and inefficient stopping power. Careful alignment is crucial for optimal braking system function. Skipping brake pad lubrication steps: Not lubricating caliper guide pins or pad backs results in sticky movement and persistently noisy brakes. Mismatched brake pads: Installing the wrong type or unevenly worn pads can cause inconsistent pedal feel, faster deterioration, and even damage to the caliper or rotor. Brake Pad Replacement Mistakes and the 30 30 30 Rule Explanation of the 30 30 30 break-in rule and its relevance to DIY brake pad jobs: The 30 30 30 rule is a proven break-in method after brake pad replacement: complete 30 gradual stops from 30 mph, spacing each stop about 30 seconds apart. This process evenly beds new pads into your disc brakes while ensuring proper friction material transfer. How improper brake pad replacement can make it difficult to implement the 30 30 30 rule: If pads are mismatched, installed incorrectly, or not properly lubricated, the break-in phase—critical to maximizing pad and rotor life—will not be effective. Skipping steps increases the risk of uneven wear and brake rotor damage, making even the best break-in routine much less effective. Signs You've Made a Brake Pad Replacement Mistake Common symptoms after DIY brake pad replacement mistakes: If you hear squealing, grinding, feel a pulsing brake pedal, or notice inconsistent pedal feel, your brake job may have gone wrong. These warning signs often indicate issues like sticking caliper guide pins, misplaced brake pads, or uneven contact with the rotor. Braking system warning indications: Look out for dashboard warning lights, visible brake fluid leaks around the caliper, or excessive brake dust shortly after pad replacement. Ignoring these warning signals can accelerate disc brakes and rotor damage. When to revisit your pad replacement job: If you experience any of the above or hear grinding/scraping shortly after DIY brake pad replacement, stop riding and re-examine every step. It’s better to redo a brake job than risk your safety or compromise the braking system further. How to Fix Brake Pad Replacement Mistakes and Ensure Safety Safely lift the motorcycle and remove the wheel and caliper as you did initially. Retract caliper pistons fully using a proper tool to ensure room for fitting new pads. Thoroughly clean the caliper guide pins, pad slots, and brake rotor surface with approved brake cleaner. Carefully realign new brake pads, ensuring both sides are seated evenly on the contact surface. Apply the correct lubricant to caliper guide pins and pad backs to prevent squealing and binding. Torque all bolts to the manufacturer’s specs for a secure fit and check all components for proper installation. Pump the brake lever or brake pedal to restore system pressure and check for leaks before test riding. Ensuring braking system integrity after brake pad replacement: Always check brake pedal or lever feel, inspect for leaks, and confirm pads and calipers move freely. Address warning lights on your dash immediately to protect your disc brakes and overall braking performance. When to seek professional help after a bad DIY brake job: If repeated attempts result in spongy pedal feel, persistent noises, or leakage, consult a certified mechanic. Some pad replacement issues, like damaged brake rotors or a compromised braking system, require specific expertise and diagnostic equipment. Expert Quote on the Dangers of Overlooking Brake Pad Replacement Mistakes "One overlooked step in a brake pad replacement can compromise your entire braking system. Always double-check every component before hitting the road." – Certified Motorcycle Technician People Also Ask: Brake Pad Replacement Mistakes What are common mistakes when installing brake pads? Skipping lubrication of caliper guide pins and pad backs, not seating pads correctly in the caliper, and ignoring torque specifications are some of the most frequent errors. Missing these steps leads to brake noise, uneven wear, and poor braking system performance—issues avoidable with careful attention during your pad replacement. What is the 30 30 30 rule for brakes? The 30 30 30 rule describes the break-in process for new brake pads: perform 30 gradual stops from 30 mph, each spaced about 30 seconds apart. This bedding-in routine allows friction material to transfer properly and ensures even contact surface wear, maximizing pad replacement effectiveness and disc brakes longevity. Does Les Schwab bleed brakes? Les Schwab shops generally include brake bleeding service during brake pad replacement if necessary to maintain optimal braking system function. Always confirm with your service provider when booking a brake job. How much do brake pads cost for a Mazda CX-5? Brake pad costs for a Mazda CX-5 can vary by location and product. Always consult certified shops or your dealership for accurate pad replacement estimates. Essential Tools and Products to Prevent Brake Pad Replacement Mistakes Recommended equipment for DIY brake pad replacement: Ensure you have a reliable torque wrench, caliper piston tool, brake cleaner, quality gloves, and a jack stand. Having the right gear makes your pad replacement smoother and minimizes the risk of damaging the braking system. Top-rated lubricants and cleaning products for brake pads and braking system: Use silicones or high-temp disc brakes grease for guide pins, and an approved, non-oil-based brake cleaner for rotors and calipers to keep everything moving smoothly and cleanly. Checklist for successful pad replacement job: New, compatible brake pads Brake cleaner and high-temp grease Torque wrench and piston retractor Gloves and eye protection Detailed shop manual for your specific model FAQs: Brake Pad Replacement Mistakes Can I drive after a DIY brake pad replacement if I suspect a mistake? It is strongly recommended not to drive until you’ve identified and corrected any possible brake pad replacement mistakes. Continuing to ride may worsen damage or compromise your safety. Always double-check your work if anything seems off. What if my braking system feels spongy after pad replacement? A spongy brake pedal or lever often signals air in the brake lines or insufficient pad contact. Re-bleed your brakes carefully, check all pad and caliper alignments, and ensure no brake fluid leaks are present. Persistent issues require professional inspection. How often should brake pads be checked and replaced? Brake pads should be checked as part of every major motorcycle maintenance schedule or at least every 5,000-7,000 miles, depending on usage. Replace pads when friction material is below minimum thickness, or sooner if uneven wear or performance loss is detected. Key Takeaways to Avoid Brake Pad Replacement Mistakes Always double-check alignment after changing brake pads to ensure perfect seating and avoid uneven wear. Follow the 30 30 30 break-in procedure after every DIY brake pad replacement for optimal bedding and longevity. Don’t overlook the braking system inspection after pad replacement—catch issues before they become safety hazards. Conclusion: Mastering Brake Pad Replacement and Avoiding Mistakes To prevent brake pad replacement mistakes, follow every step with care, check and double-check your work, and don’t hesitate to review your brake job if anything feels off. Consistent practice and a focus on learning are key to mastering DIY brake pad replacement and ensuring safety every ride. Keep honing your skills—confident, mistake-free brake jobs are within every DIY mechanic’s reach! If you’re committed to keeping your motorcycle in peak condition, don’t stop at just the brakes. Expanding your knowledge to include seasonal maintenance can help you anticipate issues before they arise and extend the life of every component. Explore seasonal bike care secrets every rider must know for expert advice on preparing your bike for changing weather, optimizing performance, and ensuring safe rides all year long. By integrating these advanced care strategies with your brake maintenance routine, you’ll be equipped to handle both everyday upkeep and the unique challenges each season brings. Take the next step in your DIY journey and make your motorcycle maintenance truly comprehensive. Ready to Safely Replace Your Pads? Call Nasty Performance Motorcycle Shop Today: 847-458-4858

Common Mistakes with Motorcycle Tire Pressure

While understanding the basics of tire pressure is essential, many riders overlook the importance of adjusting their approach as the seasons change. For a deeper dive into how temperature shifts and seasonal factors can impact your motorcycle’s performance and tire health, explore our guide on seasonal bike care strategies every rider should know. This resource offers practical tips for adapting your maintenance routine year-round. If you’re ready to take your motorcycle maintenance to the next level, don’t stop at tire pressure. Expanding your knowledge of comprehensive bike care—especially as the seasons change—can dramatically improve your ride’s reliability, safety, and longevity. Discover expert insights on preparing your motorcycle for every climate, from winter storage to spring tune-ups, by visiting our in-depth article on seasonal bike care secrets. Investing in a holistic maintenance approach ensures you’re always ready for the road ahead, no matter what the weather brings.

When To Conduct a Motorcycle Clutch Inspection

Did you know most unexpected breakdowns on the road can be traced back to neglected motorcycle clutch inspection? For riders, understanding when and how to check your clutch can mean the difference between a smooth cruise and being stranded unexpectedly. In this complete guide, we reveal why clutch inspection is an essential habit for every motorcycle owner, how to recognize early warning signs, and vital tips for maximizing your bike’s performance and safety. Unveiling the Importance of Motorcycle Clutch Inspection The motorcycle clutch is a vital component responsible for transferring power from the engine to the rear wheel, allowing smooth gear shifts and controlled acceleration. If overlooked, hidden clutch problems often escalate into serious mechanical issues and sudden breakdowns. A timely clutch inspection protects your investment, prevents costly repairs, and ensures the safety of you and your bike. Recognizing the importance of regular inspection is crucial. Clutch problems may begin subtly, with symptoms like a stiff clutch lever or odd vibrations. Many riders ignore these signs, only to face bigger problems later such as clutch slippage, sticking, or total loss of acceleration. By scheduling regular inspections and staying attentive to early warning signs, you greatly extend your clutch’s—and your bike’s—lifespan. "Did you know that neglecting regular motorcycle clutch inspection is one of the leading causes of unexpected breakdowns on the road?" What You'll Learn About Motorcycle Clutch Inspection The key signs indicating the need for a motorcycle clutch inspection Step-by-step process for conducting a clutch inspection How to identify clutch problems before they escalate When to involve a professional versus DIY Expert tips for optimizing clutch lever response and performance Understanding the Role of the Motorcycle Clutch The motorcycle clutch isn’t just a lever—it’s a sophisticated mechanism that manages the delicate transfer of engine power to the road, allowing smooth starts, effortless shifts, and controlled stops. Without the clutch, shifting gears or coming to a stop would be abrupt and potentially damaging. Understanding its role is the first step towards mastering clutch maintenance, helping you prevent clutch problems and optimize performance. Across all types of motorcycles, from dirt bikes to street bikes, the clutch assembly includes multiple crucial parts—clutch plates, friction plates, steel plates, clutch basket, pressure plate, clutch hub, and more. Each plays a pivotal role in the transfer of power and the ride quality. By grasping how the clutch works and recognizing how different components interact, riders become empowered to detect subtle issues before they evolve into major repairs. How the Motorcycle Clutch Functions The clutch operates by compressing or releasing clutch discs and friction plates between the clutch basket and pressure plate. When you pull the clutch lever, the plates separate, breaking the connection between the engine and rear wheel. This action allows you to change gears safely. When you release the lever, the plates re-engage, transmitting power again. Components such as the clutch hub, needle bearing, clutch spring, and clutch basket fingers must be in harmony for seamless operation. Any wear or warping of these parts may trigger issues like clutch drag (when the plates fail to fully disengage) or slippage (when friction plates fail to transfer full power). For hydraulic systems, the clutch’s operation depends on hydraulic fluid pressure. Both mechanical (cable) and hydraulic clutches require regular inspection to avoid progressive damage. Motorcycle Clutch Problems: Common Triggers and Impacts Clutch problems arise from several common sources. Worn clutch plates, warping due to excessive heat, poor cable adjustment, or contaminated hydraulic fluid can all lead to troublesome symptoms. Dirt bikes, for example, often suffer clutch wear from aggressive riding in off-road conditions, while street bikes may see clutch disc glazing from frequent stop-and-go traffic. The impacts of overlooked clutch issues are serious: reduced acceleration, strange noises during shifting, increased lever stiffness, and a slipping clutch that struggles under load. Over time, if the pressure plate and clutch hub are not inspected, you risk damaging the clutch basket or warping steel plates, leading to expensive repairs and compromised safety. Understanding these triggers is vital for effective inspection and preventative maintenance. Essential Timing: When To Conduct a Motorcycle Clutch Inspection Knowing when to conduct a motorcycle clutch inspection is as important as understanding how to perform one. Manufacturers generally recommend inspection intervals based on mileage and riding style, but attentive riders should always be alert to symptoms that demand immediate attention. Regular inspection ensures the clutch plate, friction plate, clutch discs, and related parts remain in proper working order, preserving both safety and motorcycle performance. Inspections aren’t just about distance traveled. They help identify subtle warning signs, prevent breakdowns, and can catch issues such as free play anomalies, cable tension problems, or the onset of rattling sounds. Monitoring your mileage and listening to your bike ensures you address problems before they escalate into larger, more costly repairs. Mileage-Based Motorcycle Clutch Inspection Intervals Most modern motorcycles benefit from a clutch inspection every 6,000 to 12,000 miles. However, your ideal interval varies depending on riding habits and bike type. Aggressive riders, racers, or those who commute frequently in heavy traffic often require more frequent inspections as clutch components wear faster. Dirt bikes may need checked every few months due to tougher conditions, while touring bikes typically have longer intervals. Always consult your owner’s manual for your motorcycle’s recommended service schedule. It’s best to err on the side of caution; if you notice symptoms like a spongy clutch lever, difficulty shifting, or changes in clutch engagement, conduct an inspection regardless of your last service date. Remember, a minor investment of time now can save you from a major repair bill later. Symptoms Suggesting Immediate Clutch Inspection Immediate inspection is warranted whenever you observe notable changes in clutch performance. Classic red flags include suddenly increased clutch lever travel, the presence of gear crunching, a feeling of the clutch slipping (where power delivery is inconsistent), or the emergence of rattling sounds near the clutch cover. Sticky or hard-to-pull levers, vibration under load, or visible clutch disc overheating are further warning signs that demand prompt attention. Pay attention to both how your bike rides and how it sounds. If a once-smooth shift now jerks, or you detect hesitation in power, these may indicate friction plate glazing, warped plates, or issues with the clutch basket or pressure plate. Swift diagnosis helps prevent further damage and ensures safer, more reliable rides. Comparison of Recommended Inspection Intervals by Motorcycle Type Motorcycle Type Recommended Inspection Interval Special Notes Standard/Commuter 6,000–8,000 miles Typical mixed-use conditions Dirt Bike/Off-Road Every 3–6 monthsor after every major ride Check more often due to harsher operating environments Sport Bike (Street) 8,000–10,000 miles More frequent for aggressive riders Touring/Cruiser 10,000–12,000 miles Less stress due to steady, long rides Custom/Performance Varies Inspect after tuning or track events How to Tell if Your Clutch is Bad on a Motorcycle Knowing how to identify a failing clutch can help you act fast and avoid being stranded. Here are common warning signs that indicate serious clutch problems: Difficulty shifting gears A spongy or tight clutch lever Slipping or sticking clutch Strange noises or vibrations Loss of acceleration When the clutch lever becomes hard to operate, or you feel the clutch fails to engage or disengage smoothly, it’s time to inspect for worn clutch plates, stretched cables, low hydraulic fluid, or warping in the pressure plate and clutch hub. Ignoring these problems may worsen wear on internal clutch discs, basket fingers, and may even damage the clutch basket itself. Always treat these symptoms as critical warnings to conduct immediate clutch inspection. What Does a Motorcycle Clutch Inspection Involve? A proper motorcycle clutch inspection consists of various steps, from general checks of the lever and cable to detailed examination of the clutch plates themselves. Both manual and hydraulic system motorcycles require careful assessment to catch issues early and maintain smooth clutch engagement. Inspectors begin by assessing free play at the clutch lever, cable adjustment, and inspecting for leaks or color change if the system is hydraulic. Next, they're looking for excessive play, unusual resistance, or changes in the feel of the lever—key indicators of internal clutch problems. A thorough inspection might include removing the clutch cover for a hands-on check of the clutch plates, friction plate, and basket. Preliminary Checks: Clutch Lever, Cable, and Fluid Start your clutch inspection by checking the free play at the clutch lever. There should be a small, but definite, amount of loose play—too much or too little indicates a need for cable adjustment. Check cable tension for signs of wear or fraying and lubricate as necessary. For bikes with hydraulic clutches, inspect the hydraulic fluid reservoir for proper levels and evidence of contamination or discoloration. Evaluate the smoothness of clutch lever movement. Any sponginess, excessive stiffness, or inconsistent resistance may signal deeper clutch problems. Don't forget to check for leaks in the hydraulic system, as low fluid or air contamination can drastically affect clutch engagement and performance. These preliminary checks set the stage for more detailed inspections if abnormalities are found. Step-by-Step Clutch Plate Inspection on a Motorcycle To check the health of your clutch plates and related components, you need basic tools, patience, and a methodical approach. Begin by ensuring your motorcycle is safely parked, turned off, and the engine is completely cool. Remove the clutch cover to access the clutch basket, pressure plate, clutch discs, and steel plates. Examine each clutch disc and friction plate for visible signs of wear, overheating (discoloration), warping, or grooves on the clutch basket fingers. Using a micrometer, measure the thickness of the plates and compare with manufacturer specifications—any plate thickness below spec means the component must be replaced. Note any uneven wear, chips, or signs of burnt friction surfaces which may indicate improper clutch spring tension or hydraulic problems. Reassemble carefully, ensuring the pressure plate and clutch hub are aligned and all components are torqued to the correct specs. How to Inspect Clutch Plates on a Motorcycle Here is a simplified outline for inspecting the clutch plates on your motorcycle. Always consult your owner’s manual for details specific to your model: Ensure the motorcycle is secured and cool Remove the clutch cover Examine clutch plates for wear, burning, or warping Measure plate thickness and compare to manufacturer specifications Reassemble with proper torque settings "Regular motorcycle clutch inspection helps riders avoid costly emergency repairs and ensures performance and safety on every ride." Top 5 Symptoms of a Bad Motorcycle Clutch Dragging clutch Clutch slippage under load Noisy operation during shifting Stiff or loose clutch lever Irregular clutch engagement If you encounter any of these symptoms, consider them urgent signals for a detailed clutch inspection. Address these issues before they lead to further damage of the clutch hub, basket, or pressure plate components. Expert Tips for Addressing Motorcycle Clutch Problems Handling clutch issues proactively is vital for every responsible rider. Here are actionable tips from seasoned professionals: First, establish a regular schedule for clutch lever and cable inspection. Lubricate moving parts regularly and monitor hydraulic fluid levels for any color or viscosity changes. Store your motorcycle properly and always allow the bike to warm up before demanding rides to prevent thermal shock and warping of the clutch discs and friction plate. When in doubt, consult a trusted mechanic familiar with your motorcycle type. When to Seek Professional Motorcycle Clutch Inspection DIY inspection can handle routine checks and maintenance, but certain issues—such as persistent clutch problems, rattling sounds, or apparent damage to the clutch basket or hub—require a trained eye. If you lack proper tools or are unsure about measurement specs, don’t hesitate to visit a reputable shop. Remember, clutch systems have little room for error, and improper inspection or assembly may worsen the problem. Seek professional inspection if you’re dealing with chronic slippage, noisy operation, excessive free play that cannot be adjusted out, or if you suspect hydraulic system leaks or contamination. It’s always better to be safe and seek help, especially with complex or performance motorcycles. Maintenance Best Practices for Preventing Clutch Problems Prevention is the best cure for clutch issues. Prioritize regular oil changes (especially for wet clutches), keep the cable and lever system free of debris, and follow manufacturer guidelines for clutch adjustment. Periodically check the basket fingers, pressure plate, and friction plate for scoring or grooves. In dry clutches, monitor dust buildup, since excess grime accelerates plate wear and clutch engagement issues. Riding habits also influence clutch longevity. Avoid riding the clutch unnecessarily (such as holding the lever at traffic lights), use smooth and deliberate gear shifts, and refrain from excessive aggressive acceleration. Proper storage and regular cleaning further extend clutch spring, clutch hub, and clutch basket lifespan, translating into smoother, more reliable performance. FAQs: Motorcycle Clutch Inspection and Clutch Problems How often should I inspect my motorcycle clutch? Most manufacturers suggest inspecting your motorcycle’s clutch every 6,000 to 12,000 miles, or more often for aggressive riding, harsh conditions, or older bikes. Always check your owner's manual for your specific model. Can I inspect the clutch myself, or should I go to a professional? Many preliminary checks (like free play and lever movement) and simple inspections can be done at home with basic tools. However, if you notice advanced symptoms like slippage, noise, or suspect internal wear, it’s best to consult a professional mechanic. What clutch problems are most common in modern motorcycles? The most common issues include worn or glazed friction plates, stretched cables, low or dirty hydraulic fluid, and warped steel plates or clutch basket fingers. Is clutch inspection different for dirt bikes versus street bikes? Yes—dirt bikes often require more frequent clutch inspections due to the harsher operating conditions and increased wear from aggressive off-road riding. Street and touring bikes may maintain longer intervals but require equal attention to detail. Key Takeaways from Your Motorcycle Clutch Inspection Timely inspections prolong clutch lifespan Recognizing early symptoms of clutch problems is critical DIY inspection is possible but professional help may be required for complex issues A well-maintained clutch lever ensures safety and smoother rides Contact Trusted Professionals for Your Next Motorcycle Clutch Inspection Ready to keep your bike running smoothly? Protect your investment and never compromise on safety—Call Nasty Performance Motorcycle Shop Today: 847-458-4858 "Protect your investment and never compromise on safety—Call Nasty Performance Motorcycle Shop Today: 847-458-4858" Conclusion: Proactive motorcycle clutch inspections guarantee safer, longer, and more enjoyable rides. Listen to your bike, follow inspection intervals, and trust professionals when in doubt for ultimate peace of mind. While understanding clutch inspection intervals is crucial, it's equally important to adapt your maintenance routine to the changing seasons. For practical advice on how weather and seasonal shifts can impact your bike’s performance and what steps you should take, explore these essential seasonal bike care secrets every rider should know. Mastering clutch inspection is just one part of keeping your motorcycle in peak condition year-round. To truly safeguard your ride and enjoy worry-free journeys, consider how comprehensive seasonal care can further enhance your bike’s reliability and longevity. Discover expert strategies for adapting your maintenance routine to every season and unlock advanced tips that go beyond the basics by visiting our in-depth guide on seasonal motorcycle care. Your next level of riding confidence starts with a holistic approach to maintenance.

Terms of Service

Privacy Policy

Core Modal Title

Sorry, no results found

You Might Find These Articles Interesting

T
Please Check Your Email
We Will Be Following Up Shortly
*
*
*