cropper
update

Nasty Performance ~ 847-458-4858 

update
  • Blog Home
  • Categories
    • Motorcycle Maintenance
    • Riding Tips & Preps
    • Safety & Inspection
    • Customizations & Upgrades
    • DIY Motorcycle Repairs
    • Motocycle Audio Systems
    • Motocycle Seasonal Care & Storage
    • Engine, Electrical Performance
  • Bike Night
  • Nasty Performance Motorcycle Shop
March 28.2026
1 Minute Read

How to Prep Motorcycle for Spring—Get Ready to Ride Safely

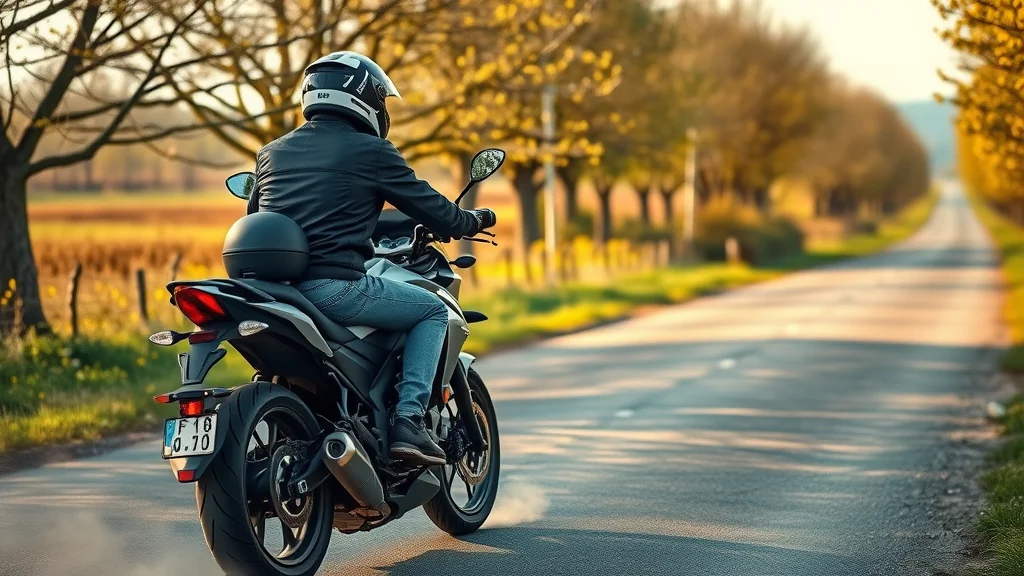
Did you know? According to recent safety studies, over 30% of spring motorcycle accidents are related to neglected maintenance checks after winter storage. If you’re itching to hit the open road, investing a little time in your spring motorcycle maintenance could be the difference between a great riding season and a costly—or dangerous—mishap. This comprehensive guide explains how to prep motorcycle for spring with a practical maintenance checklist, smart safety measures, and advice from industry pros, helping you ride into spring with confidence.

Unveiling the Importance: Why Properly Prepping Your Motorcycle for Spring Matters

After months of sitting idle during the colder months, your motorcycle needs more than just a turn of the key to be ready for the road. Ignoring essential checks and inspections can result in unexpected breakdowns, compromised safety, and premature wear of critical components. Each spring, thousands of riders face issues with battery failure, degraded fuel in the gas tank, worn brake pads, and low tire pressure—reminders of why a spring motorcycle maintenance checklist is vital.

When you follow a structured motorcycle maintenance checklist, you’re not just prolonging the life of your bike—you’re also ensuring your own safety and the safety of others. Essential steps like checking for signs of damage, topping off fluids, and performing a thorough maintenance check can reveal lurking issues that might have gone unnoticed during storage. Regular motorcycle maintenance each spring gives you peace of mind and keeps you focused on enjoying the riding season rather than worrying about preventable problems.

Vibrant motorcycle parked in a sunny suburban driveway, glistening chrome and signs of fresh polish, perfect spring motorcycle maintenance setting for how to prep motorcycle for spring

Startling Motorcycle Maintenance Statistics Every Rider Should Know

Consistent findings show that roughly 60% of motorcycle breakdowns in early spring are linked directly to insufficient post-winter storage checks. Items like the battery, gas tank, and brake system are especially vulnerable after an extended period of inactivity. Even experienced riders may forget basic tasks like checking the air pressure in both front and rear tires or inspecting the condition of the drive belt and chain. According to insurance claims, most spring incidents could have been prevented by a simple maintenance check covering items like spark plugs, brake lever operation, and the lighting system.

"A thorough maintenance check before riding season is the single most vital step you can take to ensure both your safety and the longevity of your bike." – Motorcycle Maintenance Expert

What You'll Learn in Our How to Prep Motorcycle for Spring Guide

  • Comprehensive motorcycle maintenance checklist for Spring
  • Essential maintenance checks post-winter storage
  • Spring motorcycle maintenance tips from industry experts
  • Safety essentials for your first test ride

Spring Motorcycle Maintenance Checklist: Step-by-Step Guide

To ensure your bike is ready for the riding season, use this structured motorcycle maintenance checklist. Each step addresses critical components that may suffer from winter storage. Whether you plan to ride daily or just on weekends, these actions will help extend your motorcycle’s life and safeguard your journey. Let’s break down the key areas of focus so you can approach your spring maintenance check with confidence.

Remember, even minor issues like incorrect tire pressure or overlooked signs of damage can lead to major setbacks. As you perform each check, keep an eye out for excessive wear, corrosion, or leaks. Logging your findings in a regular maintenance journal is a smart habit—especially as your bike transitions out of storage all winter and back onto the road.

For a more detailed look at how to keep your motorcycle in peak condition throughout the year, you might find it helpful to review additional seasonal care strategies. The article on seasonal bike care secrets every rider must know offers practical tips that complement your spring maintenance routine and help prevent issues before they arise.

Component Recommended Action Tools Needed
Battery Charge and inspect terminals Multimeter, Wrenches
Tires Check air pressure, tread depth Tire gauge
Brakes Inspect brake pads, brake fluid Brake fluid, Wrench
Drive Belt/Chain Clean, lubricate, and adjust tension Lubricant, Cleaner
Fluids Change oil, coolant, etc. Oil, Coolant
Lights & Controls Check function, replace bulbs as needed Bulbs, Screwdriver

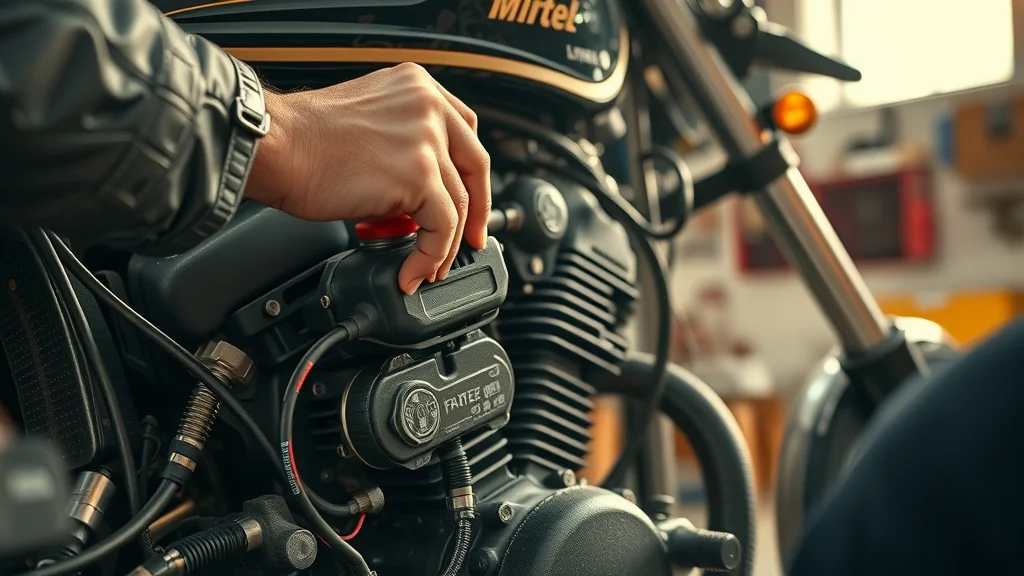
Winter Storage Recovery: Motorcycle Maintenance After Months of Inactivity

If your motorcycle has been in storage all winter, it’s essential to focus on every area potentially affected by months of inactivity. Batteries are often the first to show signs of sluggishness, needing a charge and a thorough inspection for corrosion or loose connections. Next, check the air in both front and rear tires for proper tire pressure and examine each for flat spots or cracks. Don’t overlook fluids—oil, brake fluid, and coolant can degrade or attract condensation, causing internal engine harm or brake system errors.

Brake pads and the drive belt or chain should be examined closely for excessive wear or damage such as cracks. The fuel tank can also suffer from old, stale gas, which might harm your fuel system and engine performance. A meticulous spring motorcycle maintenance check addresses these problem areas before they escalate into major repairs, giving you full confidence when returning to the road for the new riding season.

Detailed motorcycle engine inspection in progress as part of post-winter storage maintenance check, perfect for how to prep motorcycle for spring

Critical Motorcycle Maintenance Checks for Spring Riding Season

  • Battery condition and connections
  • Brake pads and brake fluid
  • Tire inspection—air pressure and tread wear
  • Engine oil, coolant, and gas tank
  • Spark plug and spark plugs inspection
  • Drive belt and chain maintenance
  • Throttle, controls, and lighting system

Tackling each of these motorcycle maintenance checklist items is critical to ensure your ride is in top working order. Start with your battery—charge it fully and clean any terminal residue before installation. Next, inspect both brake pads for signs of excessive wear or thinning, and refill brake fluid as needed for optimal brake lever pressure and safety. Tires require particular attention: check the air pressure using a reliable tire gauge and inspect the tread for signs of damage such as cracks or flat spots.

Changing your engine oil and coolant ensures no moisture or contaminants compromise performance. The gas tank should be filled with fresh fuel and inspected for corrosion if it sat empty during winter storage. Clean and adjust the drive belt or chain as needed for smooth power transfer, and replace spark plugs that show fouling, rust, or pitting. Finally, test the function of your throttle, lights, and electronic systems—including the brake light and headlamp—before hitting the road for a test ride.

Deep Dive: Gas Tank, Brake Pads, and Air Pressure Checks

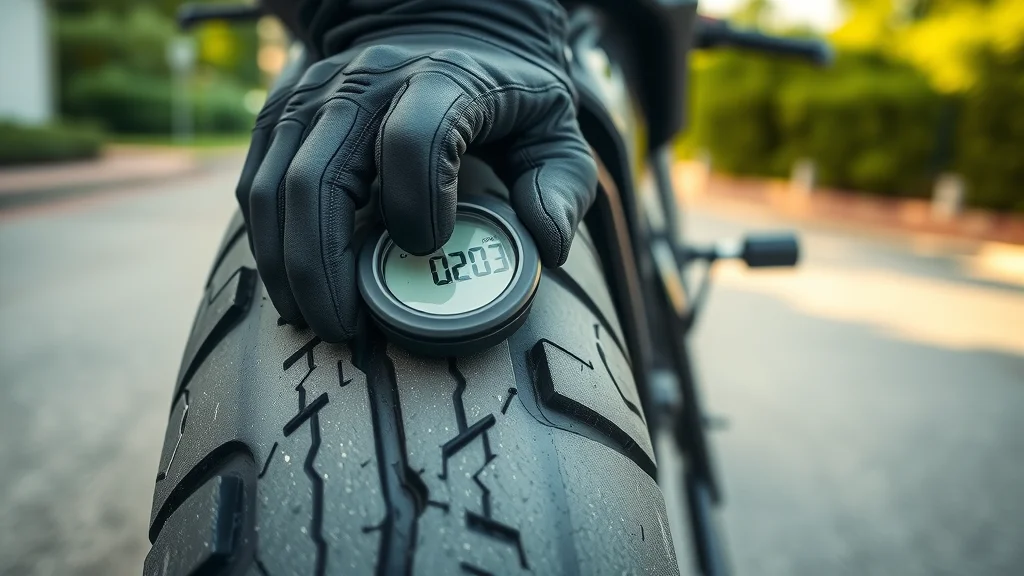
Among all spring motorcycle maintenance steps, your gas tank, brake pads, and tire air pressure checks are especially critical for both safety and performance. Water condensation in the gas tank during winter storage can lead to rust or diluted fuel, affecting your engine’s starting and reliability. For brake pads, wear indicators or visible grooves signal the need for replacement, especially as you rely on powerful stopping in the unpredictable spring riding season. When it comes to tires, air pressure fluctuations from temperature swings may cause underinflation, a major factor in unsafe handling and poor gas mileage.

Make checking the air pressure in your tires a weekly routine. Most motorcycles specify a recommended range for front and rear pressure in the owner’s manual—failing to meet these specs not only puts you at risk but can also void certain aspects of your motorcycle insurance should an accident occur. Keeping all systems in working order with simple but thorough checks will set the stage for a carefree and exhilarating spring ride.

Rider

Inspecting and Maintaining the Gas Tank After Winter Storage

After winter storage, the gas tank is vulnerable to issues like condensation, rust, or old fuel residue. Drain any remaining fuel if it’s been sitting for more than a few months, and inspect the inside of the tank using a flashlight for any signs of corrosion or debris. If you notice rust or sediment, a thorough cleaning and fuel filter replacement are wise. Once clean, refill the tank with fresh fuel—preferably adding a fuel stabilizer for added protection—and check fuel lines for cracks or leaks. These preventative steps support reliable engine starts and avoid wider issues with the fuel system throughout the riding season.

If your fuel tank develops significant rust or if you spot leaks, consult a professional mechanic immediately. Riding with a compromised gas tank risks engine failure or fire. Keeping your gas tank in prime shape each spring is a cornerstone of the maintenance check required for long-term bike health.

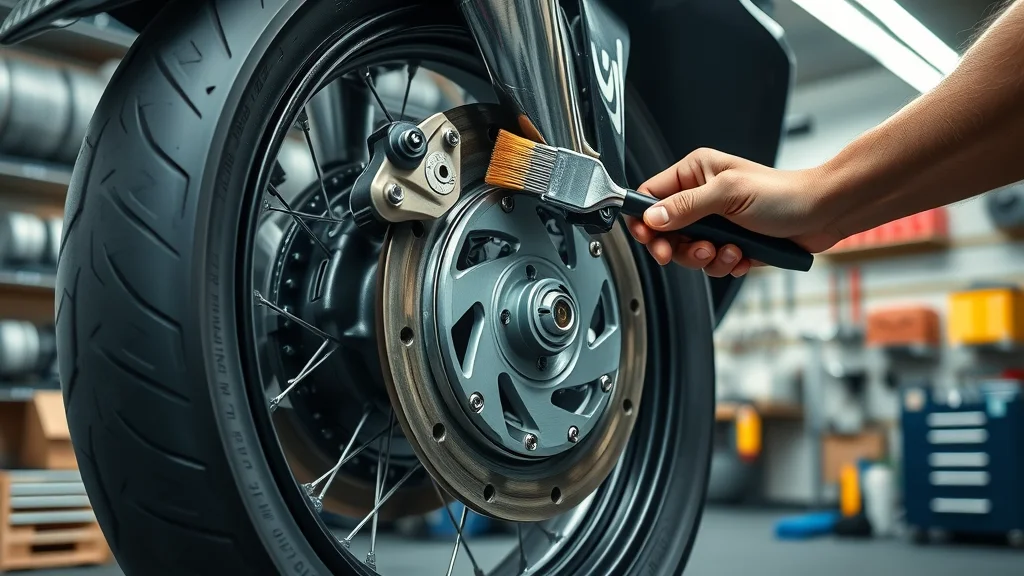
How to Check Brake Pads for Spring Motorcycle Maintenance

Brake pads are indispensable for safe riding, especially as sudden stops often occur when road conditions fluctuate in early spring. Begin by visually inspecting both the front and rear brake pads for signs of excessive wear—these may appear as thin friction material or grooves worn into the pad’s face. Squeeze the brake lever and check for a firm, responsive feel; a spongy lever might indicate air in your brake lines or low brake fluid. If pad thickness is below the manufacturer’s safety minimum (generally 2–3 mm), replace them immediately. Don’t forget to examine the rear brake and ensure the brake light operates correctly.

Close-up of mechanic cleaning and inspecting motorcycle brake pads, key task on motorcycle maintenance checklist for spring riding season

Setting Correct Air Pressure for Safe Riding

Keeping your tires at the correct air pressure is crucial for safe handling, even tread wear, and optimal gas mileage. Underinflated tires reduce traction and make steering sluggish, while overinflated ones increase the risk of punctures and reduced contact with the road. Use a tire gauge to check the air pressure against your motorcycle’s stated requirements, which can usually be found inside the owner’s manual or on the frame. Adjust the pressure for both front and rear tires, and check the tread to ensure no excessive wear or embedded debris.

Neglecting regular tire maintenance can hurt both safety and wallet. Poorly inflated or worn tires are frequent causes of accidents in the riding season, and some insurance policies may not cover crashes if basic maintenance is overlooked. Make air pressure checks part of your routine, especially in spring when temperature changes can throw off tire balances.

Spark Plug and Drive Belt Inspection: Key Steps in Motorcycle Maintenance

Spark plugs are the heart of your engine’s ignition system, while the drive belt or chain transfers power from the engine to the wheels. Ignoring these components can lead to lackluster engine starts, lower fuel economy, or even sudden breakdowns. For spring motorcycle maintenance, always start by removing the spark plugs and inspecting them for rust, fouling, or pitting. Replace any plugs that appear compromised, as faulty ignition affects both engine performance and emissions.

Next, examine the drive belt (or, if your bike uses a chain, the chain itself) for signs of excessive wear such as cracking, fraying, or loose tension. Lubricate and adjust according to the manufacturer’s specifications, and check the sprockets for uneven teeth or excessive play. Both spark plug and drive belt care are essential parts of your spring motorcycle maintenance checklist.

Mechanic inspecting spark plug near motorcycle engine, vital step in how to prep motorcycle for spring using maintenance checklist

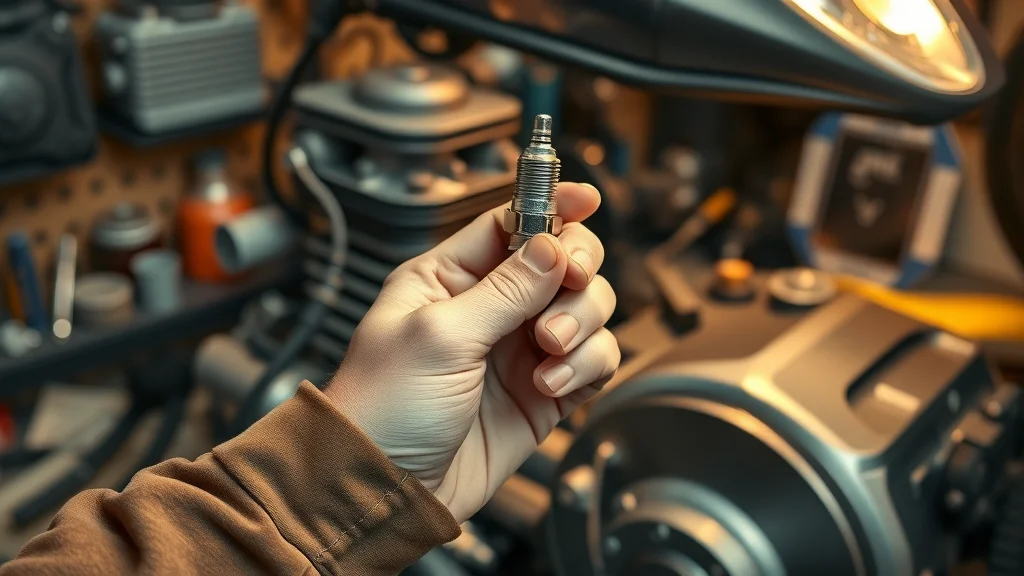
How to Remove, Inspect, and Replace Spark Plugs

To maintain engine efficiency, remove your spark plugs using an appropriate socket, then check the tips for oil fouling, soot, or burned electrodes. If you spot any abnormalities or if the plug’s gap has widened significantly, replace the spark plugs with ones recommended in your owner’s manual. Apply a small amount of anti-seize compound to the threads, install the new plugs carefully, and torque them to specification. This simple process keeps your engine running smoothly and reliably throughout the riding season.

Spark plugs should be checked every season and replaced as needed—failing to do so may result in hard starts, misfires, or poor fuel economy. Clean connections and ensure wire boots are securely fitted to prevent electrical loss.

Drive Belt vs. Chain: Which Should You Inspect and Why?

The choice between drive belt and chain depends on your bike model, but both require inspection at the start of spring. A drive belt should be checked for cracks, frays, or obvious signs of excessive wear, then tensioned according to the owner’s manual. Chains need to be cleaned, lubricated, and examined for stiff or rusted links—uneven tension can lead to abrupt power transfer and premature sprocket damage. Consider replacing the drive belt or chain if you spot visible signs of damage such as cracks, as a failed drive system can cause loss of control at speed.

Keeping these power delivery components in excellent working order minimizes sudden breakdowns and maximizes both performance and safety. Include this step in every annual spring motorcycle maintenance check.

Test Ride: Final Safety Maintenance Check Before Your First Spring Ride

Once every item on your motorcycle maintenance checklist has been checked off, it’s time for the moment you’ve been waiting for—a careful test ride. Begin slowly in a controlled environment, listening for unusual noises and feeling for smooth acceleration, responsive brakes, and even steering. Test the throttle, brake lever, and brake light before getting up to speed. Take note of any hesitation or unpredictable handling, which could signal missed maintenance issues or parts in need of a closer look.

If your test ride uncovers anything questionable, return to your garage or seek a professional inspection before venturing far from home. Logging your experiences and adjustments after this first ride makes troubleshooting easier during the rest of the riding season.

Excited rider beginning safe test ride on motorcycle, sign of successful spring motorcycle maintenance

People Also Ask: Common Motorcycle Spring Prep Questions

What is the 12 second rule on a motorcycle?

The 12 second rule is a safety guideline suggesting you should always scan the road ahead and be prepared to react to obstacles appearing within 12 seconds of travel. This gives riders enough time to adjust speed, position, or direction safely, especially critical at the start of the riding season when spring conditions may be unpredictable. Adhering to the 12 second rule, alongside regular spring motorcycle maintenance, reduces risk and improves situational awareness.

How to prepare your bike for spring?

To prep your motorcycle for spring, begin with a maintenance check focusing on your battery, tires (checking air pressure and tread wear), brake pads, and fluids (oil, brake fluid, coolant). Inspect your gas tank for rust or old fuel, check and replace spark plugs if needed, and test all lights and controls for proper working order. Using a maintenance checklist ensures you don’t overlook any vital steps, securing a safe and smooth start to the riding season.

How cold does 40 degrees feel on a motorcycle?

Riding a motorcycle at 40 degrees Fahrenheit can feel significantly colder due to wind chill, often making it feel like the low 30s or upper 20s depending on your speed. At this temperature, it’s essential to wear appropriate gear and remain alert to colder tires, which may affect traction. Always check the air pressure, as cold air can lower tire pressure overnight, impacting your bike’s handling and safety.

Is it better to store a motorcycle with a full or empty tank?

Storing your motorcycle with a full gas tank is usually best, as this minimizes air space inside and reduces the risk of rust and condensation buildup. Adding a fuel stabilizer helps prevent fuel degradation during winter storage. An empty tank may be appropriate if you plan to clean or repair the tank, but generally, filling it helps keep your fuel system in working order for easier spring starts.

Expert Tips and Tricks: Lists for Efficient Motorcycle Maintenance

  • Always refer to your motorbike’s manual for manufacturer-specific maintenance check details.
  • Use a motorcycle maintenance checklist and log your findings each spring.
  • Test all lighting and electronic systems before hitting the road.
  • Replace any worn brake pad or spark plugs to ensure safety.

Creating your own motorcycle maintenance checklist allows you to spot trends over time, such as which components tend to wear fastest. Experts emphasize that even routine checks of items like the drive belt, air pressure, and battery can prevent costly repairs later. Stay ahead of issues by addressing minor problems early—your spring motorcycle maintenance efforts pay off throughout the riding season.

For those seeking a visual walkthrough, watch our mechanic expertly guide you step by step through every stage of spring motorcycle maintenance—from checking air pressure and replacing brake pads to tuning up your spark plug and drive belt. See real-world demonstration of all tasks in under 15 minutes.

Frequently Asked Questions: How to Prep Motorcycle for Spring

  • What signs indicate my motorcycle needs professional spring maintenance?
  • How can I ensure my motorcycle battery survives next winter storage?
  • Can I perform a motorcycle maintenance check myself or visit a shop?
  • What’s included in a complete motorcycle maintenance checklist for spring?

If you notice trouble starting, lights that flicker, sluggish throttle, or visible leaks, seek a professional maintenance check. Storing your battery on a tender and keeping it fully charged can prevent damage during the next winter storage. While many riders perform basic checks themselves, visiting a reputable shop ensures a deep dive into hard-to-access parts like the drive belt and internal systems. A total spring motorcycle maintenance checklist reviews battery, brakes, tires, fluids, drive components, spark plugs, and lighting—all essential for safe spring riding.

Key Takeaways for How to Prep Motorcycle for Spring

  • Following a structured maintenance checklist extends your bike’s life.
  • Thorough motorcycle maintenance keeps you safe at the start of the riding season.
  • Doing proper maintenance now saves money and hassle later.
  • Always consult with a professional for complex repairs or if you have doubts about your motorcycle maintenance check.

Ready for Spring? Schedule Your Motorcycle Maintenance Check Today

Start your riding season on the right foot—Call Nasty Performance Motorcycle Shop Today: 847-458-4858

As you continue to refine your approach to motorcycle care, consider exploring broader strategies that go beyond spring prep. Our guide to seasonal bike care secrets every rider must know dives into year-round maintenance habits, helping you protect your investment and enjoy a safer, smoother ride no matter the season. Take your maintenance knowledge to the next level and ensure your bike is always ready for the road ahead.

Motorcycle Maintenance

0 Comments

Write A Comment

*
*
Please complete the captcha to submit your comment.
Related Posts All Posts

Common Mistakes In Motorcycle Brake Pad Replacement

Did you know that over 35% of DIY brake pad replacements end up with follow-up repairs due to simple mistakes? While changing brake pads on your motorcycle can save you money and offer a sense of accomplishment, a single overlooked step could put your safety at risk. Understanding and avoiding brake pad replacement mistakes is not just about saving costs—it’s about ensuring every ride is safe, smooth, and reliable. Whether you're an experienced do-it-yourselfer or just starting out with DIY brake pad replacement, this comprehensive guide will help you sidestep common pitfalls and master the art of changing brake pads safely. Understanding Brake Pad Replacement Mistakes Overview of brake pad replacement mistakes and their consequences: Even the most enthusiastic DIY brake pad replacement can go awry if critical steps are skipped. Common mistakes like improper pad alignment, failing to fully retract caliper pistons, or mismatching brake pads can lead to uneven wear, poor braking performance, and even brake system failure. These errors may not only damage the braking system but could also put you and others on the road in danger. Mistakes during pad replacement can translate to costly repairs and jeopardize the braking system’s reliability. Importance of avoiding common mistake in DIY brake pad replacement: Safety should always be the top priority when tackling brake jobs. Simple oversights—like not cleaning caliper guide pins or using incompatible friction material—can lead to squealing brakes, uneven pedal feel, or danger in emergency stops. Knowing the most frequent brake pad replacement mistakes empowers you to avoid them from the outset, ensuring each changing brake job boosts your motorcycle’s overall performance and secures your peace of mind. What You'll Learn About Brake Pad Replacement Mistakes Identifying typical brake pad mistakes: Pinpoint the most frequent slip-ups that plague DIY brake pad replacement jobs. Why pad replacement precision matters: Understand how every detail in changing brake pads contributes to your motorcycle’s safety and performance. How to improve your DIY brake pad replacement process: Gain actionable advice so you avoid brake pad replacement mistakes on your next brake job. Why Attention to Brake Pad Replacement Mistakes is Critical Impact of brake pad replacement mistakes on your motorcycle’s safety and braking system: A single common mistake, such as failing to secure brake pads or neglecting to lubricate caliper guide pins, can compromise your entire braking system. DIY brake jobs done incorrectly may cause uneven wear, noisy brakes, or even lead to brake fluid leaks. Each part of the braking system relies on proper pad replacement procedures—overlooking one can reduce braking performance, extend stopping distances, and cause unpredictable pedal feel that threatens safe riding. A quote from a trusted mechanic discussing common mistake in brake pad jobs: "One overlooked step in a brake pad replacement can compromise your entire braking system. Always double-check every component before hitting the road." – Certified Motorcycle Technician Table: Overview of the Most Frequent Brake Pad Replacement Mistakes Common Mistake Impact on Braking System How to Avoid Estimated DIY Difficulty Rating Not Retracting Caliper Pistons Fully Prevents new pads from fitting correctly and causes uneven wear. Use a proper tool to compress pistons fully before installing new pads. Moderate Improper Brake Pad Positioning Results in brake noise, vibration, and loss of braking performance. Align pads carefully and ensure proper seating in the caliper. Easy Skipping Lubrication Leads to stiff caliper movement and squeaky brakes. Apply brake grease to caliper guide pins and backs of pads. Easy Mismatched Brake Pads Inconsistent wear, reduced effectiveness, and potential caliper damage. Verify compatibility and always install matching pad sets. Easy For those looking to take their maintenance skills further, understanding how seasonal changes can impact your motorcycle’s performance is just as important as mastering brake pad replacement. You can discover practical tips for year-round care in this guide to seasonal bike care secrets every rider must know, which complements your DIY brake work with broader maintenance strategies. Preparation Steps: Avoiding Brake Pad Replacement Mistakes Before You Start Gathering proper tools for DIY brake pad replacement: Before tackling any brake job, ensure you have all the right tools on hand. This typically includes a torque wrench, caliper tool, brake pad spreader, high-quality gloves, and cleaning products. Using proper tools reduces the risk of damaging lug nuts, caliper guide pins, or the brake pad itself. Be sure to lay out all necessary equipment on a clear, organized workspace to streamline your pad replacement and help you avoid common mistakes that can arise from being unprepared. Inspecting brake pads and braking system before pad replacement: Before starting your DIY brake pad replacement, carefully inspect the current pads, brake rotors, and calipers. Check for uneven wear or signs of brake fluid leakage, as these can indicate underlying braking system issues. Ensuring components are in good condition reduces the risk of new pad replacement mistakes and helps you address problems that could affect your brake job’s effectiveness. Checking compatibility of replacement brake pads: Not all brake pads are created equal. Confirm that your replacements match your motorcycle’s make, model, and braking system specifications. Using mismatched pads can lead to inconsistent braking, excessive wear of the brake rotor, and increased risk for future brake pad replacement mistakes—so double-check before installing. Step-by-Step Guide: Correct Brake Pad Replacement Safely elevate your motorcycle and remove the wheels. Loosen lug nuts and detach the caliper, taking care not to hang the brake by the hose. This avoids strain on the brake hose and prevents brake fluid leaks. Completely retract the caliper pistons using a proper caliper tool. Ensure there is enough clearance for the new brake pads—don't force the pads, as this can damage the piston or caliper guide pin. Remove the old brake pads and carefully clean the caliper, guide pin, and rotor surface. Use brake cleaner to eliminate debris and old lubricant for a smooth pad replacement. Align the new brake pads properly in the caliper, ensuring they fit flush against the contact surface. Double-check their position to avoid common mistakes like uneven wear or noise. Apply a high-quality brake lubricant to the caliper guide pins and pad backing plates. This step is vital for smooth operation and to prevent squealing. Reinstall the brake caliper and torque all bolts to manufacturer specifications. Secure all components and ensure the brake pad is properly seated. Pump the brake lever or pedal several times to restore proper brake pad contact and pedal feel before riding. Monitor the system for leaks or warning lights. Proper brake pad alignment and installation tips: Always ensure pads sit flush against the rotor and check for any gaps or misalignment. Improper positioning can lead to reduced braking system performance and uneven pad wear. Key braking system checks during brake pad replacement: Examine caliper movement, rotor condition, and brake fluid level after each step. Resolve any abnormalities before continuing your brake job. Common DIY Brake Pad Replacement Mistakes Not fully retracting caliper pistons: A frequent error in DIY brake pad replacement, this prevents new pads from fitting and causes the brake caliper to bind or rub against the rotor, leading to reduced performance and uneven wear. Improper brake pad positioning: Incorrectly aligned pads can cause contact surface issues, brake squeal, and inefficient stopping power. Careful alignment is crucial for optimal braking system function. Skipping brake pad lubrication steps: Not lubricating caliper guide pins or pad backs results in sticky movement and persistently noisy brakes. Mismatched brake pads: Installing the wrong type or unevenly worn pads can cause inconsistent pedal feel, faster deterioration, and even damage to the caliper or rotor. Brake Pad Replacement Mistakes and the 30 30 30 Rule Explanation of the 30 30 30 break-in rule and its relevance to DIY brake pad jobs: The 30 30 30 rule is a proven break-in method after brake pad replacement: complete 30 gradual stops from 30 mph, spacing each stop about 30 seconds apart. This process evenly beds new pads into your disc brakes while ensuring proper friction material transfer. How improper brake pad replacement can make it difficult to implement the 30 30 30 rule: If pads are mismatched, installed incorrectly, or not properly lubricated, the break-in phase—critical to maximizing pad and rotor life—will not be effective. Skipping steps increases the risk of uneven wear and brake rotor damage, making even the best break-in routine much less effective. Signs You've Made a Brake Pad Replacement Mistake Common symptoms after DIY brake pad replacement mistakes: If you hear squealing, grinding, feel a pulsing brake pedal, or notice inconsistent pedal feel, your brake job may have gone wrong. These warning signs often indicate issues like sticking caliper guide pins, misplaced brake pads, or uneven contact with the rotor. Braking system warning indications: Look out for dashboard warning lights, visible brake fluid leaks around the caliper, or excessive brake dust shortly after pad replacement. Ignoring these warning signals can accelerate disc brakes and rotor damage. When to revisit your pad replacement job: If you experience any of the above or hear grinding/scraping shortly after DIY brake pad replacement, stop riding and re-examine every step. It’s better to redo a brake job than risk your safety or compromise the braking system further. How to Fix Brake Pad Replacement Mistakes and Ensure Safety Safely lift the motorcycle and remove the wheel and caliper as you did initially. Retract caliper pistons fully using a proper tool to ensure room for fitting new pads. Thoroughly clean the caliper guide pins, pad slots, and brake rotor surface with approved brake cleaner. Carefully realign new brake pads, ensuring both sides are seated evenly on the contact surface. Apply the correct lubricant to caliper guide pins and pad backs to prevent squealing and binding. Torque all bolts to the manufacturer’s specs for a secure fit and check all components for proper installation. Pump the brake lever or brake pedal to restore system pressure and check for leaks before test riding. Ensuring braking system integrity after brake pad replacement: Always check brake pedal or lever feel, inspect for leaks, and confirm pads and calipers move freely. Address warning lights on your dash immediately to protect your disc brakes and overall braking performance. When to seek professional help after a bad DIY brake job: If repeated attempts result in spongy pedal feel, persistent noises, or leakage, consult a certified mechanic. Some pad replacement issues, like damaged brake rotors or a compromised braking system, require specific expertise and diagnostic equipment. Expert Quote on the Dangers of Overlooking Brake Pad Replacement Mistakes "One overlooked step in a brake pad replacement can compromise your entire braking system. Always double-check every component before hitting the road." – Certified Motorcycle Technician People Also Ask: Brake Pad Replacement Mistakes What are common mistakes when installing brake pads? Skipping lubrication of caliper guide pins and pad backs, not seating pads correctly in the caliper, and ignoring torque specifications are some of the most frequent errors. Missing these steps leads to brake noise, uneven wear, and poor braking system performance—issues avoidable with careful attention during your pad replacement. What is the 30 30 30 rule for brakes? The 30 30 30 rule describes the break-in process for new brake pads: perform 30 gradual stops from 30 mph, each spaced about 30 seconds apart. This bedding-in routine allows friction material to transfer properly and ensures even contact surface wear, maximizing pad replacement effectiveness and disc brakes longevity. Does Les Schwab bleed brakes? Les Schwab shops generally include brake bleeding service during brake pad replacement if necessary to maintain optimal braking system function. Always confirm with your service provider when booking a brake job. How much do brake pads cost for a Mazda CX-5? Brake pad costs for a Mazda CX-5 can vary by location and product. Always consult certified shops or your dealership for accurate pad replacement estimates. Essential Tools and Products to Prevent Brake Pad Replacement Mistakes Recommended equipment for DIY brake pad replacement: Ensure you have a reliable torque wrench, caliper piston tool, brake cleaner, quality gloves, and a jack stand. Having the right gear makes your pad replacement smoother and minimizes the risk of damaging the braking system. Top-rated lubricants and cleaning products for brake pads and braking system: Use silicones or high-temp disc brakes grease for guide pins, and an approved, non-oil-based brake cleaner for rotors and calipers to keep everything moving smoothly and cleanly. Checklist for successful pad replacement job: New, compatible brake pads Brake cleaner and high-temp grease Torque wrench and piston retractor Gloves and eye protection Detailed shop manual for your specific model FAQs: Brake Pad Replacement Mistakes Can I drive after a DIY brake pad replacement if I suspect a mistake? It is strongly recommended not to drive until you’ve identified and corrected any possible brake pad replacement mistakes. Continuing to ride may worsen damage or compromise your safety. Always double-check your work if anything seems off. What if my braking system feels spongy after pad replacement? A spongy brake pedal or lever often signals air in the brake lines or insufficient pad contact. Re-bleed your brakes carefully, check all pad and caliper alignments, and ensure no brake fluid leaks are present. Persistent issues require professional inspection. How often should brake pads be checked and replaced? Brake pads should be checked as part of every major motorcycle maintenance schedule or at least every 5,000-7,000 miles, depending on usage. Replace pads when friction material is below minimum thickness, or sooner if uneven wear or performance loss is detected. Key Takeaways to Avoid Brake Pad Replacement Mistakes Always double-check alignment after changing brake pads to ensure perfect seating and avoid uneven wear. Follow the 30 30 30 break-in procedure after every DIY brake pad replacement for optimal bedding and longevity. Don’t overlook the braking system inspection after pad replacement—catch issues before they become safety hazards. Conclusion: Mastering Brake Pad Replacement and Avoiding Mistakes To prevent brake pad replacement mistakes, follow every step with care, check and double-check your work, and don’t hesitate to review your brake job if anything feels off. Consistent practice and a focus on learning are key to mastering DIY brake pad replacement and ensuring safety every ride. Keep honing your skills—confident, mistake-free brake jobs are within every DIY mechanic’s reach! If you’re committed to keeping your motorcycle in peak condition, don’t stop at just the brakes. Expanding your knowledge to include seasonal maintenance can help you anticipate issues before they arise and extend the life of every component. Explore seasonal bike care secrets every rider must know for expert advice on preparing your bike for changing weather, optimizing performance, and ensuring safe rides all year long. By integrating these advanced care strategies with your brake maintenance routine, you’ll be equipped to handle both everyday upkeep and the unique challenges each season brings. Take the next step in your DIY journey and make your motorcycle maintenance truly comprehensive. Ready to Safely Replace Your Pads? Call Nasty Performance Motorcycle Shop Today: 847-458-4858

Common Mistakes with Motorcycle Tire Pressure

While understanding the basics of tire pressure is essential, many riders overlook the importance of adjusting their approach as the seasons change. For a deeper dive into how temperature shifts and seasonal factors can impact your motorcycle’s performance and tire health, explore our guide on seasonal bike care strategies every rider should know. This resource offers practical tips for adapting your maintenance routine year-round. If you’re ready to take your motorcycle maintenance to the next level, don’t stop at tire pressure. Expanding your knowledge of comprehensive bike care—especially as the seasons change—can dramatically improve your ride’s reliability, safety, and longevity. Discover expert insights on preparing your motorcycle for every climate, from winter storage to spring tune-ups, by visiting our in-depth article on seasonal bike care secrets. Investing in a holistic maintenance approach ensures you’re always ready for the road ahead, no matter what the weather brings.

When To Conduct a Motorcycle Clutch Inspection

Did you know most unexpected breakdowns on the road can be traced back to neglected motorcycle clutch inspection? For riders, understanding when and how to check your clutch can mean the difference between a smooth cruise and being stranded unexpectedly. In this complete guide, we reveal why clutch inspection is an essential habit for every motorcycle owner, how to recognize early warning signs, and vital tips for maximizing your bike’s performance and safety. Unveiling the Importance of Motorcycle Clutch Inspection The motorcycle clutch is a vital component responsible for transferring power from the engine to the rear wheel, allowing smooth gear shifts and controlled acceleration. If overlooked, hidden clutch problems often escalate into serious mechanical issues and sudden breakdowns. A timely clutch inspection protects your investment, prevents costly repairs, and ensures the safety of you and your bike. Recognizing the importance of regular inspection is crucial. Clutch problems may begin subtly, with symptoms like a stiff clutch lever or odd vibrations. Many riders ignore these signs, only to face bigger problems later such as clutch slippage, sticking, or total loss of acceleration. By scheduling regular inspections and staying attentive to early warning signs, you greatly extend your clutch’s—and your bike’s—lifespan. "Did you know that neglecting regular motorcycle clutch inspection is one of the leading causes of unexpected breakdowns on the road?" What You'll Learn About Motorcycle Clutch Inspection The key signs indicating the need for a motorcycle clutch inspection Step-by-step process for conducting a clutch inspection How to identify clutch problems before they escalate When to involve a professional versus DIY Expert tips for optimizing clutch lever response and performance Understanding the Role of the Motorcycle Clutch The motorcycle clutch isn’t just a lever—it’s a sophisticated mechanism that manages the delicate transfer of engine power to the road, allowing smooth starts, effortless shifts, and controlled stops. Without the clutch, shifting gears or coming to a stop would be abrupt and potentially damaging. Understanding its role is the first step towards mastering clutch maintenance, helping you prevent clutch problems and optimize performance. Across all types of motorcycles, from dirt bikes to street bikes, the clutch assembly includes multiple crucial parts—clutch plates, friction plates, steel plates, clutch basket, pressure plate, clutch hub, and more. Each plays a pivotal role in the transfer of power and the ride quality. By grasping how the clutch works and recognizing how different components interact, riders become empowered to detect subtle issues before they evolve into major repairs. How the Motorcycle Clutch Functions The clutch operates by compressing or releasing clutch discs and friction plates between the clutch basket and pressure plate. When you pull the clutch lever, the plates separate, breaking the connection between the engine and rear wheel. This action allows you to change gears safely. When you release the lever, the plates re-engage, transmitting power again. Components such as the clutch hub, needle bearing, clutch spring, and clutch basket fingers must be in harmony for seamless operation. Any wear or warping of these parts may trigger issues like clutch drag (when the plates fail to fully disengage) or slippage (when friction plates fail to transfer full power). For hydraulic systems, the clutch’s operation depends on hydraulic fluid pressure. Both mechanical (cable) and hydraulic clutches require regular inspection to avoid progressive damage. Motorcycle Clutch Problems: Common Triggers and Impacts Clutch problems arise from several common sources. Worn clutch plates, warping due to excessive heat, poor cable adjustment, or contaminated hydraulic fluid can all lead to troublesome symptoms. Dirt bikes, for example, often suffer clutch wear from aggressive riding in off-road conditions, while street bikes may see clutch disc glazing from frequent stop-and-go traffic. The impacts of overlooked clutch issues are serious: reduced acceleration, strange noises during shifting, increased lever stiffness, and a slipping clutch that struggles under load. Over time, if the pressure plate and clutch hub are not inspected, you risk damaging the clutch basket or warping steel plates, leading to expensive repairs and compromised safety. Understanding these triggers is vital for effective inspection and preventative maintenance. Essential Timing: When To Conduct a Motorcycle Clutch Inspection Knowing when to conduct a motorcycle clutch inspection is as important as understanding how to perform one. Manufacturers generally recommend inspection intervals based on mileage and riding style, but attentive riders should always be alert to symptoms that demand immediate attention. Regular inspection ensures the clutch plate, friction plate, clutch discs, and related parts remain in proper working order, preserving both safety and motorcycle performance. Inspections aren’t just about distance traveled. They help identify subtle warning signs, prevent breakdowns, and can catch issues such as free play anomalies, cable tension problems, or the onset of rattling sounds. Monitoring your mileage and listening to your bike ensures you address problems before they escalate into larger, more costly repairs. Mileage-Based Motorcycle Clutch Inspection Intervals Most modern motorcycles benefit from a clutch inspection every 6,000 to 12,000 miles. However, your ideal interval varies depending on riding habits and bike type. Aggressive riders, racers, or those who commute frequently in heavy traffic often require more frequent inspections as clutch components wear faster. Dirt bikes may need checked every few months due to tougher conditions, while touring bikes typically have longer intervals. Always consult your owner’s manual for your motorcycle’s recommended service schedule. It’s best to err on the side of caution; if you notice symptoms like a spongy clutch lever, difficulty shifting, or changes in clutch engagement, conduct an inspection regardless of your last service date. Remember, a minor investment of time now can save you from a major repair bill later. Symptoms Suggesting Immediate Clutch Inspection Immediate inspection is warranted whenever you observe notable changes in clutch performance. Classic red flags include suddenly increased clutch lever travel, the presence of gear crunching, a feeling of the clutch slipping (where power delivery is inconsistent), or the emergence of rattling sounds near the clutch cover. Sticky or hard-to-pull levers, vibration under load, or visible clutch disc overheating are further warning signs that demand prompt attention. Pay attention to both how your bike rides and how it sounds. If a once-smooth shift now jerks, or you detect hesitation in power, these may indicate friction plate glazing, warped plates, or issues with the clutch basket or pressure plate. Swift diagnosis helps prevent further damage and ensures safer, more reliable rides. Comparison of Recommended Inspection Intervals by Motorcycle Type Motorcycle Type Recommended Inspection Interval Special Notes Standard/Commuter 6,000–8,000 miles Typical mixed-use conditions Dirt Bike/Off-Road Every 3–6 monthsor after every major ride Check more often due to harsher operating environments Sport Bike (Street) 8,000–10,000 miles More frequent for aggressive riders Touring/Cruiser 10,000–12,000 miles Less stress due to steady, long rides Custom/Performance Varies Inspect after tuning or track events How to Tell if Your Clutch is Bad on a Motorcycle Knowing how to identify a failing clutch can help you act fast and avoid being stranded. Here are common warning signs that indicate serious clutch problems: Difficulty shifting gears A spongy or tight clutch lever Slipping or sticking clutch Strange noises or vibrations Loss of acceleration When the clutch lever becomes hard to operate, or you feel the clutch fails to engage or disengage smoothly, it’s time to inspect for worn clutch plates, stretched cables, low hydraulic fluid, or warping in the pressure plate and clutch hub. Ignoring these problems may worsen wear on internal clutch discs, basket fingers, and may even damage the clutch basket itself. Always treat these symptoms as critical warnings to conduct immediate clutch inspection. What Does a Motorcycle Clutch Inspection Involve? A proper motorcycle clutch inspection consists of various steps, from general checks of the lever and cable to detailed examination of the clutch plates themselves. Both manual and hydraulic system motorcycles require careful assessment to catch issues early and maintain smooth clutch engagement. Inspectors begin by assessing free play at the clutch lever, cable adjustment, and inspecting for leaks or color change if the system is hydraulic. Next, they're looking for excessive play, unusual resistance, or changes in the feel of the lever—key indicators of internal clutch problems. A thorough inspection might include removing the clutch cover for a hands-on check of the clutch plates, friction plate, and basket. Preliminary Checks: Clutch Lever, Cable, and Fluid Start your clutch inspection by checking the free play at the clutch lever. There should be a small, but definite, amount of loose play—too much or too little indicates a need for cable adjustment. Check cable tension for signs of wear or fraying and lubricate as necessary. For bikes with hydraulic clutches, inspect the hydraulic fluid reservoir for proper levels and evidence of contamination or discoloration. Evaluate the smoothness of clutch lever movement. Any sponginess, excessive stiffness, or inconsistent resistance may signal deeper clutch problems. Don't forget to check for leaks in the hydraulic system, as low fluid or air contamination can drastically affect clutch engagement and performance. These preliminary checks set the stage for more detailed inspections if abnormalities are found. Step-by-Step Clutch Plate Inspection on a Motorcycle To check the health of your clutch plates and related components, you need basic tools, patience, and a methodical approach. Begin by ensuring your motorcycle is safely parked, turned off, and the engine is completely cool. Remove the clutch cover to access the clutch basket, pressure plate, clutch discs, and steel plates. Examine each clutch disc and friction plate for visible signs of wear, overheating (discoloration), warping, or grooves on the clutch basket fingers. Using a micrometer, measure the thickness of the plates and compare with manufacturer specifications—any plate thickness below spec means the component must be replaced. Note any uneven wear, chips, or signs of burnt friction surfaces which may indicate improper clutch spring tension or hydraulic problems. Reassemble carefully, ensuring the pressure plate and clutch hub are aligned and all components are torqued to the correct specs. How to Inspect Clutch Plates on a Motorcycle Here is a simplified outline for inspecting the clutch plates on your motorcycle. Always consult your owner’s manual for details specific to your model: Ensure the motorcycle is secured and cool Remove the clutch cover Examine clutch plates for wear, burning, or warping Measure plate thickness and compare to manufacturer specifications Reassemble with proper torque settings "Regular motorcycle clutch inspection helps riders avoid costly emergency repairs and ensures performance and safety on every ride." Top 5 Symptoms of a Bad Motorcycle Clutch Dragging clutch Clutch slippage under load Noisy operation during shifting Stiff or loose clutch lever Irregular clutch engagement If you encounter any of these symptoms, consider them urgent signals for a detailed clutch inspection. Address these issues before they lead to further damage of the clutch hub, basket, or pressure plate components. Expert Tips for Addressing Motorcycle Clutch Problems Handling clutch issues proactively is vital for every responsible rider. Here are actionable tips from seasoned professionals: First, establish a regular schedule for clutch lever and cable inspection. Lubricate moving parts regularly and monitor hydraulic fluid levels for any color or viscosity changes. Store your motorcycle properly and always allow the bike to warm up before demanding rides to prevent thermal shock and warping of the clutch discs and friction plate. When in doubt, consult a trusted mechanic familiar with your motorcycle type. When to Seek Professional Motorcycle Clutch Inspection DIY inspection can handle routine checks and maintenance, but certain issues—such as persistent clutch problems, rattling sounds, or apparent damage to the clutch basket or hub—require a trained eye. If you lack proper tools or are unsure about measurement specs, don’t hesitate to visit a reputable shop. Remember, clutch systems have little room for error, and improper inspection or assembly may worsen the problem. Seek professional inspection if you’re dealing with chronic slippage, noisy operation, excessive free play that cannot be adjusted out, or if you suspect hydraulic system leaks or contamination. It’s always better to be safe and seek help, especially with complex or performance motorcycles. Maintenance Best Practices for Preventing Clutch Problems Prevention is the best cure for clutch issues. Prioritize regular oil changes (especially for wet clutches), keep the cable and lever system free of debris, and follow manufacturer guidelines for clutch adjustment. Periodically check the basket fingers, pressure plate, and friction plate for scoring or grooves. In dry clutches, monitor dust buildup, since excess grime accelerates plate wear and clutch engagement issues. Riding habits also influence clutch longevity. Avoid riding the clutch unnecessarily (such as holding the lever at traffic lights), use smooth and deliberate gear shifts, and refrain from excessive aggressive acceleration. Proper storage and regular cleaning further extend clutch spring, clutch hub, and clutch basket lifespan, translating into smoother, more reliable performance. FAQs: Motorcycle Clutch Inspection and Clutch Problems How often should I inspect my motorcycle clutch? Most manufacturers suggest inspecting your motorcycle’s clutch every 6,000 to 12,000 miles, or more often for aggressive riding, harsh conditions, or older bikes. Always check your owner's manual for your specific model. Can I inspect the clutch myself, or should I go to a professional? Many preliminary checks (like free play and lever movement) and simple inspections can be done at home with basic tools. However, if you notice advanced symptoms like slippage, noise, or suspect internal wear, it’s best to consult a professional mechanic. What clutch problems are most common in modern motorcycles? The most common issues include worn or glazed friction plates, stretched cables, low or dirty hydraulic fluid, and warped steel plates or clutch basket fingers. Is clutch inspection different for dirt bikes versus street bikes? Yes—dirt bikes often require more frequent clutch inspections due to the harsher operating conditions and increased wear from aggressive off-road riding. Street and touring bikes may maintain longer intervals but require equal attention to detail. Key Takeaways from Your Motorcycle Clutch Inspection Timely inspections prolong clutch lifespan Recognizing early symptoms of clutch problems is critical DIY inspection is possible but professional help may be required for complex issues A well-maintained clutch lever ensures safety and smoother rides Contact Trusted Professionals for Your Next Motorcycle Clutch Inspection Ready to keep your bike running smoothly? Protect your investment and never compromise on safety—Call Nasty Performance Motorcycle Shop Today: 847-458-4858 "Protect your investment and never compromise on safety—Call Nasty Performance Motorcycle Shop Today: 847-458-4858" Conclusion: Proactive motorcycle clutch inspections guarantee safer, longer, and more enjoyable rides. Listen to your bike, follow inspection intervals, and trust professionals when in doubt for ultimate peace of mind. While understanding clutch inspection intervals is crucial, it's equally important to adapt your maintenance routine to the changing seasons. For practical advice on how weather and seasonal shifts can impact your bike’s performance and what steps you should take, explore these essential seasonal bike care secrets every rider should know. Mastering clutch inspection is just one part of keeping your motorcycle in peak condition year-round. To truly safeguard your ride and enjoy worry-free journeys, consider how comprehensive seasonal care can further enhance your bike’s reliability and longevity. Discover expert strategies for adapting your maintenance routine to every season and unlock advanced tips that go beyond the basics by visiting our in-depth guide on seasonal motorcycle care. Your next level of riding confidence starts with a holistic approach to maintenance.

Terms of Service

Privacy Policy

Core Modal Title

Sorry, no results found

You Might Find These Articles Interesting

T
Please Check Your Email
We Will Be Following Up Shortly
*
*
*