cropper
update

Nasty Performance ~ 847-458-4858 

update
  • Blog Home
  • Categories
    • Motorcycle Maintenance
    • Riding Tips & Preps
    • Safety & Inspection
    • Customizations & Upgrades
    • DIY Motorcycle Repairs
    • Motocycle Audio Systems
    • Motocycle Seasonal Care & Storage
    • Engine, Electrical Performance
  • Bike Night
  • Nasty Performance Motorcycle Shop
June 05.2026
1 Minute Read

Why the Importance of Motorcycle Chain Inspection Can’t Be Ignored

Curious how one overlooked detail could determine your next ride’s safety, performance, and cost? For many riders, the condition of their motorcycle chain is an afterthought—until a sudden breakdown or dodgy ride forces the issue. This comprehensive guide reveals why the importance of motorcycle chain inspection shouldn’t be underestimated, and how meticulous care sets the foundation for both thrilling rides and lasting peace of mind.

Unlocking Safety: The Importance of Motorcycle Chain Inspection

When considering motorcycle maintenance tips, few aspects are as critical—and often neglected—as the routine inspection of your drive chain and sprockets. The importance of motorcycle chain inspection is more than a mechanical afterthought; it's a core safety measure that directly affects how your bike handles, accelerates, and brakes. Whether your motorcycle is your daily commuter, weekend adventure machine, or a top entry on your list of motorcycles for sale, ensuring the health of your chain drive keeps both novice and seasoned riders secure on every journey.

Ignoring chain and sprocket wear can compromise your rear wheel stability, degrade fuel efficiency, and even lead to chain failure at high speed—an avoidable hazard no one wants to experience. Regular chain maintenance lets you identify issues before they evolve into serious safety risks, including uneven sprocket teeth, excessive slack, and worn sprocket surfaces. By adopting a proactive approach to chain and sprocket maintenance, riders avoid the pitfalls of excessive wear, sudden malfunctions, and costly repairs. Ultimately, chain inspection isn’t just a good idea—it’s a non-negotiable part of responsible motorcycling.

Well-maintained motorcycle chain and rear sprocket with clean metal gleam, chain maintenance visual

Opening Inquiry: How Often Do You Examine Your Motorcycle Chain?

Think about your ride routine: when was the last time you checked your motorcycle chain? For too many riders, it's only after their rear sprocket starts making noise or the chain feels loose mid-ride that maintenance comes to mind. Reflecting on this often-overlooked habit opens the door to developing a systematic, safety-first approach to motorcycle chain care. If the answer is vague or “not recently,” you may be overdue for a closer look.

Regular chain and sprocket inspection matters whether you’re tearing up the asphalt or cruising at leisure. Examining your drive chain doesn’t just prevent mechanical wear and tear; it extends your bike’s life and ensures each component—especially the chain and sprockets—work together seamlessly. By integrating a few simple habits into your routine, you’ll not only improve your machine’s performance but also reinforce good riding habits that benefit every journey.

As you refine your maintenance routine, it's also helpful to consider how seasonal changes can impact your motorcycle's components. For practical advice on adapting your care regimen throughout the year, explore these seasonal bike care secrets every rider should know to keep your chain and other vital parts in top condition.

What You’ll Learn About the Importance of Motorcycle Chain Inspection

  • Key indicators that your motorcycle chain needs attention
  • The relationship between chain and sprockets for rider safety
  • Step-by-step motorcycle chain maintenance tips
  • When to seek professional help for chain drive issues
  • Common misconceptions about chain and sprocket care

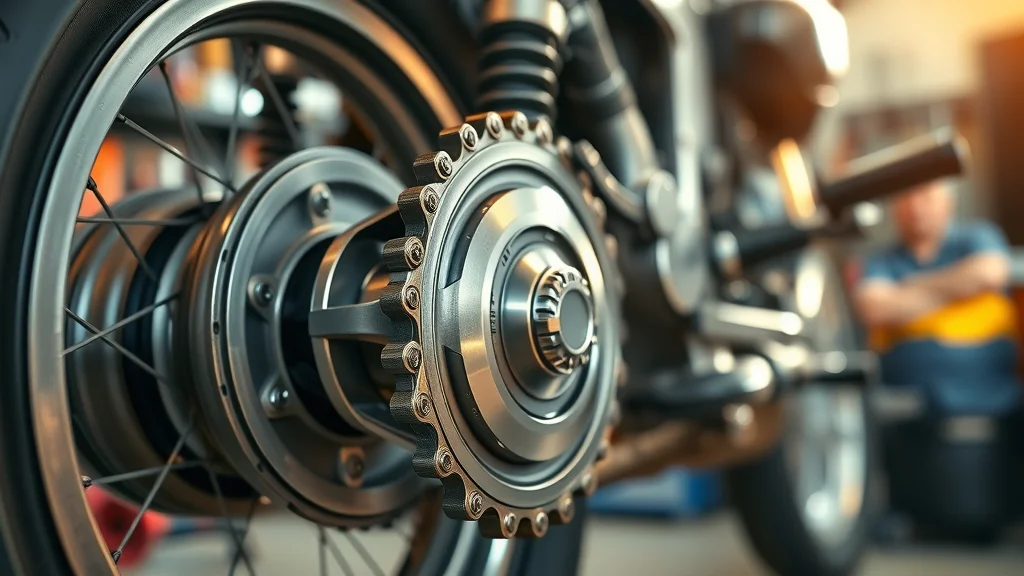
Understanding the Anatomy of a Motorcycle Chain and Sprockets

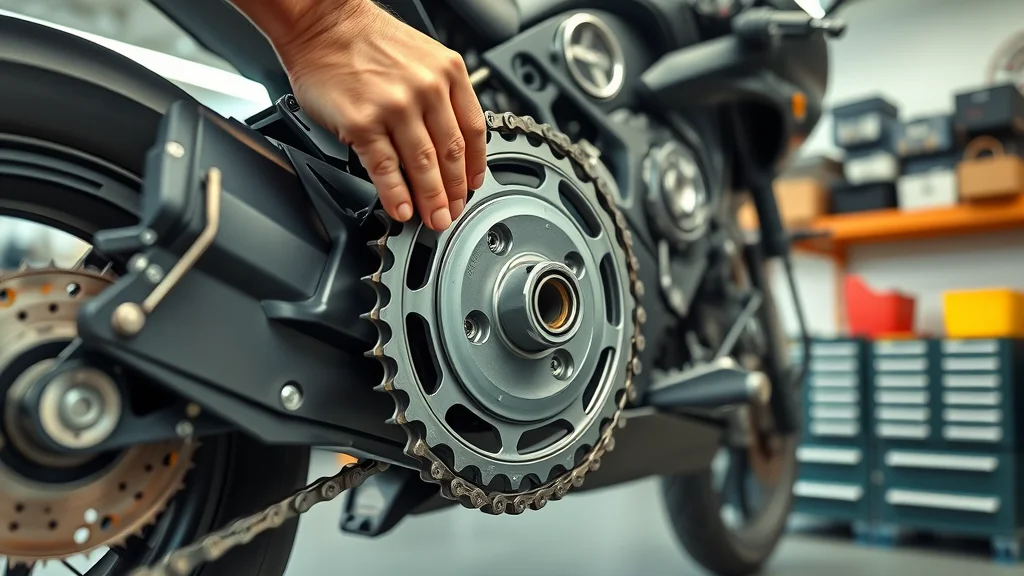
At the heart of motorcycle performance lies the intricate relationship between the chain and sprockets. Together, these components form the chain drive system, translating engine power into wheel motion. The chain—sometimes a standard or a ring chain—loops around the front sprocket (attached to the gearbox output) and the rear sprocket (mounted on the rear wheel). Every time you twist the throttle, the drive chain transmits torque, propelling you forward. A well-maintained motorcycle chain ensures smooth power delivery, precise acceleration, and stable braking, while neglected chains and sprockets quickly succumb to wear and tear.

Modern motorcycle chains come in a variety of styles: from classic roller chains to O-ring and X-ring chains, each requiring slightly different maintenance tips. Sprockets, whether front or rear, must be perfectly aligned and free of damaged teeth to keep the drive chain tension consistent. If the interplay between chain and sprocket isn’t balanced—through misalignment or excessive slack—both ride quality and safety are instantly compromised. Knowing these basics lets riders spot issues early and take corrective action before they spiral into expensive repairs or dangerous riding conditions.

Cutaway illustration of motorcycle chain and sprocket system mechanics, chain and sprocket maintenance

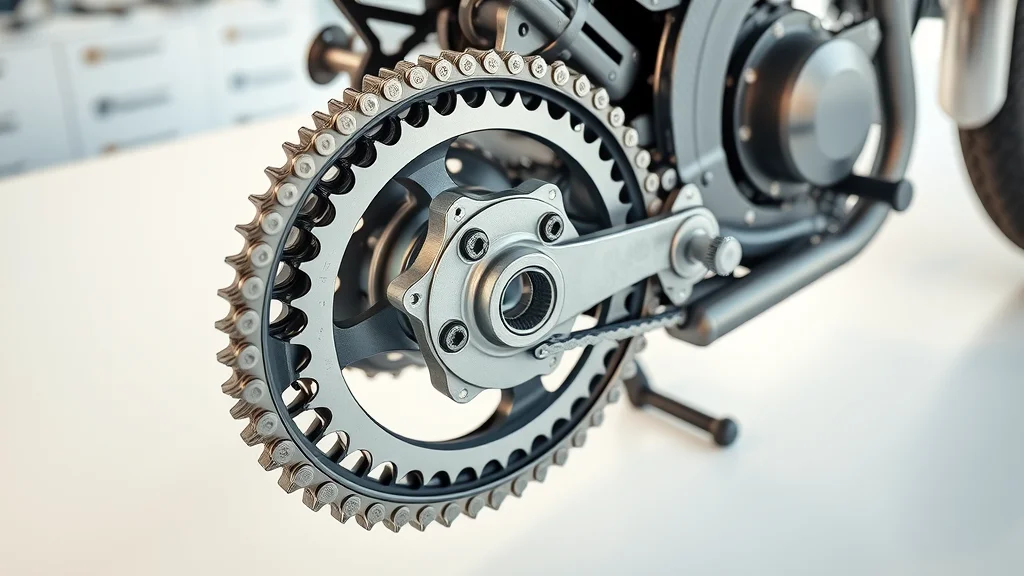
How the Drive Chain and Sprocket System Works

The drive chain and sprocket system acts as the muscle behind your motorcycle’s movement. To understand why chain maintenance is so important, consider how power moves: when you accelerate, energy passes from the engine to the gearbox, through the front sprocket, along the chain, and finally to the rear sprocket and wheel. This synergy lets your bike respond instantly to rider input, with the chain taking the brunt of stress, tension, and environmental conditions.

Over time, even the best-maintained drive chains experience elongation (stretch), which increases slack, affects chain and sprockets alignment, and can lead to slipped teeth or sudden failure. If the connection between the chain, front, and rear sprockets is compromised, your entire ride feels rough, noisy, and unpredictable. That's why both novice and experienced riders must regularly inspect the chain and assess wear not just on the bike chain, but also on the sprocket teeth, mounting points, and alignment—all essential for a safe, efficient ride.

The Critical Role of Chain Maintenance for Motorcycle Longevity

Consistent chain maintenance is the backbone of your motorcycle’s longevity and reliability. Ignoring chain inspection can have ripple effects throughout your bike, causing premature wear to the front and rear sprocket, reducing fuel efficiency, and even straining the rear tire due to uneven power delivery. With proper attention, both chain and sprockets remain in sync, delivering optimal performance and extending the time between replacements. It’s a simple routine that pays long-term dividends, saving both money and frustration—and keeping your motorcycle ready for every adventure.

Inspecting, cleaning, and lubricating the drive chain and sprockets on a regular schedule reduces the chances of encountering kinks, seized links, or rust—all of which can limit the lifespan of your bike chain or result in sudden failure. Many motorcycles for sale highlight recent chain maintenance as a selling point, underscoring just how vital this aspect is for both riders and buyers who prize peace of mind and performance.

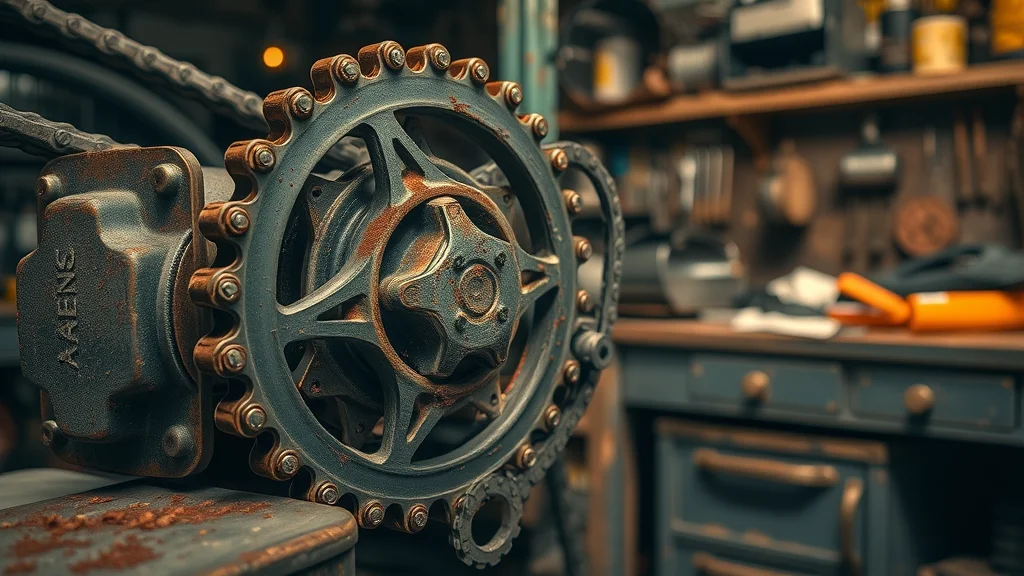
Chain and Sprocket Wear: What Riders Should Know

Wear and tear on the chain and sprockets presents itself in several recognizable forms—elongated or kinked links, sharp-edged sprocket teeth, and visible rust signal the need for immediate attention. Chains that stretch lose their ability to maintain proper chain tension, which stresses the rear wheel and can cause erratic handling. If you pull the chain away from the rear sprocket and notice excessive space or teeth that appear hooked or chipped, your chain drive has likely reached the end of its safe operating life.

To ensure both safety and reliability, always replace the chain and sprocket together as a set if you notice excessive wear on either component. Neglecting one risks premature damage to the other, since a worn sprocket quickly ruins a new chain, and vice versa. Good chain maintenance means proactively looking for these indicators and never ignoring subtle warnings like odd noises or changes in ride feel—each could spell trouble for your chain and drive system.

How Chain Drive Issues Affect Performance and Safety

A neglected or poorly maintained chain drive reduces both the fun and safety of riding. Misaligned chains put uneven stress on sprockets, causing premature failures and, in severe cases, slippage that can lead to sudden power loss or locked wheels. This jeopardizes your control, especially during sharp turns, braking, or emergency maneuvers—key moments when rider safety depends on reliable drive chain performance.

Beyond safety, ride quality takes a nosedive when chains and sprockets aren’t cared for. Noisy acceleration, jerky throttle response, and reduced fuel efficiency become frequent frustrations. If left unchecked, these issues often escalate to snapped chains or damaged sprockets, making repairs expensive and downtime unavoidable. With regular inspection and timely maintenance, riders can prevent these dangers and enjoy smooth, responsive performance mile after mile.

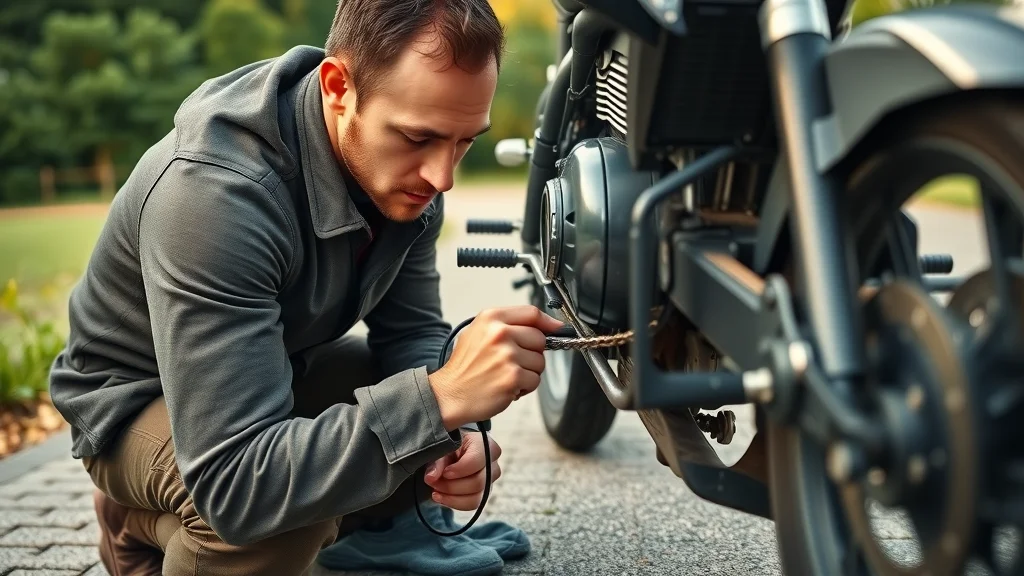
The Step-by-Step Motorcycle Chain Inspection Process

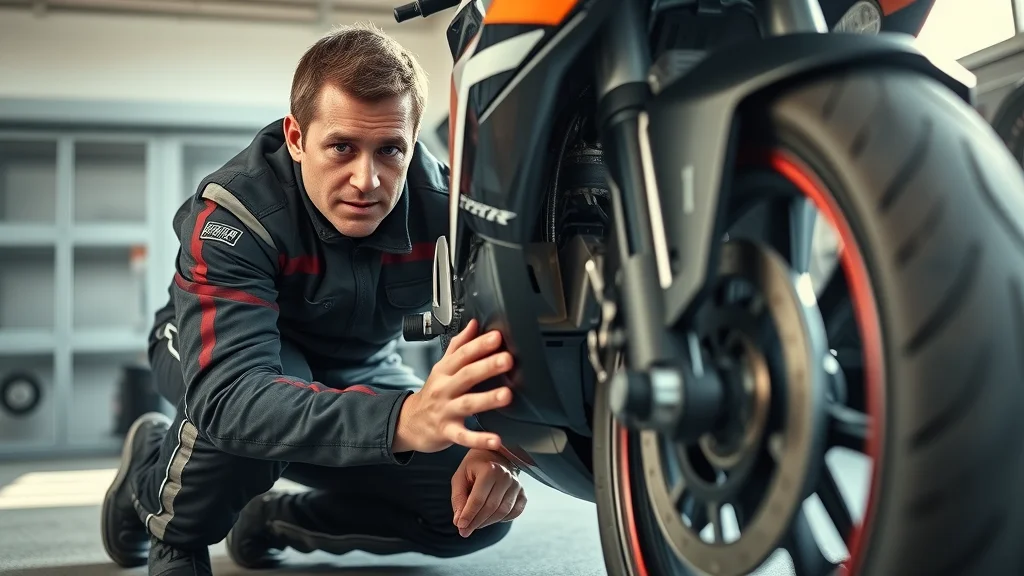
Implementing a thorough inspection routine is essential for every rider, whether you’re prepping for a long trip or simply commuting to work. Here’s how to make your motorcycle chain inspection both efficient and effective:

  1. Preparing your motorcycle for inspection: Place the bike on a center stand or suitable lift to elevate the rear tire and ensure stability. Gather basic tools like gloves, a flashlight, and a clean rag for your inspection.
  2. Checking chain tension: Importance and correct methods: Rotate the rear wheel gently and gauge the chain’s slack at its loosest point. Refer to your owner’s manual for correct measurements, often conducted mid-way on the chain between the front and rear sprocket. Too much slack invites jumping teeth, while too little strains the drivetrain.
  3. Assessing for visible damage and rust: Visually inspect both inner and outer portions of the chain for rust, stiff links, or debris. Look for excessive grime or build-up, which requires a chain clean session with appropriate chain cleaner.
  4. Measuring chain slack and wear: Measure slack by lightly pressing upward on the lower run of the chain midway between the sprockets. Excessive movement signals a stretched or worn chain that could slip under load.
  5. Evaluating sprocket condition: Examine the front and rear sprocket teeth for sharpness, uneven wear, or bent teeth. Check for side-to-side movement indicating potential misalignment or excessive wear.
  6. When chain replacement is required: If you notice significant stretching, worn sprocket teeth, or rust that cannot be removed, it’s best to replace the chain and sprocket set promptly to maintain performance and safety.

Attentive rider inspecting a motorcycle chain for chain tension, chain maintenance, and chain care

Best Practices for Motorcycle Chain Maintenance

  • Lubrication frequency and technique: Always lubricate your chain after cleaning, and ideally every 300-600 miles, or after riding in wet conditions.
  • Cleaning steps for optimum performance: Use an approved chain cleaner and a soft brush to remove dirt and debris, avoiding harsh chemicals that can damage O-ring or X-ring seals.
  • Using the right products for chain and sprockets: Stick to manufacturer-recommended lubricants and cleaning products to prevent premature wear on your drive chain and sprocket surfaces.
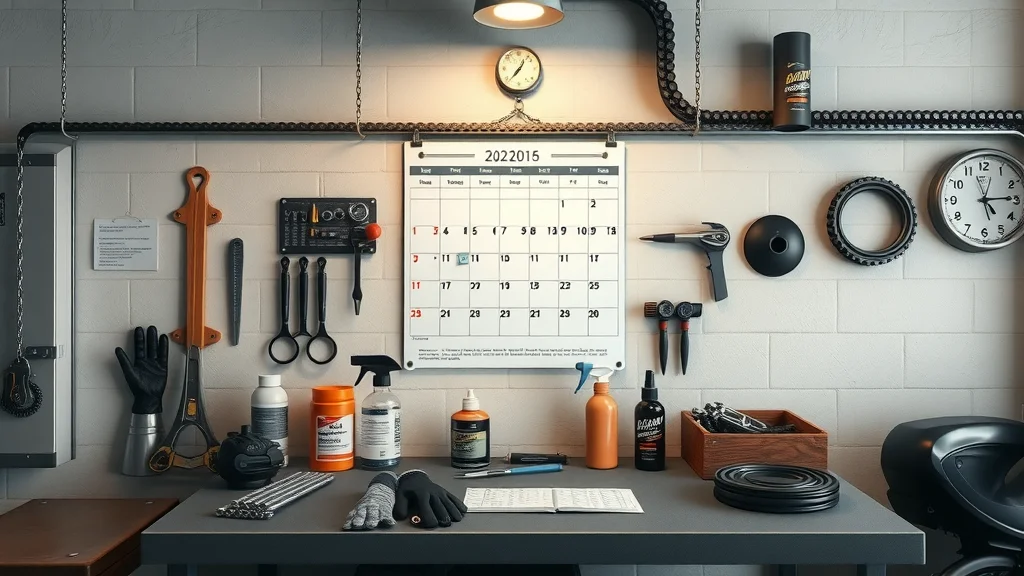
  • Maintenance tips from experts: Never over-tighten the chain drive and always check alignment when adjusting tension. Experts stress consistency: a well-kept maintenance calendar ensures reliability and longer component life.

Common Motorcycle Chain Inspection Mistakes to Avoid

Even the most diligent riders can fall into maintenance traps that reduce the effectiveness of their inspections. Avoiding these common mistakes helps safeguard your investment and keeps the ride smooth and trouble-free.

  • Over-tightening the chain drive
  • Neglecting chain and sprocket alignment
  • Ignoring manufacturer recommendations

Over-tightening may seem like a good idea to prevent chain slap, but it actually puts excessive strain on the center stand, rear sprocket, and gearbox bearings. Similarly, if you adjust the tension without checking the alignment, the front and rear sprocket may wear unevenly, reducing both safety and longevity. Failing to follow your bike’s specific inspection and maintenance guidelines, including the proper products for ring chain maintenance, can also invite avoidable wear and unnecessary costs.

Worn out and rusted motorcycle chain with misaligned sprocket, visual of chain maintenance gone wrong

Expert Insights: Why Chain Maintenance Matters

"Routine chain inspection is the single most overlooked aspect of motorcycle safety and longevity." — Industry Technician

This sentiment is echoed by countless mechanics and experienced riders alike. Chain maintenance isn’t just for the detail-oriented or mechanically inclined; it’s a pillar of motorcycle stewardship. A neglected drive chain can erode the integrity of your entire drivetrain, prompt excessive wear on chains and sprockets, and ultimately risk your safety on the road. Establishing a regular inspection and maintenance schedule isn’t just wise—it’s essential for maximizing both performance and rider confidence.

Listening to the wisdom of experts pays off: a few minutes spent today on chain care can mean thousands of safe, enjoyable miles tomorrow. By maintaining the harmonious relationship between the chain, front, and rear sprockets, you’ll ensure your motorcycle delivers peak performance while minimizing the risk of sudden failures or breakdowns when you least expect them.

Tables: Key Signs Your Motorcycle Chain Needs Immediate Attention

Sign What It Means Recommended Action
Visible rust Corrosion present Clean & lubricate, check for damage
Uneven wear on sprockets Chain misalignment or stretching Adjust or replace chain & sprockets
Excessive slack Chain elongation Adjust tension or replace
Noise during riding Poor lubrication or worn parts Inspect, lubricate, or replace

How Often Should You Perform Motorcycle Chain Inspection?

Riders often wonder how frequently to check their drive chain and sprockets. While manufacturer guidelines typically suggest inspecting the chain every 500-700 miles, real-world best practice is to examine your motorcycle chain at least once per month and after long or demanding rides. Environmental factors—such as rain, dust, or off-road use—can hasten wear, making regular audits even more crucial for riders who push their equipment to the limits.

Establishing a calendar reminder or a maintenance checklist in your garage can be the single best habit for maintaining your chain and sprockets. Investing a few minutes for inspection each month is a simple, effective way to prevent unexpected breakdowns and expensive component replacements.

Manufacturer Guidelines vs. Real World Recommendations

Manufacturer intervals provide a good baseline, but experienced riders know to look beyond the manual. Every bike and riding style is different—hard acceleration, frequent rain riding, or carrying heavy loads can all accelerate wear and require more frequent chain and sprocket checks. Incorporating visual and tactile checks of your chain drive components, in addition to following scheduled service intervals, ensures your motorcycle chain remains both reliable and safe regardless of how or where you ride.

In the real world, erring on the side of caution is wise. If ever in doubt, inspect the chain—and when clear signs of excessive wear, noise, or damage appear, prioritize chain maintenance or replacement as needed. Your rear wheel, ride quality, and safety are worth every minute spent on preventative care.

Organized maintenance area with calendar and checklist for motorcycle chain inspection, chain care system

People Also Ask: Answers You Need About Motorcycle Chain Care

What is the 4 second rule for motorcycles?

The 4 second rule for motorcycles recommends that riders maintain at least four seconds of following distance behind another vehicle. This helps provide sufficient time to react to unexpected hazards, which is crucial, especially if your drive chain or chain and sprocket components are not in optimal condition.

What is the three finger rule chain?

The three finger rule chain is a quick check method where three fingers should fit between the bottom of the chain and the swingarm when the chain is pressed upwards. This indicates proper chain tension. Incorrect tension can lead to premature damage to your drive chain and sprockets.

How often does a motorcycle chain need to be cleaned?

Ideally, a motorcycle chain should be cleaned every 500-700 miles, or more frequently after riding in rain or off-road conditions. Regular cleaning prevents buildup of grime and ensures your chain and sprocket system functions reliably.

Does a bigger rear sprocket make you go faster or slower?

A bigger rear sprocket will generally increase acceleration but decrease top speed, altering your chain drive dynamics. It's important to inspect chain wear if changing sprockets to ensure the drive chain maintains its integrity.

Motorcycle Chain Maintenance Tips: Expert Recommendations

  • Always lubricate your chain after cleaning
  • Inspect your chain and sprockets monthly
  • Replace the entire chain and sprocket set if excessive wear is spotted
  • Use manufacturer-recommended products for chain maintenance

FAQs About the Importance of Motorcycle Chain Inspection

  • Why is regular chain inspection recommended?
    Regular chain inspection is recommended because it detects issues before they become dangerous or costly. Early maintenance ensures safe power delivery and smooth ride quality.
  • How does improper chain maintenance lead to accidents?
    Improper maintenance can cause the chain to derail or break, potentially locking up the rear wheel and resulting in a loss of control or crashes, especially at high speeds.
  • What tools are needed for a basic chain inspection?
    A simple inspection requires a center stand, chain cleaner, soft brush, gloves, and a ruler or gauge to measure slack.
  • Can I inspect the chain at home or should I see a professional?
    Many riders can inspect the chain and perform basic maintenance at home. For severe wear, major adjustment, or if unsure, a professional service is the safest bet.

Key Takeaways on the Importance of Motorcycle Chain Inspection

  • Consistent chain inspection prevents costly repairs
  • Proper chain and sprockets care improves motorcycle safety
  • Chain maintenance extends the lifespan of your bike
  • Don't ignore subtle signs of chain drive wear

Instructional scene of motorcycle chain and sprocket replacement, chain maintenance demonstration

Committing to Regular Motorcycle Chain Inspection

Stay proactive with your chain maintenance regimen to ensure your motorcycle's reliability and safety. For professional service and expert care, Call Nasty Performance Motorcycle Shop Today: 847-458-4858.

If you’re ready to take your motorcycle maintenance to the next level, consider how a holistic approach can safeguard your ride year-round. Beyond chain inspection, understanding the nuances of seasonal care can help you anticipate issues before they arise and keep your bike performing at its best in any weather. Discover more expert strategies and essential routines in our comprehensive guide to seasonal bike care—your next step toward mastering motorcycle longevity and reliability.

Safety & Inspection

0 Comments

Write A Comment

*
*
Please complete the captcha to submit your comment.
Related Posts All Posts

Avoid These Common Mistakes in Motorcycle Riding Visibility

Did you know that visibility errors are among the top causes of motorcycle accidents, even among experienced riders? Mastering motorcycle riding visibility isn't just about looking good—it's a critical safety measure that can save lives, reduce hospital bills, and give every motorcycle rider that extra level of confidence on the road. In this comprehensive guide, we will break down the most common mistakes in motorcycle riding visibility, offer insight from experts, and give you actionable steps to become a more visible and safer rider. Startling Facts About Common Mistakes in Motorcycle Riding Visibility "A significant portion of motorcycle accidents can be traced back to simple visibility errors. Awareness is the first step to safety." — Certified Motorcycle Instructor According to top instructors, many motorcycle riding accidents don't occur because of reckless riding, but due to riders unintentionally blending into their surroundings or making avoidable decisions that limit their visibility. It's important to make yourself as visible as possible at all times – a step that, while simple, is frequently overlooked. By addressing these common mistakes in motorcycle riding visibility, you have a real opportunity to stay safe, whether you're passing through a busy urban street or cruising into the sun on open highways. Even the right lane position, correct use of full gear, and understanding of blind spots can make the difference between a safe ride and a close call. Technologies like LED lighting, high-visibility riding gear, and advanced intersection management techniques offer today's riders more opportunities than ever to be seen. Mistakes such as neglecting your gear or incorrectly choosing a motorcycle lane position are still commonplace, however. By learning and correcting these mistakes, you not only protect yourself but also reinforce responsible riding attitudes that benefit all motorists sharing the road. While mastering visibility is crucial, it's equally important to adapt your approach as seasons change. For practical advice on keeping your motorcycle in top condition throughout the year—which can also impact your safety and visibility—explore these seasonal bike care secrets every rider should know. What You'll Learn About Common Mistakes in Motorcycle Riding Visibility Key errors that reduce motorcycle riding visibility How mistakes in visibility relate to motorcycle accidents Expert tips for increasing riding safety at every skill level Proven gear and techniques to stay visible and safe Understanding the Importance of Motorcycle Riding Visibility Why Motorcycle Riding Visibility Matters Every motorcycle rider, regardless of skill level, faces challenges staying visible on the road. Unlike cars and trucks, motorcycles have narrow profiles and can easily disappear in a driver's blind spot or against a complex backdrop. Visibility is your first line of defense against motorcycle accidents—by making yourself stand out, you reduce the chances of being overlooked by a distracted driver. Proper visibility strategies mean wearing a bright, reflective helmet and full gear, using daytime running lights, and positioning yourself where you’re more likely to be seen. Good visibility isn't just about what you wear. Where you place your bike within the motorcycle lane, how you approach intersections, and your use of high beams under varying conditions all contribute to safer rides. Riders who understand these details tend to have fewer close calls, face lower hospital bills, and maintain greater total control during both daylight and nighttime hours. The Link Between Visibility and Motorcycle Accidents The connection between poor visibility and motorcycle accident rates is clear. Countless crash investigations point to a simple fact: when motorcycle riders are overlooked by other drivers, collisions are far more likely. Mistakes like not wearing high-visibility full gear, riding in a car's blind spot, or failing to proactively manage intersections are often cited in police reports following motorcycle accidents. These errors are very often the deciding factor between a minor scare and a life-changing event. Even advanced riding techniques and sharp skill level won’t help if basic visibility mistakes persist. Whether you’re an experienced commuter or a weekend adventurer, understanding these risks can help you make smarter decisions on your next ride. A focus on visibility has been shown to drastically reduce accident likelihood, emphasizing its place at the core of motorcycle safety. Common Mistakes in Motorcycle Riding Visibility Every Motorcycle Rider Should Avoid Ignoring the value of full gear for visibility Incorrect lane position and poor use of motorcycle lane position Failure to manage intersection management proactively Overlooking motorcycle blind spots and other vehicles' blind spots Improper use of high beams in varying conditions A surprising number of accidents happen because riders skip basic measures like wearing a bright helmet, choosing the correct side of the lane, or using headlights during daylight hours. Full gear isn’t just about crash protection—it dramatically boosts your visibility, especially in challenging weather or busy city environments. The wrong lane to choose can tuck you into a driver’s existing blind spot, while improper intersection management may leave you exposed. Many motorcyclists find themselves overly relying on high beams at inappropriate times, which can dangerously blind or confuse oncoming traffic. Recognizing and avoiding these common mistakes in motorcycle riding visibility will help you command more attention wherever you ride and drastically reduce your risk of a motorcycle accident. The Role of Lane Position in Motorcycle Riding Visibility Optimal Motorcycle Lane Position Tips Your motorcycle lane position is about more than just following traffic flow—it’s a powerful tool for boosting visibility and staying out of harm’s way. Smart riders don’t stick to one spot; they adjust their lane position depending on traffic, road hazards, and visibility concerns. For example, riding in the left side of the lane provides better visibility to traffic ahead but may also put you in a blind spot for cars waiting to turn left. On multilane roads, the correct lane choice might be the center, maximizing both your path of travel and reaction time. Pro-level motorcycle riders use lane position strategically: sometimes hugging the left lane for a better view through corners, or moving to the right for improved escape routes and to avoid obstacles. The key is continual adjustment for maximum visibility while retaining a safe cushion of space. Practicing dynamic lane positioning every ride will build your throttle control and overall total control, keeping you seen and reducing accident risk. Lane Position and Blind Spots: What You Must Know A critical aspect of motorcycle lane position is understanding blind spots—your own and those of other vehicles. Most cars have large areas on both sides where motorcycles disappear from view. Avoid riding next to another car’s rear wheel or directly alongside the driver’s seat, and don’t linger near trucks or buses. Instead, line up where you can see the driver in their mirror, ensuring you are visible at all times. Remember, changing lanes requires anticipating whether you’re moving out of the blind spot and into a zone where all drivers are aware of your position. Proper path of travel can transform your commute and protect you in heavy or unpredictable traffic. Understanding the relationship between lane position and visibility is one of the most effective ways to minimize your risk of a motorcycle accident. Full Gear: The Often-Neglected Key to Motorcycle Riding Visibility Choosing High-Visibility Full Gear for Maximum Safety If you want to stand out on the road, high-visibility full gear is your best investment. This means helmets, jackets, pants, and gloves designed with reflective patches, neon coloring, or bright contrasts that catch headlights even in low-light conditions. Opt for gear that combines crash protection with visibility features—multi-reflective surfaces, LED strips, and photoluminescent panels make huge improvements. Riders often underestimate how much their full gear affects the way they’re perceived by other drivers, especially in busy urban traffic or during dusk and dawn rides. Wearing a bright vest or helmet can make you instantly recognizable from hundreds of feet away, buying you plenty of time to react and reducing the odds of a dangerous encounter with a distracted driver. Every motorcycle rider, regardless of skill level or style, should prioritize high-vis gear as a daily essential. How Full Gear Reduces Risk in a Motorcycle Accident In the unfortunate event of a motorcycle accident, the benefits of full gear are twofold: not only does it protect your body from injury, but high-contrast and reflective gear often prevents accidents by making other drivers more likely to notice you and slow down. This visibility buffer is especially vital during low-light conditions, at red lights, and when vehicles are changing lanes unexpectedly. Full gear also signals to other motorists that you’re a serious and safety-minded rider, which can impact how closely they follow and interact with you on the road. In short, investing in full gear is an investment in your long-term safety, well-being, and riding enjoyment. Intersection Management Strategies for Motorcycle Riders Common Mistakes at Intersections and How to Avoid Them Intersection management is where many motorcycle accidents happen. Riders often misjudge the intentions of oncoming vehicles, fail to account for cars running red lights, or get lost in a car’s blind spot at the worst possible moment. Common mistakes include assuming a vehicle will yield, not establishing eye contact, and stopping in a vehicle's probable path of travel. To avoid these dangerous scenarios, always approach intersections with caution and a plan. Slow down early, scan for potential risks, and make your presence obvious—flash your high beams if needed, wear gear with reflective stripes, and avoid stopping too close to the center or left side of the lane. By positioning yourself slightly off-center, you maintain an escape route and remain visible to cross traffic even if their line selection is poor or their view is obscured. Skill Level and Intersection Management Techniques Riders at every skill level can enhance intersection management by practicing defensive strategies. Novice riders should be extra cautious, focusing on creating space and anticipating worst-case scenarios. Advanced riding techniques such as quick line selection, throttle control, and scanning for multiple hazards at once pay dividends at busy crossroads. One effective approach is always planning to leave an intersection with plenty of time, never speeding through on a yellow or challenging another car for right of way. Consistent practice of these skills will transform your riding experience, keeping you safer and boosting your overall confidence in complex traffic environments. Making intersection safety part of your routine is a key factor in reducing visibility-related motorcycle accidents. Blind Spots: Understanding and Avoiding Visibility Errors How to Identify Motorcycle Blind Spots Every motorcycle rider must know where they are most likely to vanish from a driver’s view. Typical blind spots are found along the rear quarter of most vehicles, near large pillars, and directly alongside large trucks. Using your mirrors, continually check whether you can see the faces of drivers you’re close to—if not, they probably can't see you. Equally important is understanding your own blind spots. Adjust your mirrors for maximum coverage, and physically look over your shoulder before changing lanes or merging. Routinely scanning for vehicles, especially near mergers or in stop-and-go traffic, keeps you more aware and less vulnerable to surprise lane changes. Reducing Risks From Other Drivers’ Blind Spots Reducing the risk from other drivers’ blind spots requires planning and defensive anticipation. Never ride close to a car’s rear wheel for extended periods; pass efficiently or fall back until you can see the car's mirrors. Predict when a distracted driver might make an unexpected move, such as veering into your path without signaling. Bright reflective gear and proper lane management also minimize your risk, but your best protection is smart positioning and alert riding. Assume most drivers will not see you unless you take deliberate steps to announce your presence—accomplished via signals, positioning, headlight usage, and subtle lane movements within the motorcycle lane. Mastering High Beams for Better Motorcycle Riding Visibility When to Use High Beams Safely Using your high beams effectively can make a massive difference in being spotted, particularly on rural roads, at dawn, or at night. However, correct use is essential; high beams are most effective when there’s no oncoming traffic and can enhance your visible “signature” to other drivers from a much greater distance. During daylight hours, flashing high beams briefly before intersections can catch a distracted driver's eye. At night, toggle between normal and high beams depending on nearby traffic to avoid blinding others. Remember, your goal is to illuminate yourself, not endanger someone else's path of travel. Mastering this aspect of your headlight use pays off in safer journeys and greater control. High Beam Mistakes That Lead to Motorcycle Accidents Mistiming or overusing high beams is a common mistake that can have dangerous consequences. Blinding oncoming drivers is not only illegal in many regions but risks initiating abrupt maneuvers, changing lanes into your path, and triggering multi-vehicle accidents. Other common errors include relying solely on high beams for visibility while ignoring gear and lane position, or forgetting to dim lights at intersections. To maintain the highest level of safety, always balance your use of high beams with other strategies like wearing full gear, riding in a correct lane position, and maintaining an escape route. Developing good habits now can prevent a serious motorcycle accident later. List of Most Overlooked Common Mistakes in Motorcycle Riding Visibility Failing to wear reflective gear Improper lane choices Relying solely on high beams Disregarding intersection threats Underestimating other drivers’ blind spots Expert Quotes on Avoiding Motorcycle Riding Visibility Mistakes "Being seen is your best defense on the road. Every skill level can benefit from prioritizing visibility." — Veteran Motorcycle Safety Coach Table: Quick Comparison of Visibility Techniques for Motorcycle Riders Technique Effectiveness Common Mistake Recommended Action Wearing Full Gear Very High Choosing dark or non-reflective gear Select high-visibility, reflective gear for all rides Lane Positioning High Staying in car blind spots Continuously adjust lane position for max visibility Intersection Management High Failing to anticipate driver actions Scan for risks, keep an escape route, make eye contact Using High Beams Medium Overuse or blinding others Use strategically for extra visibility—never to blind Avoiding Blind Spots Very High Lingering in others' blind spots Ride where you can see—and be seen—in mirrors People Also Ask: Motorcycle Riding Visibility and Related Questions What is the 1% rule in motorcycles? Answer: The 1% rule refers to the idea that only 1% of motorcycle riders belong to outlaw or 'one-percenter' clubs, emphasizing that most riders are law-abiding. This has no direct relation to visibility but highlights public perceptions that riders must actively refute by practicing safe and visible riding. What does 2 fingers down mean to bikers? Answer: The gesture of 2 fingers down is a biker salute indicating safety and solidarity. Although not about visibility, it reflects the strong community emphasis on mutual recognition and awareness. Why do bikers tap their helmet when they see a cop? Answer: Tapping the helmet is a signal to other riders alerting them of police presence, encouraging safe riding. This practice can also heighten awareness and reinforce vigilant, visible behavior on the road. Which bike is most liked by girls? Answer: Preferences vary widely and depend on comfort, design, and ease of handling; visibility features on bikes, such as bright colors and reflective elements, may appeal to riders who prioritize safety. Watch: Top 5 Common Motorcycle Visibility Mistakes and How to Fix Them. Frequently Asked Questions About Common Mistakes in Motorcycle Riding Visibility How can I immediately improve my motorcycle riding visibility? The fastest way to improve your visibility is by donning full gear with reflective and bright elements, using proper motorcycle lane position, and keeping your headlights on during all rides—even during daylight hours. What gear is best for being seen during daytime and nighttime rides? High-visibility helmets, jackets, and pants with built-in reflective strips or neon coloring are best. Look for certified motorcycle safety gear that enhances your presence both day and night. Why do most motorcycle accidents involve visibility errors? Many motorcycle accidents occur because drivers fail to see motorcycles due to their narrow profile, poor lane position, or insufficient reflective gear, making visibility a primary concern. Does lane position really make a difference in riding safety? Absolutely. Effective lane position strategies ensure you are seen by other drivers, avoid blind spots, and have time to react—reducing your risk on any ride. Key Takeaways: Enhancing Motorcycle Riding Visibility and Safety Wearing full gear and using proper motorcycle lane position can prevent accidents. Intersection management and high beam usage should be skill-level appropriate. Being aware of blind spots—yours and others’—is a daily necessity for every motorcycle rider. Ready to Stay Safe? Take charge of your safety and visibility every time you ride. Call Nasty Performance Motorcycle Shop Today: 847-458-4858 Enhancing your visibility is just one part of a comprehensive approach to motorcycle safety and enjoyment. To truly safeguard your riding experience, consider how seasonal changes can affect both your bike’s performance and your on-road presence. Dive deeper into expert strategies for year-round maintenance and discover how proactive care can keep you visible, safe, and confident in any weather by visiting our guide on seasonal bike care secrets every rider must know. By combining smart visibility habits with seasonal upkeep, you’ll be prepared for whatever the road—and the elements—throw your way.

Step-by-Step Guide to Motorcycle Accident Prevention That Works

Did you know? According to the National Highway Traffic Safety Administration, motorcycle riders are 29 times more likely to die in a crash than passenger car occupants. While riding a motorcycle brings an undeniable sense of freedom and excitement, it also comes with significant risks that demand respect, preparation, and expertise. In this comprehensive step-by-step guide to motorcycle accident prevention, we’ll uncover safety tips, strategies, and expert habits proven to keep riders safer on every journey—whether you’re a new enthusiast or an experienced road veteran. Why Follow a Step-by-Step Guide to Motorcycle Accident Prevention? Staying safe on two wheels requires far more than simply following the speed limit or wearing a helmet. Motorcycle safety is built on comprehensive preparation, understanding risk factors, and adopting a disciplined approach to every ride. A step-by-step guide to motorcycle accident prevention helps motorcycle riders systematically address each critical aspect of safety, ensuring nothing is left to chance or forgotten in the rush of the open road. By following a purposeful structure, motorcycle riders are empowered to reduce the risk of both minor incidents and serious motorcycle crashes, ultimately keeping roads safe for everyone. From learning proper motorcycle riding habits to understanding the most common causes of motorcycle accidents, utilizing a guidance-driven approach transforms casual habits into life-saving routines. Committing to these steps is essential for both personal protection and the collective safety of our communities, as every well-prepared rider contributes to accident reduction on roads shared with cars and trucks. Let’s explore what you’ll gain from this guide and take confident steps together towards smarter, safer motorcycling. Discovering essential motorcycle safety habits Understanding common causes of motorcycle accidents Learning practical safety tips for every motorcycle rider Applying a systematic approach to accident prevention What You'll Learn in This Step-by-Step Guide to Motorcycle Accident Prevention This educational guide is designed to help every motorcycle rider master accident prevention with practical, actionable steps. Whether you’re planning your first motorcycle ride or you’re a seasoned rider seeking a safety refresher, the content below will enhance your confidence on the road. It’s more than a collection of general safety tips—it’s a roadmap to making every ride safer, smarter, and more enjoyable. Prepare to deepen your understanding, sharpen your riding skills, and discover why proper gear, preparation, and training are pivotal in motorcycle safety. Core motorcycle accident prevention strategies How to enhance motorcycle safety through gear and practice The most effective safety tips for every motorcycle ride Expert insights for both novice and experienced motorcycle riders Opening Perspectives: Startling Motorcycle Accident Facts You Need to Know "Motorcycle accidents, while less frequent than car accidents, can result in severe injuries due to the lack of protection. Understanding this risk is the first step in motorcycle safety." – Motorcycle Safety Foundation Trainer Despite advances in technology and the increased visibility of motorcycles on today’s roads, motorcycle accidents remain a serious concern. Unlike in a car or truck, a motorcycle rider is more exposed and has less margin for error in incidents involving evasive maneuvers, collisions, or loss of control. According to traffic crash data from the national highway safety authorities, fatality rates in motorcycle crashes have remained considerably higher than those for other types of motor vehicles. Typical causes include improper lane changes, ignored turn signals, and unsafe speeds. These facts highlight the critical importance of being proactive and informed—a goal that this step-by-step guide to motorcycle accident prevention aims to achieve. Recognizing the unique risks associated with motorcycle riding is empowering. By understanding these statistics and the common scenarios leading to motorcycle accidents, both new and experienced riders can take meaningful steps to reduce the risk, prioritize safety, and share the road responsibly. In addition to mastering accident prevention techniques, it's important to remember that regular maintenance and seasonal care play a crucial role in keeping your motorcycle safe and reliable. For practical advice on how to protect your bike year-round, check out these seasonal bike care secrets every rider should know to ensure your ride is always in top condition. Step 1: Motorcycle Rider Preparation and Attitude Building the Right Mindset for Motorcycle Safety Effective motorcycle riding starts long before the engine turns over. The safest motorcycle riders cultivate a mindset that prioritizes caution, anticipation, and respect for the unpredictability of the open road. Rather than viewing safety tips as tedious, experienced riders recognize that these habits keep them focused and in control, no matter the distance or destination. Motorcycle accident prevention is less about luck and more about preparation and awareness—qualities that are developed, not inherited. Always approach each motorcycle ride with a plan: Know your route, the current weather conditions, and your own mental and physical state. If you’re tired, distracted, or agitated, riding a motorcycle becomes significantly more dangerous. Training your mindset means remaining alert to risks, treating other drivers and riders with respect, and refusing to take unnecessary chances. By embedding these attitudes in your routine, you actively help reduce the risk of becoming another motorcycle accident statistic. Performing Pre-Ride Motorcycle Safety Checks Preparation is not only mental—it’s deeply mechanical. Before every motorcycle ride, make a habit of conducting a thorough pre-ride safety check. Start by examining your tires: Ensure proper pressure and look for wear or embedded objects. Check fluid levels (oil, brake, coolant) to maintain engine health and braking performance. Test turn signals, brake lights, and headlights to guarantee visibility to others on the road. Verify that your brakes feel responsive and that your chain or belt is secure. Most states require motorcycle riders to maintain their bikes in safe, roadworthy condition. Routine checks are a vital safety tip that can prevent breakdowns, loss of control, or dangerous situations in traffic. By treating this step as non-negotiable, you’ll increase your confidence, minimize the risk of an unexpected motorcycle crash, and set the tone for a responsible, enjoyable ride. Step 2: Essential Motorcycle Gear for Accident Prevention Choosing the best helmet for motorcycle crash protection Selecting proper motorcycle gear for safety The importance of visibility for motorcycle riders Wearing the right motorcycle gear is one of the most effective ways to reduce injuries in the event of a motorcycle accident. Despite motorcycle helmet laws in many states, not all riders fully appreciate the critical protection provided by modern safety gear. Every motorcycle ride presents unpredictable risks—from loose gravel and sudden rain to distracted drivers—so investing in high-quality, certified gear is essential. A certified helmet meeting DOT or ECE standards remains your most important piece of gear, protecting against catastrophic head injuries in a motorcycle crash. Jackets with CE-approved armor safeguard your torso from abrasion and impact, while gloves—especially those with reinforced palms—help prevent hand injuries in a fall. Over-the-ankle boots not only protect the feet and ankles but also provide support during sharp maneuvers. For added visibility, choose gear with reflective material to stay noticeable during night rides or low-visibility conditions. Below is a table summarizing the purposes and standards for each essential item: Purpose Gear Type Safety Standard Head Protection Helmet DOT/ECE Torso Abrasion & Impact Jacket CE Approved Hand Protection Gloves Reinforced Palm Foot & Ankle Protection Boots Over-Ankle Coverage Step 3: Mastering Safe Motorcycle Riding Techniques Understanding Speed Limits and Their Role in Motorcycle Accident Prevention Speed limits are established to maximize safety for all road users, including motorcycle riders. Riding above the speed limit—even if just by a few miles per hour—drastically increases your risk of a motorcycle crash and reduces your ability to react to hazards such as sudden lane changes or unexpected debris. Respecting the speed limit also allows better control on curves and corners, which are common areas for single-vehicle motorcycle accidents. Maintaining a controlled speed on your motorcycle ride is vital for your own safety and that of others. Remember, it’s easier to avoid a collision, change direction, or stop suddenly when traveling at the posted speed. As an added safety tip, regularly scan the area ahead for changes in the speed limit, and be mindful that wet or slippery roads often call for speeds well below posted limits for safe operation. How to Handle Corners, Intersections, and Hazards on Every Motorcycle Ride Motorcycle crashes often occur at intersections and on sharp corners, places where cars and trucks may overlook the presence of a motorcycle rider. To reduce risk, anticipate the actions of other motorists, approach bends and intersections with caution, and remember that speed must decrease before entering a curve—not during the turn. Always be prepared to brake smoothly and use both brakes when needed for maximum stability. Hazards such as potholes, oil, gravel, or wet leaves can turn a routine maneuver into a dangerous one. Wherever possible, choose your line through a corner to maximize your sight distance and avoid unexpected obstacles. At intersections, ensure your intentions are clear by using turn signals early and making eye contact with drivers. The safest motorcycle riders actively assume they may not be seen, doubling down on visibility and caution at every crossing. Defensive Riding: Sharing the Road Safely Defensive riding is the art of anticipating the mistakes of others and having a plan to respond. Motorcycle operators are especially vulnerable to the blind spots of cars and trucks, so position yourself where you are most visible and never assume another driver can see you. Practice the “4 second rule” by maintaining at least four seconds’ distance between you and the vehicle in front, giving you more time to react to sudden stops or obstacles. To share the road effectively, never ride aggressively or weave through traffic. Use reflective material and bright gear to increase visibility, always use turn signals, and scan for movement in mirrors and side streets. By adopting a defensive posture, you not only protect yourself from unpredictable traffic crashes but also foster a safer environment for fellow riders and motorists alike. Step 4: Preparing for Adverse Conditions and Unexpected Motorcycle Accidents Techniques for riding a motorcycle in wet or low-visibility conditions Responding to emergency situations and near-accidents The value of ongoing motorcycle safety training for every rider Riding a motorcycle in adverse conditions—such as rain, fog, or icy roads—demands heightened skill and preparation. Slow down and increase your following distance even further when traction is reduced, and avoid sudden throttle changes, hard braking, or abrupt steering. Use your headlight and gear with reflective material to stay visible and navigate curves with as little lean as possible. When visibility drops, assume nearby drivers may not see you until you’re directly in their line of vision. Emergency situations such as unexpected stops or near-accidents require clear-headed, practiced responses. Experienced riders often attend ongoing motorcycle safety training to refine their skills in evasive maneuvers and quick stops. Regular rider education classes also introduce riders to new safety technologies, updated laws, and best practices—a worthwhile investment for anyone who values prevention over recovery. Remember, riding smart today could save your life tomorrow. Step 5: The Role of Motorcycle Insurance in Accident Prevention How motorcycle insurance supports accident recovery Understanding what motorcycle insurance covers Why every motorcycle rider needs proper coverage While riding skills and protective motorcycle gear dramatically lower injury risks, no amount of preparation can guarantee absolute safety on every motorcycle ride. Motorcycle insurance is your financial safety net, supporting accident recovery when the unexpected happens. Comprehensive motorcycle insurance policies cover medical expenses, bike repairs, and even liability if you’re involved in an accident with another motor vehicle. Some policies also protect against theft, vandalism, and uninsured drivers. Choosing the right coverage goes beyond fulfilling state legal requirements. The best insurance policies are tailored to your riding style, covering not just the basics, but also providing peace of mind on every journey. Having robust motorcycle insurance means you can focus on riding with confidence, knowing that you’re protected if the worst occurs. Insurance is not just a safety tip—it’s an integral part of any responsible motorcycle accident prevention plan. Watch this footage compilation to see accident prevention strategies in real-world situations: observe pre-ride safety checks, defensive city riding, proper gear choices, and wet-road handling. Both new and experienced riders demonstrate how even small habits make a significant difference in real-life scenarios. Essential Motorcycle Accident Safety Tips Recap Always perform a pre-ride safety check Wear certified motorcycle gear at all times Adhere to speed limits and road rules Maintain a defensive riding posture Stay updated with regular motorcycle safety training People Also Ask: Step-by-Step Guide to Motorcycle Accident Prevention What are the steps in the accident prevention process? Preparation and mindset Wearing proper motorcycle gear Practicing safe riding techniques Training for adverse conditions Securing motorcycle insurance What does 2 fingers down mean to bikers? The '2 fingers down' gesture is a sign of motorcycle rider respect, often meaning 'stay safe' or 'keep two wheels on the ground.' What is the 4 second rule on a motorcycle? The 4 second rule helps motorcycle riders maintain safe following distance, allowing more time to react to hazards. What are the 5 safety tips for motorcycle riders? Always wear protective gear Stay visible at all times Obey speed limits Avoid distractions Take regular motorcycle safety courses Key Takeaways: Mastering Motorcycle Accident Prevention A step-by-step approach dramatically enhances motorcycle safety Preparation, knowledge, and the right gear are essential Defensive techniques and ongoing education can prevent most motorcycle accidents Frequently Asked Questions About Motorcycle Accident Prevention How often should you service your motorcycle for safety? It’s best to follow the manufacturer’s recommended service schedule—usually every 3,000 to 5,000 miles or every six months, whichever comes first. Regular checks of tires, brakes, fluids, and lights before each ride also enhance motorcycle safety. What is the best motorcycle gear for accident prevention? The best motorcycle gear includes a DOT/ECE-certified helmet, CE-armored jacket and pants, reinforced gloves, and boots with over-ankle coverage. Gear with reflective elements increases visibility and provides superior protection in the event of a crash. Can motorcycle insurance lower accident-related costs? Yes, motorcycle insurance covers repairs, medical bills, and liability, significantly reducing your financial burden after an accident. Comprehensive coverage often includes theft, weather damage, and uninsured/underinsured motorist protection. What training courses are recommended for motorcycle riders? New riders should complete a certified Motorcycle Safety Foundation (MSF) course. Experienced riders can benefit from advanced skills courses and periodic refresher sessions to keep their motorcycle accident prevention knowledge current. Speak to Experts About Motorcycle Accident Prevention "Don’t leave your safety to chance. Every ride is safer with preparation—and expert advice can make all the difference." Ready to improve your motorcycle accident prevention plan? Call Nasty Performance Motorcycle Shop Today: 847-458-4858 Every journey starts with preparation—master accident prevention today, and keep every motorcycle ride safe for tomorrow. Motorcycle safety is a lifelong commitment, and the most prepared riders know that prevention extends beyond the basics. If you’re ready to take your riding experience to the next level, consider exploring advanced maintenance and care strategies that adapt to every season. By staying proactive with your bike’s upkeep, you’ll not only enhance performance but also reinforce the safety habits outlined in this guide. Discover how seasonal adjustments can make a difference by visiting our resource on seasonal bike care secrets every rider must know—and keep your motorcycle adventure safe, smooth, and enjoyable all year long.

How to Check Motorcycle Fluid Levels Like a Pro

Do you really know how to check motorcycle fluid levels, or are you trusting luck with your engine’s health? Let’s challenge what you think you know—and make sure you’re not missing a simple step that could save your ride. Are You Confident in How to Check Motorcycle Fluid Levels? When was the last time you checked your motorcycle oil or glanced at the inspection window to verify fluid levels? Even experienced riders sometimes miss the signs of low engine oil level, leading to possible engine damage or compromised safety out on the road. How to check motorcycle fluid levels is a skill that every rider, new or seasoned, should master. This guide provides practical, easy-to-follow instructions that ensure you’re getting an accurate oil reading—no guessing, no assuming, just confident maintenance. By understanding how to use the sight glass or dip stick, and by knowing what to look for in your motorcycle engine oil, you guarantee your ride always runs at peak performance. Most modern motorcycles are equipped with simple tools for checking oil, coolant, and brake fluids, but knowing exactly when and how to check them is what sets a pro apart from a weekend rider. This article gives you the step-by-step approach, including when and how often to perform regular checks, so your next full riding season is as smooth as possible. The essential motorcycle fluids and their roles Step-by-step instructions for checking engine oil, coolant, and brake fluid When and how often you should inspect fluid levels Expert tips on avoiding common mistakes while checking motorcycle oil and other fluids Tools and tips from industry professionals Essential Motorcycle Fluids Comparison Fluid Type Function Signs of Low Level Checking Method Engine Oil Lubricates motorcycle engine Unusual noises, overheating Inspection window/dipstick Coolant Regulates motorcycle engine temp. Overheating, low reservoir Reservoir mark Brake Fluid Enables responsive braking Spongy brakes, warning light Reservoir window Understanding Why You Should Check Motorcycle Fluid Levels Regularly Maintaining the correct engine oil and fluid levels in your bike is more than just routine—it's the difference between a perfectly tuned machine and expensive motorcycle engine repairs. Your motorcycle engine depends on engine oil to reduce friction, absorb heat, and keep all the moving parts running smoothly. If even one fluid is running low, you risk severe wear or a total breakdown, especially on longer rides where high temperatures and stress are common. The oil level, visible via the inspection window or dip stick, must always sit within the designated range for optimum performance. Low fluid means your engine oil can't lubricate or cool your parts adequately, potentially leading to overheating or bearing failures. Similarly, low coolant or brake fluid levels can trigger spongy brakes, overheating, and even a loss of control. Recognizing these signs early and performing regular checks are essential to keeping your motorcycle engine in top shape. "Neglecting to check your motorcycle’s oil level and other fluids can turn a simple ride into an expensive repair." — Certified Motorcycle Technician Step-by-Step Guide: How to Check Motorcycle Fluid Levels Accurately How to Check Engine Oil: Using the Inspection Window and Dipstick Properly checking your motorcycle engine oil is simple but requires attention to detail. Begin by letting the motorcycle engine run briefly so the oil circulates—this ensures an accurate oil reading. After a few minutes, turn the bike off and let it cool so the engine oil sits evenly throughout the sight glass. With your bike level (not leaning on its kickstand), locate the inspection window or dipstick, usually found around the lower side of the engine. If using the sight glass, check that the oil line sits between the 'min' and 'max' marks. The oil should be clear, not cloudy, and shouldn’t have an unusual smell—both are signs of contamination. For bikes with a dip stick, remove it, wipe it clean, reinsert, then pull it out again to check the oil reading against the marks. This ensures an accurate reading and helps catch any issues before they escalate. Remember, always replace the cap securely after checking. For riders looking to take their maintenance skills further, understanding the nuances of seasonal care can make a significant difference in your bike’s longevity. Discover practical strategies for adapting your fluid checks and overall maintenance to changing weather in this guide to seasonal bike care secrets. Warm up the motorcycle engine briefly, then let it cool. Place the bike upright—not just on the kickstand—for accurate oil level reading. Locate the inspection window or dipstick as shown in your motorcycle manual. Observe engine oil in the inspection window, ensuring the oil level is between marks. If using a dipstick, wipe, insert, remove, and check motorcycle oil level against marks. Checking Motorcycle Coolant and Brake Fluid Levels While engine oil gets the most attention, your motorcycle engine relies equally on coolant for temperature control and brake fluid for responsive, safe stops. To check coolant levels, find the reservoir and inspect the level in relation to the 'min' and 'max' lines, always with the engine cool to avoid burns or pressure spray. Brake fluid level can be checked through a sight glass or reservoir window; the fluid should always rise above the minimum line for safe braking. Never mix fluid types—even if brands seem similar, differences in chemical composition can harm seals or the motorcycle engine itself. And always check for leaks beneath your bike or around hoses after checking fluids; a sudden drop in level usually means a gasket or line needs immediate attention. Keeping up with these quick inspections helps catch little problems before they become emergencies. Find the coolant reservoir and compare fluid against 'min'/'max' marks Inspect the brake fluid reservoir window; fluid should be above the minimum line Never mix different types of motorcycle fluids Check motorcycle for leaks "Checking your motorcycle’s fluids is the fastest way to catch small problems before they become big ones." Pro Tips for How to Check Motorcycle Fluid Levels Checking motorcycle fluids isn’t just about topping off what's low—it's about consistent, detail-oriented habits that make all the difference. Always inspect motorcycle oil with your bike on a level surface to guarantee an accurate oil reading. Choose proper lighting, whether in your garage or at a shop, so you can clearly see sight glasses and fluid levels. Pay attention to oil color and smell—dirty or burned oil signals it’s time for a change or there’s a deeper issue with your motorcycle engine oil. After checking, double-check that all filler caps are tightened and sealed to prevent leaks and contamination. Make checking your motorcycle’s engine oil, coolant, and brake fluid part of your pre-ride routine, especially before long road trips or full riding seasons. Regular checks not only extend the life of your engine but help you develop a deeper familiarity with your bike, so you’ll notice if something feels or looks off even before problems escalate. Always inspect motorcycle engine oil on a level surface Use proper lighting to see inspection windows Replace caps securely after checking motorcycle oil or brake fluid Inspect oil color and scent for signs of contamination Schedule regular checks before long rides People Also Ask: Key Motorcycle Fluid Questions Answered What is the 4 second rule on a motorcycle? The 4 second rule means keeping enough distance from the vehicle in front of you so you have a four-second reaction window in case they stop suddenly. This keeps both you and your motorcycle engine safe from sudden stops or accidents. Do you check motorcycle oil on kickstand or straight up? Always check motorcycle oil with the bike upright and level, not on the kickstand. This ensures an accurate reading with the inspection window or dipstick for precise engine oil measurement. How to tell if motorcycle oil is low? Check the engine oil level using the inspection window or dipstick. If the oil level is below the minimum mark or no oil is visible, top up immediately and investigate for possible motorcycle engine leaks or issues. Do you check your motorcycle oil hot or cold? Refer to your owner's manual, but generally, let the motorcycle engine warm up, then sit for a few minutes to cool. This will help you accurately check motorcycle oil level and avoid misleading readings. FAQs: Common Questions About How to Check Motorcycle Fluid Levels What are the signs of bad motorcycle engine oil? How often should I check motorcycle oil levels? Can I use car oil for motorcycle engine oil? What do I do if fluid levels are frequently low? Is it safe to ride a motorcycle with low brake fluid? Essential Takeaways for Checking Motorcycle Fluid Levels Like a Pro Consistent checks extend your motorcycle engine life Always use the correct type and amount of each fluid Never overlook signs of leaking or low levels When in doubt, consult a certified motorcycle technician Ready for Expert Motorcycle Service? Call Nasty Performance Motorcycle Shop Today: 847-458-4858 Conclusion: Smart riders check motorcycle fluid levels often, use the right methods, and act on issues early—keeping your engine purring and your rides safe. If you’re ready to elevate your motorcycle maintenance routine, don’t stop at fluid checks—consider how seasonal changes can impact your bike’s performance and longevity. From prepping for winter storage to optimizing for summer rides, there are expert strategies that go beyond the basics. Explore seasonal bike care secrets every rider must know to unlock advanced tips that keep your motorcycle running smoothly all year long. Taking these extra steps ensures you’re not just maintaining your bike, but truly protecting your investment and riding with confidence in every season.

Terms of Service

Privacy Policy

Core Modal Title

Sorry, no results found

You Might Find These Articles Interesting

T
Please Check Your Email
We Will Be Following Up Shortly
*
*
*