cropper
update

Nasty Performance ~ 847-458-4858 

update
  • Blog Home
  • Categories
    • Motorcycle Maintenance
    • Riding Tips & Preps
    • Safety & Inspection
    • Customizations & Upgrades
    • DIY Motorcycle Repairs
    • Motocycle Audio Systems
    • Motocycle Seasonal Care & Storage
    • Engine, Electrical Performance
  • Bike Night
  • Nasty Performance Motorcycle Shop
May 08.2026
1 Minute Read

Master How to Perform Motorcycle Safety During Group Rides Now

Did you know? According to recent rider data, group motorcycle rides see far fewer incidents when all riders follow established safety protocols and use clear hand signals. These simple precautions can make all the difference between a safe and enjoyable group ride or a potentially hazardous one. Whether you’re a seasoned rider or new to riding in a group, this comprehensive guide will empower you to master how to perform motorcycle safety during group rides—from ride prep and etiquette to mastering hand signals and planning unforgettable journeys. Let’s ride safe, together!

Understanding Motorcycle Safety During Group Rides: Why It Matters

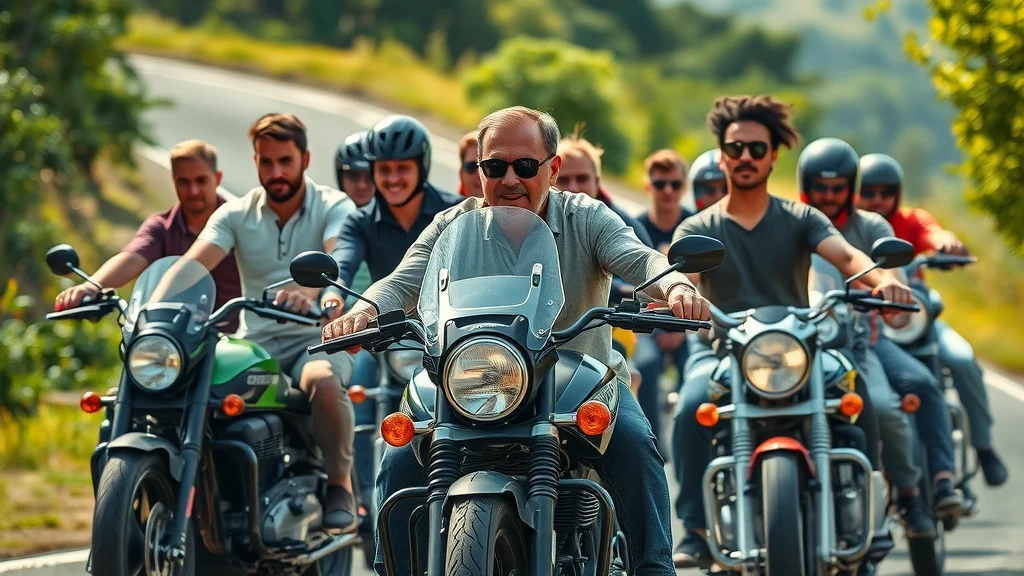
Group motorcycle rides create a shared experience unlike any solo journey, but they also come with unique challenges that demand attention to safety. Knowing how to perform motorcycle safety during group rides is essential to prevent confusion, reduce risks, and ensure everyone has a fun, incident-free outing. When you’re riding in a group, riders rely on one another—not just for camaraderie, but also for clear communication, predictable maneuvers, and mutual respect.

From open highways to winding scenic routes, every group ride brings together riders with different skills and styles. This makes following essential tips and safety protocols even more important. The right formation, use of universal hand signals, and understanding each person’s role keeps everyone safe and alert. Accidents can happen quickly if even one rider isn’t up to speed with group riding etiquette, making it clear why consistent and proactive safety measures are critical for a safe and enjoyable group motorcycle ride.

Diverse group of motorcyclists performing motorcycle safety during group rides on a scenic road, maintaining safe formation, with vivid greens and safety gear

Startling Facts About Motorcycle Group Rides and Safety

While the thrill of hitting the road with friends is undeniable, startle-worthy statistics highlight the importance of proper safety measures. Experienced riders agree that most group motorcycle ride mishaps occur from simple miscommunications or breaking formation. Something as basic as a missed hand signal or failing to maintain a proper staggered formation can result in dangerous close calls. This is precisely why understanding common rules and protocols—like the 4 second rule or using universally recognized hand signals—can minimize incidents. These practices not only keep riders safe, they enhance the overall motorcycling experience for everyone involved.

What You'll Learn About How to Perform Motorcycle Safety During Group Rides

  • The fundamental principles of group motorcycle ride safety
  • Key hand signals every rider must know
  • Planning and organizing a safe and enjoyable group ride
  • Essentials for effective group riding etiquette

Essential Tips: How to Perform Motorcycle Safety During Group Rides

  • Pre-ride checklist for group motorcycle rides
  • Roles and responsibilities in group motorcycle riding
  • Staggered versus single file formation
  • Keeping communication clear with hand signals

Rider performing pre-ride safety checks on a motorcycle before group ride with focus on details and checklist

The foundation of every safe group ride begins before anyone starts their engines. A thorough pre-ride checklist includes checking your bike’s tires, lights, oil levels, and fuel, as well as ensuring every rider has the right gear and emergency contacts saved on their cell phone. Assign roles—like lead, sweep, and mid-pack riders—before you hit the open road. Always confirm the chosen formation (staggered for most situations; single file for narrow roads or challenging conditions) and make sure everyone understands the ride’s route and planned fuel stops.

Clear communication is key—literally. Use agreed-upon hand signals to share directions, alerts, or stops while riding. This prevents confusion, keeps every rider informed, and allows the group to adjust smoothly to changes on the road. Whether you’re on a touring model motorcycle or a nimble sport bike, following these foundational steps ensures a safe and enjoyable group motorcycle ride for everyone involved.

In addition to mastering group riding protocols, it's important to remember that your motorcycle’s condition plays a crucial role in overall safety. For practical advice on keeping your bike in peak shape throughout the year, check out these seasonal bike care secrets every rider must know—a resource that complements your group ride preparation and helps prevent mechanical surprises on the road.

Table: Common Hand Signals for Group Motorcycle Riding

Signal Meaning When to Use
Left arm straight out Left turn Turning left at intersection or exit
Left arm bent up at elbow Right turn Turning right at intersection or exit
Left arm bent down at elbow Stop Stopping or slowing rapidly
Pointing with finger Hazard in roadway Road debris, pothole, or animal up ahead
Fist in the air Single file Tight roads, bridges, or construction zones
Left hand waving up and down Slow down Traffic congestion or approaching speed change

Group Ride Planning: Achieving Safe and Enjoyable Motorcycle Rides

Effective Route Selection for Group Motorcycle Rides

Careful planning is the first ingredient for a safe and enjoyable group motorcycle experience. Selecting a scenic route tailored for your group—one that matches everyone’s skill levels and preferred ride duration—prevents fatigue and maximizes fun. Avoid busy highways when possible, opting instead for well-maintained rural roads or scenic byways dotted with stops for rest, food, or photo ops. Consider weather forecasts, road conditions, and possible construction zones so all riders can focus on enjoying the journey, not navigating surprises.

Share route details—including key turns, fuel stops, and emergency contacts—before the ride. Make sure everyone knows the plan, including options for regrouping if someone falls behind or an unexpected situation arises. The more precise your route and contingency plans, the smoother your group motorcycle ride will be, and the easier it is to keep every rider engaged and safe.

Motorcyclists planning a group motorcycle ride route with map and digital tablet at a rest stop

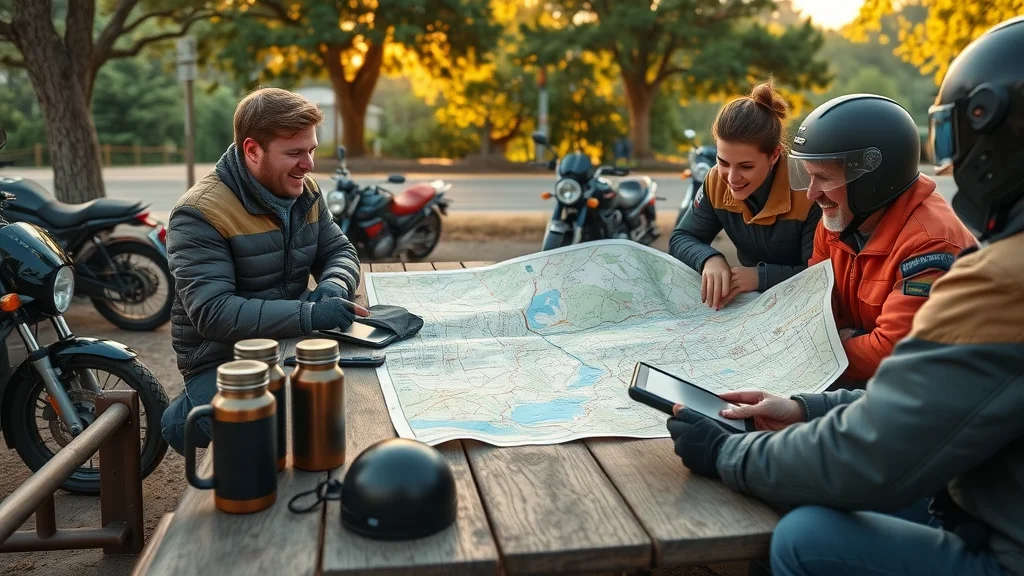
Pre-ride Meetings and Safety Briefings

A pre-ride meeting is a must for any group ride. Gather all riders before departing and review the planned route, scheduled stops, and safety protocols. This is the time to go over the pre-ride checklist, remind everyone to bring essentials like rain gear or a fully charged cell phone, and confirm everyone understands the hand signal protocols. Discuss potential hazards for the day—like traffic construction, loose gravel, or changing weather—so nobody is caught off guard.

Use the briefing to build camaraderie and address any rider questions or concerns. It’s also an opportunity for experienced riders to share wisdom with newer group members, reinforcing roles and expectations for each position in the ride lineup. A strong pre-ride briefing builds trust and helps foster a confident, cooperative atmosphere that carries through the entire journey.

Assigning Positions and Understanding the Sweep and Lead Roles

Assigning defined positions is central to group motorcycle ride safety. Typically, the most experienced rider takes the lead to set the pace, choose safe paths, and initiate hand signals for the rest of the group. The sweep (or tail gunner) takes up the rear to monitor the group, assist with issues, and make sure no one gets left behind. Riders of varying experience levels should be placed in the center of the formation for added support and guidance.

Understanding your position isn’t just about placement; it’s about responsibility. The lead must stay constantly alert for road changes, communicate frequently, and ensure the group maintains a safe and controlled flow. The sweep keeps a watchful eye, relays problems to the lead if needed, and is usually equipped to help in emergencies. With clear lead and sweep roles, every group member knows where to look for cues, minimizing confusion and creating a seamless, safe group ride experience.

Communication in Motorcycle Group Riding: Mastering Hand Signals and Non-Verbal Cues

Hand Signal Protocols for Group Motorcycle Ride Safety

Clear and universal communication is the linchpin of group motorcycle riding. While verbal cues aren’t possible on the move, hand signals are critical for transmitting information quickly and safely across the group. Every rider should know the standard set of hand signals—such as those used for turns, slowing down, pointing out hazards, or changing formation. Designate one set of signals before the ride to prevent confusion and ensure all group members are on the same page.

Practice your hand signals during slow-speed maneuvers or pre-ride meetings. The group’s lead initiates the signal, which is passed down the line to ensure everyone receives the message, even if the group is long or spread out. Frequent review and hands-on practice make this process second nature, keeping all riders aware and ready to adapt as the ride progresses.

Motorcyclist in bright safety gear demonstrating left turn hand signal for group riding on open road

Maintaining Awareness and Visual Contact While Riding in a Group

Besides hand signals, non-verbal communication plays a massive role in group riding. Maintaining constant visual contact with the riders ahead and behind—using mirrors and frequent shoulder checks—prevents gaps, reduces risk of separation, and keeps everyone together. Non-verbal cues, such as subtle head nods or shifting lanes, can alert the group to changes or hazards even before a formal signal is sent.

Riders must stay alert, scanning for brake lights, tire movements, and hand signals from those in front or behind. Avoid distractions such as fiddling with a cell phone or music device, and always keep your eyes forward on the road ahead. The more attentive the group, the quicker the response to unexpected changes—improving overall safety for every motorcycle group ride.

Watch this quick video demonstration of a group motorcycle ride in action: see staggered formation, hand signals, pre-ride guidelines, and how effective lead/sweep roles keep everyone riding safe—and having a blast!

People Also Ask: How to Perform Motorcycle Safety During Group Rides

What is the 1% rule in motorcycles?

Explanation of the 1% rule in motorcycle group riding culture and its relevance to safety and etiquette.

The “1% rule” refers to a cultural notion within the motorcycle community that only 1% of riders engage in outlaw or reckless behavior—meaning the vast majority (99%) ride responsibly. In group motorcycle rides, this principle reinforces the importance of following safety and etiquette guidelines, respecting traffic rules, and looking out for fellow riders. While the term often applies to social identity among motorcyclists, it highlights the expectation that group riding should always prioritize safety, not risky or aggressive behavior.

What does 2 fingers down mean to bikers?

Gloved rider demonstrating the

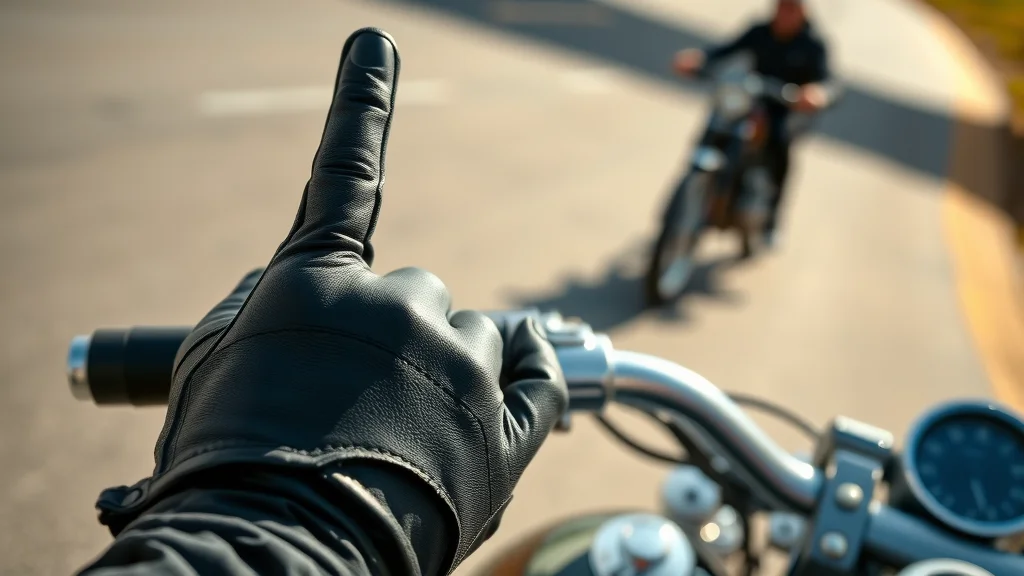
Overview of common biker gestures, specifically 2 fingers down, and how it applies during group motorcycle rides.

The “2 fingers down” gesture—where a rider casually extends their index and middle finger toward the road—signals respect and safe riding to fellow motorcyclists. It’s a non-verbal way of saying “ride safe” and wishing good fortune. During group motorcycle rides, this gesture helps build camaraderie and reminds everyone to keep safety top of mind. It’s one of many unspoken ways riders support each other, especially when passing other groups or fellow bikers out on the open road.

What procedure should motorcyclists follow when riding in groups?

Step-by-step guidance for motorcyclists on group ride procedures to optimize motorcycle safety.

For safe group ride execution, always start with a pre-ride checklist, then organize a safety briefing covering the route, expected stops, and hand signal protocols. Assign experienced riders to the lead and sweep roles, and ensure newer riders have support nearby in the middle. Adopt a staggered formation for most roads, switching to single file when necessary. Use hand signals consistently and communicate any hazards immediately down the line. Schedule regular stops for fuel and rest and regroup if the team gets separated. Foster an environment where everyone feels confident voicing questions or concerns, ensuring the entire group is always ride-ready.

What is the 4 second rule on a motorcycle?

Explanation of the 4 second rule and its application in maintaining safe distances during group motorcycle riding.

The 4 second rule is a universal safe-following guideline for both solo and group motorcycle rides. It suggests leaving at least four seconds of distance between you and the rider (or vehicle) in front of you. Pick a fixed point on the road ahead; when the rider in front passes it, count “one-thousand-one, one-thousand-two, one-thousand-three, one-thousand-four. ” If you pass that spot before you finish, you’re following too closely! This rule gives plenty of time for reaction and stops, ensuring safety for everyone when riding in a group.

Expert Quotes on How to Perform Motorcycle Safety During Group Rides

“Consistent communication and clear roles are the backbone of every safe and enjoyable group motorcycle ride.” — Motorcycle Safety Foundation

Key Takeaways for Motorcycle Safety During Group Rides

  • Always follow established group riding protocols
  • Use hand signals to communicate clearly
  • Respect fellow riders and the lead/sweep structure
  • Stay alert and maintain proper formation

Confident group of motorcyclists taking a break during group ride, parked and chatting overlooking scenic valley

FAQs: How to Perform Motorcycle Safety During Group Rides

Can new riders participate in group motorcycle rides safely?

Absolutely. With proper pre-ride briefings, support from experienced riders, and everyone adhering to group riding protocols, new riders can quickly adapt and contribute to a safe and enjoyable motorcycle group ride. Place newer riders in the center of the formation for added visibility and guidance, and encourage an open environment for questions and feedback throughout the ride.

What equipment is essential for group riding safety?

Every rider should wear a DOT-approved helmet, gloves, boots, and protective riding gear. Carry a cell phone for emergencies, basic first aid kit, rain gear, and enough water for longer rides. Make sure your motorcycle is in top working condition by following a comprehensive pre-ride checklist, and bring tools or tire repair kits for unexpected issues on the road.

How often should hand signal training be revisited?

Hand signal protocols should be reviewed before every group ride. Even experienced riders benefit from regular practice, especially when riding with new group members or unfamiliar faces. Incorporating signal review into pre-ride meetings ensures all riders communicate clearly and are prepared to respond quickly in any situation.

Conclusion: Ensuring Safe and Enjoyable Motorcycle Riding in Groups

Final Thoughts on Mastering How to Perform Motorcycle Safety During Group Rides

Mastering how to perform motorcycle safety during group rides transforms every outing into a safe and rewarding adventure. Armed with the right knowledge, clear communication, and respect for your fellow riders, you’ll enjoy every mile with confidence, camaraderie, and peace of mind.

If you’re ready to take your group riding experience to the next level, consider how ongoing bike maintenance and seasonal care can further enhance your safety and enjoyment. Exploring expert strategies for year-round motorcycle upkeep not only extends the life of your ride but also ensures you’re always prepared for whatever the road brings. For deeper insights and advanced tips, discover the essential seasonal bike care secrets every rider must know—your next step toward mastering both group riding and motorcycle longevity.

Call Nasty Performance Motorcycle Shop Today: 847-458-4858

Safety & Inspection

0 Comments

Write A Comment

*
*
Please complete the captcha to submit your comment.
Related Posts All Posts

Learn How to Perform Motorcycle Emergency Braking Safely

Did you know that improper emergency braking is one of the leading causes of motorcycle crashes? Mastering how to perform motorcycle emergency braking safely could make the difference between a minor scare and a life-altering incident. Every second counts when the unexpected happens on the road. Whether it’s a car turning without warning or an animal darting into your path, knowing the right braking technique isn’t just for expert riders—it’s essential for everyone on two wheels. Startling Facts: The Importance of Knowing How to Perform Motorcycle Emergency Braking "A split second can mean the difference between a safe stop and a serious crash—mastering motorcycle emergency braking is crucial for every rider." Motorcycle riders face significantly shorter reaction times than drivers in cars. An unexpected hazard can appear at any moment, requiring a swift and precise emergency stop. The ability to execute emergency braking correctly improves your stopping power and can greatly reduce stopping distance, which is critical for your safety. Motorcycles use both front and rear brakes, each playing a distinct role in the emergency braking process. Understanding and practicing standardized braking technique ensures that you remain in control of your bike and significantly minimizes the risk of a rear wheel skid or a dangerous wheel lock. What You'll Learn About Motorcycle Emergency Braking Techniques Understanding the dynamics of emergency braking and emergency stop Step-by-step process of how to perform motorcycle emergency braking safely Differences between rear brake and front brake application How to handle gear change and brake lever usage during an emergency stop Safety tips for preventing rear wheel lock-up and optimizing braking response How to use linked brakes appropriately Introduction to How to Perform Motorcycle Emergency Braking Every motorcyclist will eventually face a situation where an emergency stop is unavoidable. Learning how to perform motorcycle emergency braking is not something to leave to chance—not only does it protect you, but it also equips you to react swiftly and confidently in critical situations. Practicing emergency braking builds muscle memory, refines your reaction time, and allows you to manage the front brake, rear brake, and gear change effectively when every split second counts. Far too often, riders either brake too abruptly or not hard enough, leading to front or rear wheel lock, skidding, and loss of control. While mastering emergency braking is essential for immediate safety, it's equally important to keep your motorcycle in peak condition to ensure your brakes and other systems respond as expected. For a comprehensive approach to motorcycle care, consider exploring seasonal bike care strategies that every rider should know—these tips can help you maintain optimal performance year-round. This guide will break down the science behind emergency stops, uncover common braking misconceptions, and teach you how to use both the front brake and rear brake efficiently. You’ll also get scenario-specific advice and expert tips on making emergency stops safer—whether you’re navigating wet roads, slippery gravel, or making a quick stop at highway speeds. Why Learning Emergency Braking is Essential for Every Rider Accidents rarely announce themselves. When faced with an emergency, being able to brake hard without losing traction or control is a lifesaving skill. Many riders mistakenly believe that just grabbing the brake lever or stomping on the brake pedal will stop them in time, but abrupt braking is the fastest way to lose grip, pitch forward, or send the rear wheel sliding. By mastering how to perform motorcycle emergency braking, you dramatically increase your odds of surviving and avoiding serious collisions. With regular practice in controlled environments, riders internalize safe braking procedures, making them second nature in high-pressure scenarios. Common Misconceptions About Motorcycle Emergency Braking There are several widespread myths about emergency braking among both new and experienced riders. One misconception is that using the front brake is dangerous and should be avoided. In reality, the front brake supplies approximately 70-80% of the bike’s stopping power due to weight transfer during hard stops. Another mistaken belief is that the rear brake should be the primary way to stop in a crisis; unfortunately, relying solely on the rear brake extends stopping distances and increases the risk of rear wheel lock-up. Equally problematic is the idea that sudden and maximum brake pressure is always safer—this often leads to wheels locking and skids, especially if the road surface is slippery or uneven. Core Concepts: Emergency Braking and Emergency Stop Explained Defining Emergency Braking and Emergency Stop Emergency braking refers to the rapid, controlled deceleration required to avoid a hazard. An emergency stop is the process whereby you bring the bike to a halt as quickly and safely as possible, maintaining control throughout. During an emergency stop, your goal is to keep your bike upright and in a straight line while maximizing stopping power through balanced use of the front brake and rear brake. The efficiency of your braking technique, the condition of your tires, and your grasp of the brake lever and brake pedal directly affect the likelihood of a safe outcome. These foundational concepts are essential before exploring advanced braking systems or scenario-based adjustments. The Science of Motorcycle Braking Forces When you initiate an emergency stop, forces acting on your motorcycle dramatically change. The instant you apply the brakes, weight is transferred forward, compressing the front tire and increasing its traction and stopping capacity, while the rear wheel carries less load. This weight transfer highlights why the front brake is responsible for the majority of your braking power and why careful modulation is needed to avoid pitching forward or causing the front wheel to lose traction. Proper brake pressure application, done progressively and smoothly, helps maintain grip between tires and road while minimizing wheel lock. Understanding braking forces equips you to harness maximum stopping power without exceeding traction limits and risking a fall. The Role of Front Brake and Rear Brake in Emergency Braking Front Brake Dynamics in Emergency Stop Situations The front brake is the workhorse during motorcycle emergency braking, providing up to 80% of the total stopping power, especially as weight shifts forward onto the front tire. Pulling the front brake lever with a progressive squeeze (rather than an abrupt grab) helps maximize stopping power while preventing the front wheel from locking up. Controlled front brake application maintains the bike upright and stable, reducing stopping distances dramatically. However, using too much force on the front brake lever too quickly, especially on slippery or uneven surfaces, increases the risk of losing the front tire grip and results in a fall. Practicing progressive front brake lever use is critical for every rider who wants to stop their motorcycle effectively and safely during an emergency stop. Rear Brake Usage: Pitfalls and Best Practices The rear brake supports the front brake by stabilizing the bike during sudden stops. Gently applying the rear brake pedal adds extra control, preventing the rear wheel from lifting and improving overall balance. However, excessive force or abrupt pressure on the rear brake can lead to locking the rear wheel. When the rear wheel locks, the motorcycle skids and can become unpredictable, especially during high-speed stops or on low-traction surfaces. The best practice is to use the rear brake in tandem with the front brake—never as your sole source of stopping power—and to modulate rear brake pressure to maintain stability. This approach ensures that the rear wheel remains in line, reducing the risk of a high-side crash or rear-end skid during emergency braking. Preventing Rear Wheel Lock-up During Emergency Braking Rear wheel lock-up remains a common issue during panicked stops. To prevent rear wheel lock-up: apply rear brake pressure smoothly rather than abruptly, especially as the rear becomes lighter due to weight transfer to the front. If you sense the rear wheel beginning to skid or lose grip, immediately release and reapply the brake pedal smoothly to regain traction and keep control. Coordination between the front and rear brake levers is essential; maintaining the bike upright and braking in a straight line further minimizes the risk of either wheel locking. Practice is key—riders who regularly simulate emergency stops in controlled settings become adept at recognizing and correcting rear wheel lock-ups before they escalate. "Smooth brake lever input, more on the front brake and controlled rear brake pressure, can save you from skidding off course." Step-by-Step Guide: How to Perform Motorcycle Emergency Braking Safely Assess the hazard and remain calm: Instantly identify the need for an emergency stop—keep a cool head to avoid panicked actions. Close the throttle and apply both brakes simultaneously: Roll off the throttle completely while engaging both front brake (lever) and rear brake (pedal) at once. Apply progressive front brake pressure: Squeeze the front brake lever smoothly and firmly, increasing pressure as the suspension loads up to maximize stopping power. Maintain balance with gentle rear brake application: Press the rear brake pedal lightly, adding stability without risking rear wheel lock-up. Monitor and control gear change if feasible: If you have time, downshift smoothly while keeping the clutch engaged to avoid destabilizing the bike. Keep eyes up and look ahead: Focus beyond the immediate hazard to stay balanced and avoid fixating on obstacles. Release brakes gradually once stopped: After coming to a complete stop, let go of the brakes smoothly to prevent sudden jerks or loss of balance. Detailed Instructions for Using the Brake Lever During Emergency Stop The key to effective emergency braking is the way you use your brake levers. For the front brake lever, use two to four fingers, squeezing progressively rather than grabbing abruptly. This action gradually transfers weight to the front tire, enhancing grip and reducing the likelihood of the front wheel locking up. Pull the lever in a smooth, controlled motion—avoid sudden, jerky movements that could make the front tire lose traction. Your rear brake pedal should be pressed just enough to add rear wheel stability, but never so hard as to lock up the rear wheel, especially as the suspension compresses and the rear of the bike becomes lighter. By coordinating both levers, you’ll maintain optimal braking force and control, which is the foundation of safe emergency stops. Optimal Gear Change Strategies While Braking Gear change during emergency braking should be approached with caution. If possible, downshift as your speed drops, but do so only while pulling in the clutch to prevent engine braking from destabilizing the bike. Many inexperienced riders get caught up trying to find the right gear rather than focusing on stopping safely. It’s more important to bring the motorcycle to a complete stop using the brakes first than to worry about gear position. Once stopped safely, you can shift into neutral or first gear to prepare for moving off again if needed. Practicing smooth gear changes alongside emergency stops in a safe environment can significantly boost your confidence and technique under pressure. Braking Systems: Understanding Linked Brakes and ABS in Emergency Situations How Linked Brakes Affect Emergency Braking Linked brakes are systems where activating one brake (usually the front brake lever) also applies a proportion of the rear brake, or vice versa. This technology helps riders who may struggle to coordinate both front and rear brake inputs during an emergency stop. With linked brakes, stopping power is distributed automatically, reducing the chances of rear wheel lock or applying uneven brake pressure. Riders should still practice the fundamentals, as linked systems are designed to supplement, not replace, correct technique. Familiarize yourself with your specific linked brake setup by consulting your motorcycle’s manual and testing the feel in a controlled area before relying on it in real-world emergencies. The Role of ABS in Preventing Rear Wheel and Front Wheel Lock-Up Anti-lock Braking Systems (ABS) are a lifesaver during emergency braking, preventing both the front and rear wheels from locking up when overwhelming brake force is applied. ABS works by rapidly modulating brake pressure when it senses a wheel about to skid, allowing you to brake hard while maintaining steering control. ABS is especially useful in low-traction conditions like wet pavement, gravel, or painted road lines. However, ABS is not a substitute for proper technique; you still need to apply both the front and rear brake progressively and keep your bike upright in a straight line for maximum effectiveness. Understanding how your ABS system responds in different braking scenarios can give you even more confidence during crisis stops. Scenario-Based Emergency Braking: Real-World Application Wet Roads: Emergency Stop Adjustments Rain-soaked streets drastically reduce tire grip, increasing stopping distances and the risk of wheel locks. During emergency stops in wet conditions, be extra vigilant and apply the brakes even more progressively and gently than usual. Focus on using both brakes, but avoid sudden or maximum pressure on either the front brake lever or rear brake pedal. Keep your motorcycle as upright as possible and your inputs smooth to maximize the contact patch and prevent tire slip. Allow for a longer stopping distance and always keep your eyes forward to scan for the slickest spots, such as painted road lines or manhole covers, which are especially hazardous during emergency braking on wet roads. Gravel, Sand, and Slippery Surfaces Loose surfaces such as gravel or sand pose one of the greatest challenges for emergency braking. Here, the focus shifts to minimizing both braking power and steering input. Use gentle pressure on both front and rear brakes, prioritizing the rear brake slightly more than on asphalt, and try to keep the bike moving in a straight line. Sudden or harsh use of the front brake lever can cause the front tire to dig in and lose grip completely. If you feel a wheel starting to slide or if the wheel locks, quickly release and reapply the brakes to regain traction. Anticipate longer stopping distances and keep your inputs as fluid as possible to stay in control during emergency stops on slippery surfaces. Highway Emergency Braking: Maintaining Control at Speed At highway speeds, braking distances extend and the need for precision becomes even greater. When an emergency stop is required, apply both the front brake lever and rear brake pedal simultaneously, increasing pressure as the motorcycle’s weight transfers to the front wheel. Keep your bodyweight slightly back to help maintain bike balance and avoid pitching forward. Remain in a straight line; avoid swerving aggressively, as sudden direction changes can easily overwhelm tire grip and cause a loss of control. Downshift smoothly if time permits, but only after prioritizing braking. Remember that ABS and linked brakes offer valuable support at highway speeds, helping prevent wheels from locking when you brake hard. Advanced Tips: Mastering How to Perform Motorcycle Emergency Braking Practice emergency stops regularly in controlled environments: Set up training sessions in empty parking lots with cones or markers to simulate hazards and sharpen your braking reflexes. Understand your brake balance and motorcycle setup: Each bike behaves differently—get to know how your specific model’s front and rear brakes interact during hard stops. Maintain your brake system for reliability: Regularly inspect brake pads, rotors, brake fluid, and tire condition to ensure your braking system delivers maximum stopping power when you need it most. Tables: Comparing Front Brake vs. Rear Brake Impact Brake Type Stopping Power Risk of Skid Typical Application Front Brake 70–80% High if abrupt Primary for emergency braking Rear Brake 20–30% Low, but risk of lock-up Stabilizing aid People Also Ask: Motorcycle Emergency Braking How do you perform an emergency stop on a motorcycle? To perform an emergency stop, remain calm and instantly close the throttle. Apply both the front brake lever and rear brake pedal simultaneously. Use progressive pressure on the front brake to maximize stopping power without causing the front tire to lock, while gently pressing the rear brake for added stability. Keep your motorcycle in a straight line and your body upright, gripping the tank with your knees. As you come to a complete stop, smoothly release both brakes. Practice these steps regularly in controlled conditions for best results. Is it better to use front or rear brake during emergency braking? During emergency braking, the front brake provides most of your stopping power due to weight transfer to the front wheel. Always prioritize progressive front brake use, supplemented by gentle rear brake input for balance. Relying solely on the rear brake significantly extends your stopping distance and increases skidding risk. Both brakes used together, with proper technique, ensure the shortest and safest stop. What should you avoid during motorcycle emergency braking? Avoid grabbing or slamming either brake abruptly. Sudden application can trigger wheels locking or skidding, resulting in loss of control. Don’t focus just on the hazard—instead, keep your eyes up and the bike upright. Ensure you don’t downshift abruptly, as it can unsettle the motorcycle. Always strive for smooth, coordinated input on both the front brake lever and rear brake pedal for the most effective emergency stop. How does road condition affect emergency braking? Road conditions significantly impact emergency braking effectiveness. Wet surfaces, gravel, and loose debris all reduce traction and increase stopping distance. In these situations, apply brakes more gently and progressively, use both brakes, keep your inputs smooth, and maintain the motorcycle upright in a straight line to prevent losing grip on either wheel. Can ABS help in motorcycle emergency stops? Absolutely. ABS (Anti-lock Braking System) helps prevent both front and rear wheels from locking up under heavy braking. It modulates brake pressure automatically, allowing you to focus on steering and maintaining balance even under panic stops on slippery surfaces. However, proper braking technique is still essential to get the best results from ABS. What are linked brakes and how do they help with emergency braking? Linked brakes distribute stopping force between the front and rear wheels even if you use just one brake lever or pedal. This aids in maintaining stability and optimizing stopping distances, especially in emergencies. Still, familiarizing yourself with how your linked braking system works is important for maximum safety during real-world emergency braking scenarios. FAQs About How to Perform Motorcycle Emergency Braking How does body position impact emergency braking? Proper body position is crucial. Sit upright, grip the tank with your knees, and keep your arms relaxed but ready. This posture keeps the bike upright and stable during aggressive braking, helping maximize grip and control. Should you practice emergency stops regularly? Yes! Regular, controlled practice improves your reaction time, hones your technique, and builds muscle memory for real-world emergencies, making emergency braking more instinctive. What's the difference between controlled stop and emergency stop? A controlled stop is planned and gradual, while an emergency stop is unplanned and requires maximum braking power in the shortest distance, with a focus on keeping control throughout. Key Takeaways: Achieving Safe Motorcycle Emergency Braking Progressive brake application is the safest method Understand your motorcycle's braking system (front brake, rear brake, linked brakes) Practice in safe, controlled spaces is essential to mastering emergency stop Maintain and inspect your braking system regularly Ready to Enhance Your Safety? Call Nasty Performance Motorcycle Shop Today: 847-458-4858 Take action now and make motorcycle safety your top priority—regular training and expert advice are just a phone call away! If you're committed to mastering emergency braking, consider taking your motorcycle safety and performance to the next level by focusing on year-round bike maintenance. Proactive care not only extends the life of your ride but also ensures your braking system and other critical components are always ready when you need them most. Discover expert advice and essential routines in Seasonal Bike Care Secrets Every Rider Must Know. By integrating these seasonal strategies with your emergency braking skills, you'll be better equipped for safe, confident riding in any condition.

How to Stay Safe with Motorcycle Accident Prevention Today

Startling fact: More than half of all motorcycle accidents involving another vehicle happen because drivers simply didn’t see the rider. That means every time you gear up for a motorcycle ride, your safety isn’t just in your hands—it relies on awareness, preparation, and proactive habits that can protect you from common causes of a motorcycle crash. This guide explains how to stay safe with motorcycle accident prevention—giving you actionable strategies that save lives, reduce injuries and death, and ensure every ride is a safe one. Staying Safe: Why Motorcycle Accident Prevention Is More Important Than Ever The modern road is busier than ever, which makes motorcycle safety a pressing concern for every motorcycle rider. Sadly, statistics show that despite new protective gear and advances in rider education, motorcycle crashes are still a leading cause of injury and fatal motor vehicle incidents nationwide. Today’s focus on how to stay safe with motorcycle accident prevention isn’t just about compliance or ticking boxes for a motorcycle license—it’s about adopting habits that can be life-saving every time you hit the road. Whether you’re an experienced rider or gearing up for your first ride, understanding the importance of safety goes beyond state requirements; it forms the backbone of every responsible journey. Seasoned riders know that preparation—and the right mindset—are just as critical as excellent riding technique. The skills you bring to every motorcycle ride, combined with awareness and the use of proper protective gear, reduce the risk of serious injury. Optimizing your habits and making traffic safety your priority not only helps you stay safe but also protects everyone sharing the road. Before diving into detailed safety tips, remember that every decision you make on the bike—choosing your lane, checking your gear, reading the road—shapes your ride’s outcome. “Every time you get on a bike, you make decisions that protect your life and others on the road." — Motorcycle safety expert What You’ll Learn About How to Stay Safe with Motorcycle Accident Prevention Critical motorcycle safety tips Key strategies to prevent motorcycle crashes Importance of protective gear and sharing the road Answers to frequently asked motorcycle rider questions Understanding Motorcycle Accident Risks for Every Motorcycle Rider Anyone who rides a motorcycle is exposed to unique risks—ranging from unpredictable weather to careless drivers. Before we focus on prevention, understanding motorcycle crash risks helps highlight why safety habits matter so much. Every ride presents potential challenges, whether you’re navigating busy intersections or rural roads with poor visibility. While motor vehicle drivers may take traffic safety for granted, even a moment of inattention can be life-altering for a motorcycle rider. Recognizing risk factors is the first step. Key reports from gov websites and public awareness campaigns show that factors like driver inattention, poor road surfaces, and rider fatigue contribute significantly to accidents. Knowing these risks allows motorcycle riders to anticipate danger, adjust their riding, and adopt safety tips that can prevent crashes and injuries. In addition to understanding accident risks, it's also important to consider how seasonal changes can impact your motorcycle's performance and your safety on the road. For practical advice on keeping your bike in top condition throughout the year, check out these seasonal bike care secrets every rider must know—these tips can help you avoid unexpected breakdowns and stay safer in changing weather. Common Causes of Motorcycle Crashes and Motorcycle Accidents High-risk traffic scenarios Effects of road and weather conditions Motor vehicle driver behavior Most motorcycle accidents stem from a few common causes. High-traffic intersections, for example, are notorious danger zones. Urban environments—with stop-and-go patterns and left-turning vehicles—often lead to situations where a motorcycle rider is unseen. Adding to this, weather conditions such as rain or fog can reduce traction and visibility, increasing the likelihood of a motorcycle crash. Another leading cause is motor vehicle driver error. Many drivers simply don’t check blind spots or misjudge how fast a motorcycle is traveling. Defensive riding—one of the top motorcycle safety tips—means always assuming that other drivers may not see you. With awareness and practical strategies like proper lane positioning and using high-visibility gear, you can dramatically reduce the risk of traffic crashes and ensure you stay safe on every ride. Motorcycle Safety: Essential Safety Tips for Every Motorcycle Ride Every motorcycle ride is a fresh opportunity to put your safety skills into practice. While excitement is part of why many love motorcycling, that excitement must always be balanced with firm safety habits. Motorcycle safety starts before you leave the driveway—with the right preparation, training, and proactive thinking. It’s about much more than wearing a helmet; it includes mastering your bike, practicing defensive techniques, and performing regular equipment checks. Applying key safety tips helps prevent motorcycle accidents before they happen. Begin each ride with a checklist: check your motorcycle’s tire pressure, lights, brakes, and mirrors. Use protective gear even for short trips—research has repeatedly shown that gear like gloves, jackets, and helmets dramatically reduce injuries and death rates. By incorporating these habits daily, you prepare yourself to handle everything from unexpected weather to unpredictable traffic situations. How Proper Motorcycle License and Training Prevent Motorcycle Accidents Earning and maintaining a valid motorcycle license isn’t just about legality—it’s about proving you have the skills to ride safely. Rider education programs cover far more than traffic laws; they teach critical skills like emergency braking, swerving, and anticipating hazardous conditions. Taking a certified training course benefits both beginners and experienced riders. Instructors provide real-world safety tips that improve decision-making and reaction times. Ongoing education matters, too. Even experienced riders benefit from refresher courses, which reinforce knowledge and address bad habits that can creep in over time. Evidence from gov websites shows that riders with current licenses and up-to-date training are less likely to be involved in fatal motor vehicle accidents. By prioritizing rider education and ensuring your motorcycle license is current, you greatly reduce risks on every motorcycle ride. Protective Gear: Helmet, Gloves, Jackets, and More for Motorcycle Riders DOT-approved helmets Wear-resistant jackets Gloves and boots Selecting and using the right protective gear is one of the most effective measures to stay safe. A DOT-approved motorcycle helmet is essential for every ride—head injuries are the leading cause of death in motorcycle crashes. Beyond helmets, armored jackets, reinforced gloves, and sturdy boots protect against abrasions, fractures, and the elements. Modern gear is not only safer but also comfortable and stylish, encouraging consistent use. A full gear ensemble creates a vital layer of protection, particularly in high-speed or urban traffic. Look for wear-resistant materials and visibility features like reflective bands, bright colors, or LED additions. Simple habits—like always strapping your helmet and checking gear integrity—can prevent life-changing injuries. Pair gear with consistent pre-ride checks to further reduce the risk of a motorcycle accident. Motorcycle Safety Tips to Practice Before and During a Motorcycle Ride Preparation is key. Before every motorcycle ride, run a quick check on your motorcycle’s tire pressure, brakes, chains, and lights. This not only makes your ride smoother but helps catch small mechanical issues before they cause larger problems. Wearing protective gear, even for short commutes, reduces your risk for severe injury (check your motorcycle every ride). During your ride, keep a safe distance from other vehicles and avoid blind spots. Practice constant scanning—keep your eyes moving between mirrors, road ahead, and traffic around you. Use hand signals and make your intentions clear. Defensive riding—as promoted by public awareness campaigns and gov websites—means always predicting what drivers might do. Combine these habits, and you equip yourself with the best motorcycle safety practices. Share the Road: Ensuring Traffic Safety and Preventing Motorcycle Crashes A key factor in how to stay safe with motorcycle accident prevention is understanding that every roadway is shared. Traffic safety isn’t just your responsibility—it’s a collective effort between motorcycle riders and motor vehicle drivers. Sadly, many motorcycle accidents happen because motorists fail to notice a bike, especially in heavy traffic or changing lanes. By making yourself visible and predictable, you can prevent miscommunications and keep both yourself and others safe. “Share the road” should be more than a slogan. When both riders and drivers respect right-of-way, use signals, and exercise patience, everyone benefits. Awareness campaigns repeatedly stress this message: safer roads depend on everyone being alert and considerate. Each time you head out for a motorcycle ride, remember you are setting an example in your neighborhood and for other motorcycle riders. Sharing the Road with Motor Vehicles Most collisions between a motorcycle and a motor vehicle are the result of miscommunication or a simple oversight—often at intersections or when vehicles are merging. The best way to share the road is through proactive communication. Make eye contact with drivers at stoplights or while passing; use clear hand signals along with your signal lights. Stay out of vehicle blind spots and always provide enough space for unexpected stops. Cooperation goes both ways. Car and truck drivers must also remain vigilant for motorcycles—public awareness campaigns and government sites urge all road users to double-check mirrors and turn signals before changing lanes. When riders and drivers alike treat each other with respect and patience, the risk of motorcycle accidents drops dramatically. Visibility Tips for Motorcycle Riders and Motor Vehicle Drivers Visibility remains one of the greatest challenges on the road. To stay safe, use reflective elements on your clothing and bike, especially at night or in bad weather. Brightly colored jackets and helmets can prevent accidents by making you stand out in busy traffic. Position your motorcycle where other drivers can see you—don’t linger in blind spots or behind large vehicles. For drivers, stay alert for smaller vehicles like motorcycles, especially at intersections. Turn on headlights, use turn signals in advance, and scan crosswalks for approaching bikes. By prioritizing visibility, you protect yourself and help foster a safer traffic safety culture. Tables: Comparing Causes and Prevention of Motorcycle Accidents Common Causes of Motorcycle Accidents Prevention Measures Distracted Driving (car or motorcycle) Stay alert, avoid mobile devices, and keep eyes on the road at all times Speeding Follow speed limits, adjust speed for weather/road conditions, and anticipate hazards Poor Visibility Use reflective gear, high-visibility clothing, and make use of proper lane positioning Unsafe Lane Changes Signal early, double-check mirrors and blind spots, and maintain a safe buffer zone Weather Hazards (rain, fog, ice) Monitor forecasts, slow down, and wear weather-appropriate gear Expert Quotes on How to Stay Safe with Motorcycle Accident Prevention “Preparation and awareness are a motorcyclist’s strongest protection against preventable accidents.” — Certified motorcycle instructor Frequently Overlooked Motorcycle Safety Practices Routine pre-ride checks Defensive riding techniques Weather monitoring and adaptation Continuous skill improvement for motorcycle riders While core safety tips are widely promoted, some crucial habits are often skipped by even experienced riders. Routine pre-ride inspections—checking tire pressure, brake function, and lights—catch mechanical problems before they become emergencies. Defensive riding goes beyond obeying laws; it’s about anticipating the next move from vehicles, reading the road surface for potential hazards, and always having a backup plan. Adapting your riding to weather (rain, heat, fog) decreases the chance of accidents in challenging conditions. Finally, never stop learning. Taking advanced or refresher rider education classes hones skills and increases confidence. Many motorcycle accidents happen because riders overestimate their abilities. Embrace continuous improvement as a key to long-term safety. People Also Ask: Answers About Motorcycle Accident Prevention and Motorcycle Safety What is the 1% rule in motorcycles? The '1% rule' refers to a small percentage of motorcycle riders who operate outside the law, but this is not connected to mainstream motorcycle safety or accident prevention. What does 2 fingers down mean to bikers? It's a signal of respect and camaraderie between motorcycle riders, indicating 'stay safe.' Where do 70% of motorcycle accidents occur? Approximately 70% of motorcycle crashes happen at intersections and urban areas, often involving motor vehicles failing to see the motorcycle. Why do bikers tap their helmet when they see a cop? Bikers tap their helmet to warn fellow riders about law enforcement or other hazards ahead, promoting group motorcycle safety. FAQs: Motorcycle Accident, Crash Prevention, and Motorcycle Safety How can motorcycle riders improve their visibility? Riders can improve visibility by wearing bright, reflective gear, using proper lighting on their bikes, and strategically positioning themselves in lanes so drivers can see them. Keeping headlights on during the day and avoiding vehicle blind spots are also essential traffic safety habits. What role does protective gear play in motorcycle accident prevention? Protective gear dramatically reduces the risk of serious injury during a motorcycle crash. Helmets, armored jackets, gloves, and sturdy boots form a barrier against impact and abrasion, even at low speeds. Why is sharing the road important? Sharing the road ensures the safety of all users—motor vehicle drivers and motorcycles alike. Respecting right-of-way, using signals, and maintaining awareness decrease the risk of motorcycle collisions and traffic crashes. What steps should be taken after a motorcycle crash? Move to safety (if possible), check for injuries, call emergency services, and document the scene. Notify insurance and legal authorities, and seek medical evaluation even if you feel fine, as some injuries from motorcycle accidents show up later. Key Takeaways for How to Stay Safe with Motorcycle Accident Prevention Consistent use of protective gear saves lives Training and a valid motorcycle license are non-negotiable Sharing the road reduces motorcycle accidents Proactive safety habits make every ride safer Next Steps: Enhance Your Motorcycle Safety Now "Safe riding is learned, practiced, and repeated every day you take to the road." Call Nasty Performance Motorcycle Shop Today: 847-458-4858 Motorcycle safety is a journey that extends beyond the basics of accident prevention—it's about building habits that protect you in every season and situation. If you're ready to take your riding confidence to the next level, consider exploring how proactive bike maintenance can further reduce risks and keep your machine performing at its best. Discover expert guidance and practical tips in Seasonal Bike Care Secrets Every Rider Must Know. By combining smart riding strategies with year-round bike care, you'll be better equipped for safe, enjoyable journeys wherever the road leads.

Why the Importance of Motorcycle Chain Inspection Can’t Be Ignored

Curious how one overlooked detail could determine your next ride’s safety, performance, and cost? For many riders, the condition of their motorcycle chain is an afterthought—until a sudden breakdown or dodgy ride forces the issue. This comprehensive guide reveals why the importance of motorcycle chain inspection shouldn’t be underestimated, and how meticulous care sets the foundation for both thrilling rides and lasting peace of mind. Unlocking Safety: The Importance of Motorcycle Chain Inspection When considering motorcycle maintenance tips, few aspects are as critical—and often neglected—as the routine inspection of your drive chain and sprockets. The importance of motorcycle chain inspection is more than a mechanical afterthought; it's a core safety measure that directly affects how your bike handles, accelerates, and brakes. Whether your motorcycle is your daily commuter, weekend adventure machine, or a top entry on your list of motorcycles for sale, ensuring the health of your chain drive keeps both novice and seasoned riders secure on every journey. Ignoring chain and sprocket wear can compromise your rear wheel stability, degrade fuel efficiency, and even lead to chain failure at high speed—an avoidable hazard no one wants to experience. Regular chain maintenance lets you identify issues before they evolve into serious safety risks, including uneven sprocket teeth, excessive slack, and worn sprocket surfaces. By adopting a proactive approach to chain and sprocket maintenance, riders avoid the pitfalls of excessive wear, sudden malfunctions, and costly repairs. Ultimately, chain inspection isn’t just a good idea—it’s a non-negotiable part of responsible motorcycling. Opening Inquiry: How Often Do You Examine Your Motorcycle Chain? Think about your ride routine: when was the last time you checked your motorcycle chain? For too many riders, it's only after their rear sprocket starts making noise or the chain feels loose mid-ride that maintenance comes to mind. Reflecting on this often-overlooked habit opens the door to developing a systematic, safety-first approach to motorcycle chain care. If the answer is vague or “not recently,” you may be overdue for a closer look. Regular chain and sprocket inspection matters whether you’re tearing up the asphalt or cruising at leisure. Examining your drive chain doesn’t just prevent mechanical wear and tear; it extends your bike’s life and ensures each component—especially the chain and sprockets—work together seamlessly. By integrating a few simple habits into your routine, you’ll not only improve your machine’s performance but also reinforce good riding habits that benefit every journey. As you refine your maintenance routine, it's also helpful to consider how seasonal changes can impact your motorcycle's components. For practical advice on adapting your care regimen throughout the year, explore these seasonal bike care secrets every rider should know to keep your chain and other vital parts in top condition. What You’ll Learn About the Importance of Motorcycle Chain Inspection Key indicators that your motorcycle chain needs attention The relationship between chain and sprockets for rider safety Step-by-step motorcycle chain maintenance tips When to seek professional help for chain drive issues Common misconceptions about chain and sprocket care Understanding the Anatomy of a Motorcycle Chain and Sprockets At the heart of motorcycle performance lies the intricate relationship between the chain and sprockets. Together, these components form the chain drive system, translating engine power into wheel motion. The chain—sometimes a standard or a ring chain—loops around the front sprocket (attached to the gearbox output) and the rear sprocket (mounted on the rear wheel). Every time you twist the throttle, the drive chain transmits torque, propelling you forward. A well-maintained motorcycle chain ensures smooth power delivery, precise acceleration, and stable braking, while neglected chains and sprockets quickly succumb to wear and tear. Modern motorcycle chains come in a variety of styles: from classic roller chains to O-ring and X-ring chains, each requiring slightly different maintenance tips. Sprockets, whether front or rear, must be perfectly aligned and free of damaged teeth to keep the drive chain tension consistent. If the interplay between chain and sprocket isn’t balanced—through misalignment or excessive slack—both ride quality and safety are instantly compromised. Knowing these basics lets riders spot issues early and take corrective action before they spiral into expensive repairs or dangerous riding conditions. How the Drive Chain and Sprocket System Works The drive chain and sprocket system acts as the muscle behind your motorcycle’s movement. To understand why chain maintenance is so important, consider how power moves: when you accelerate, energy passes from the engine to the gearbox, through the front sprocket, along the chain, and finally to the rear sprocket and wheel. This synergy lets your bike respond instantly to rider input, with the chain taking the brunt of stress, tension, and environmental conditions. Over time, even the best-maintained drive chains experience elongation (stretch), which increases slack, affects chain and sprockets alignment, and can lead to slipped teeth or sudden failure. If the connection between the chain, front, and rear sprockets is compromised, your entire ride feels rough, noisy, and unpredictable. That's why both novice and experienced riders must regularly inspect the chain and assess wear not just on the bike chain, but also on the sprocket teeth, mounting points, and alignment—all essential for a safe, efficient ride. The Critical Role of Chain Maintenance for Motorcycle Longevity Consistent chain maintenance is the backbone of your motorcycle’s longevity and reliability. Ignoring chain inspection can have ripple effects throughout your bike, causing premature wear to the front and rear sprocket, reducing fuel efficiency, and even straining the rear tire due to uneven power delivery. With proper attention, both chain and sprockets remain in sync, delivering optimal performance and extending the time between replacements. It’s a simple routine that pays long-term dividends, saving both money and frustration—and keeping your motorcycle ready for every adventure. Inspecting, cleaning, and lubricating the drive chain and sprockets on a regular schedule reduces the chances of encountering kinks, seized links, or rust—all of which can limit the lifespan of your bike chain or result in sudden failure. Many motorcycles for sale highlight recent chain maintenance as a selling point, underscoring just how vital this aspect is for both riders and buyers who prize peace of mind and performance. Chain and Sprocket Wear: What Riders Should Know Wear and tear on the chain and sprockets presents itself in several recognizable forms—elongated or kinked links, sharp-edged sprocket teeth, and visible rust signal the need for immediate attention. Chains that stretch lose their ability to maintain proper chain tension, which stresses the rear wheel and can cause erratic handling. If you pull the chain away from the rear sprocket and notice excessive space or teeth that appear hooked or chipped, your chain drive has likely reached the end of its safe operating life. To ensure both safety and reliability, always replace the chain and sprocket together as a set if you notice excessive wear on either component. Neglecting one risks premature damage to the other, since a worn sprocket quickly ruins a new chain, and vice versa. Good chain maintenance means proactively looking for these indicators and never ignoring subtle warnings like odd noises or changes in ride feel—each could spell trouble for your chain and drive system. How Chain Drive Issues Affect Performance and Safety A neglected or poorly maintained chain drive reduces both the fun and safety of riding. Misaligned chains put uneven stress on sprockets, causing premature failures and, in severe cases, slippage that can lead to sudden power loss or locked wheels. This jeopardizes your control, especially during sharp turns, braking, or emergency maneuvers—key moments when rider safety depends on reliable drive chain performance. Beyond safety, ride quality takes a nosedive when chains and sprockets aren’t cared for. Noisy acceleration, jerky throttle response, and reduced fuel efficiency become frequent frustrations. If left unchecked, these issues often escalate to snapped chains or damaged sprockets, making repairs expensive and downtime unavoidable. With regular inspection and timely maintenance, riders can prevent these dangers and enjoy smooth, responsive performance mile after mile. The Step-by-Step Motorcycle Chain Inspection Process Implementing a thorough inspection routine is essential for every rider, whether you’re prepping for a long trip or simply commuting to work. Here’s how to make your motorcycle chain inspection both efficient and effective: Preparing your motorcycle for inspection: Place the bike on a center stand or suitable lift to elevate the rear tire and ensure stability. Gather basic tools like gloves, a flashlight, and a clean rag for your inspection. Checking chain tension: Importance and correct methods: Rotate the rear wheel gently and gauge the chain’s slack at its loosest point. Refer to your owner’s manual for correct measurements, often conducted mid-way on the chain between the front and rear sprocket. Too much slack invites jumping teeth, while too little strains the drivetrain. Assessing for visible damage and rust: Visually inspect both inner and outer portions of the chain for rust, stiff links, or debris. Look for excessive grime or build-up, which requires a chain clean session with appropriate chain cleaner. Measuring chain slack and wear: Measure slack by lightly pressing upward on the lower run of the chain midway between the sprockets. Excessive movement signals a stretched or worn chain that could slip under load. Evaluating sprocket condition: Examine the front and rear sprocket teeth for sharpness, uneven wear, or bent teeth. Check for side-to-side movement indicating potential misalignment or excessive wear. When chain replacement is required: If you notice significant stretching, worn sprocket teeth, or rust that cannot be removed, it’s best to replace the chain and sprocket set promptly to maintain performance and safety. Best Practices for Motorcycle Chain Maintenance Lubrication frequency and technique: Always lubricate your chain after cleaning, and ideally every 300-600 miles, or after riding in wet conditions. Cleaning steps for optimum performance: Use an approved chain cleaner and a soft brush to remove dirt and debris, avoiding harsh chemicals that can damage O-ring or X-ring seals. Using the right products for chain and sprockets: Stick to manufacturer-recommended lubricants and cleaning products to prevent premature wear on your drive chain and sprocket surfaces. Maintenance tips from experts: Never over-tighten the chain drive and always check alignment when adjusting tension. Experts stress consistency: a well-kept maintenance calendar ensures reliability and longer component life. Common Motorcycle Chain Inspection Mistakes to Avoid Even the most diligent riders can fall into maintenance traps that reduce the effectiveness of their inspections. Avoiding these common mistakes helps safeguard your investment and keeps the ride smooth and trouble-free. Over-tightening the chain drive Neglecting chain and sprocket alignment Ignoring manufacturer recommendations Over-tightening may seem like a good idea to prevent chain slap, but it actually puts excessive strain on the center stand, rear sprocket, and gearbox bearings. Similarly, if you adjust the tension without checking the alignment, the front and rear sprocket may wear unevenly, reducing both safety and longevity. Failing to follow your bike’s specific inspection and maintenance guidelines, including the proper products for ring chain maintenance, can also invite avoidable wear and unnecessary costs. Expert Insights: Why Chain Maintenance Matters "Routine chain inspection is the single most overlooked aspect of motorcycle safety and longevity." — Industry Technician This sentiment is echoed by countless mechanics and experienced riders alike. Chain maintenance isn’t just for the detail-oriented or mechanically inclined; it’s a pillar of motorcycle stewardship. A neglected drive chain can erode the integrity of your entire drivetrain, prompt excessive wear on chains and sprockets, and ultimately risk your safety on the road. Establishing a regular inspection and maintenance schedule isn’t just wise—it’s essential for maximizing both performance and rider confidence. Listening to the wisdom of experts pays off: a few minutes spent today on chain care can mean thousands of safe, enjoyable miles tomorrow. By maintaining the harmonious relationship between the chain, front, and rear sprockets, you’ll ensure your motorcycle delivers peak performance while minimizing the risk of sudden failures or breakdowns when you least expect them. Tables: Key Signs Your Motorcycle Chain Needs Immediate Attention Sign What It Means Recommended Action Visible rust Corrosion present Clean & lubricate, check for damage Uneven wear on sprockets Chain misalignment or stretching Adjust or replace chain & sprockets Excessive slack Chain elongation Adjust tension or replace Noise during riding Poor lubrication or worn parts Inspect, lubricate, or replace How Often Should You Perform Motorcycle Chain Inspection? Riders often wonder how frequently to check their drive chain and sprockets. While manufacturer guidelines typically suggest inspecting the chain every 500-700 miles, real-world best practice is to examine your motorcycle chain at least once per month and after long or demanding rides. Environmental factors—such as rain, dust, or off-road use—can hasten wear, making regular audits even more crucial for riders who push their equipment to the limits. Establishing a calendar reminder or a maintenance checklist in your garage can be the single best habit for maintaining your chain and sprockets. Investing a few minutes for inspection each month is a simple, effective way to prevent unexpected breakdowns and expensive component replacements. Manufacturer Guidelines vs. Real World Recommendations Manufacturer intervals provide a good baseline, but experienced riders know to look beyond the manual. Every bike and riding style is different—hard acceleration, frequent rain riding, or carrying heavy loads can all accelerate wear and require more frequent chain and sprocket checks. Incorporating visual and tactile checks of your chain drive components, in addition to following scheduled service intervals, ensures your motorcycle chain remains both reliable and safe regardless of how or where you ride. In the real world, erring on the side of caution is wise. If ever in doubt, inspect the chain—and when clear signs of excessive wear, noise, or damage appear, prioritize chain maintenance or replacement as needed. Your rear wheel, ride quality, and safety are worth every minute spent on preventative care. People Also Ask: Answers You Need About Motorcycle Chain Care What is the 4 second rule for motorcycles? The 4 second rule for motorcycles recommends that riders maintain at least four seconds of following distance behind another vehicle. This helps provide sufficient time to react to unexpected hazards, which is crucial, especially if your drive chain or chain and sprocket components are not in optimal condition. What is the three finger rule chain? The three finger rule chain is a quick check method where three fingers should fit between the bottom of the chain and the swingarm when the chain is pressed upwards. This indicates proper chain tension. Incorrect tension can lead to premature damage to your drive chain and sprockets. How often does a motorcycle chain need to be cleaned? Ideally, a motorcycle chain should be cleaned every 500-700 miles, or more frequently after riding in rain or off-road conditions. Regular cleaning prevents buildup of grime and ensures your chain and sprocket system functions reliably. Does a bigger rear sprocket make you go faster or slower? A bigger rear sprocket will generally increase acceleration but decrease top speed, altering your chain drive dynamics. It's important to inspect chain wear if changing sprockets to ensure the drive chain maintains its integrity. Motorcycle Chain Maintenance Tips: Expert Recommendations Always lubricate your chain after cleaning Inspect your chain and sprockets monthly Replace the entire chain and sprocket set if excessive wear is spotted Use manufacturer-recommended products for chain maintenance FAQs About the Importance of Motorcycle Chain Inspection Why is regular chain inspection recommended? Regular chain inspection is recommended because it detects issues before they become dangerous or costly. Early maintenance ensures safe power delivery and smooth ride quality. How does improper chain maintenance lead to accidents? Improper maintenance can cause the chain to derail or break, potentially locking up the rear wheel and resulting in a loss of control or crashes, especially at high speeds. What tools are needed for a basic chain inspection? A simple inspection requires a center stand, chain cleaner, soft brush, gloves, and a ruler or gauge to measure slack. Can I inspect the chain at home or should I see a professional? Many riders can inspect the chain and perform basic maintenance at home. For severe wear, major adjustment, or if unsure, a professional service is the safest bet. Key Takeaways on the Importance of Motorcycle Chain Inspection Consistent chain inspection prevents costly repairs Proper chain and sprockets care improves motorcycle safety Chain maintenance extends the lifespan of your bike Don't ignore subtle signs of chain drive wear Committing to Regular Motorcycle Chain Inspection Stay proactive with your chain maintenance regimen to ensure your motorcycle's reliability and safety. For professional service and expert care, Call Nasty Performance Motorcycle Shop Today: 847-458-4858. If you’re ready to take your motorcycle maintenance to the next level, consider how a holistic approach can safeguard your ride year-round. Beyond chain inspection, understanding the nuances of seasonal care can help you anticipate issues before they arise and keep your bike performing at its best in any weather. Discover more expert strategies and essential routines in our comprehensive guide to seasonal bike care—your next step toward mastering motorcycle longevity and reliability.

Terms of Service

Privacy Policy

Core Modal Title

Sorry, no results found

You Might Find These Articles Interesting

T
Please Check Your Email
We Will Be Following Up Shortly
*
*
*